https://doi.org/10.5281/zenodo.18728786

Magic Commands#

In Jupyter Notebooks#

Author: Monika Doerig

Date: Jan 13 2026

License:

Note: If this notebook uses neuroimaging tools from Neurocontainers, those tools retain their original licenses. Please see Neurodesk citation guidelines for details.

Citation and Resources:#

Tools included in this workflow#

R:

  • R Core Team. (2025). R: A language and environment for statistical computing (Version 4.4.3) [Software]. R Foundation for Statistical Computing. https://www.R-project.org/

Python:

Educational resources#

1. Magic Commands#

Magic commands, often referred to as magics, are special commands available in the IPython kernel that streamline various tasks, such as connecting Python with the operating system, other languages, or different kernels. Jupyter notebooks offer a wide range of these commands, which are generally categorized into two groups:

  • Line magics: commands that affect a single line within a cell

  • Cell magics: commands that operate on the entire cell

The next sections will highlight frequently used commands from both categories. Additionally, there are alternative commands that provide similar functionality to some magics.

2. Line Magics#

A line magic, as indicated by its name, is a command that operates on a single line and is marked by a leading % symbol. These commands can be grouped into various categories.

2.1 Information Magics#

There are three information magics

  • %lsmagic

  • %magic

  • %quickref

that provide information about the available magic commands in the notebook.

%lsmagic#

Gives a list of all available magic commands in the Jupyter Notebook, including both line and cell magics.

%lsmagic
Available line magics:
%alias  %alias_magic  %autoawait  %autocall  %automagic  %autosave  %bookmark  %cat  %cd  %clear  %code_wrap  %colors  %conda  %config  %connect_info  %cp  %debug  %dhist  %dirs  %doctest_mode  %ed  %edit  %env  %gui  %hist  %history  %killbgscripts  %ldir  %less  %lf  %lk  %ll  %load  %load_ext  %loadpy  %logoff  %logon  %logstart  %logstate  %logstop  %ls  %lsmagic  %lx  %macro  %magic  %mamba  %man  %matplotlib  %micromamba  %mkdir  %more  %mv  %notebook  %page  %pastebin  %pdb  %pdef  %pdoc  %pfile  %pinfo  %pinfo2  %pip  %popd  %pprint  %precision  %prun  %psearch  %psource  %pushd  %pwd  %pycat  %pylab  %qtconsole  %quickref  %recall  %rehashx  %reload_ext  %rep  %rerun  %reset  %reset_selective  %rm  %rmdir  %run  %save  %sc  %set_env  %store  %subshell  %sx  %system  %tb  %time  %timeit  %unalias  %unload_ext  %uv  %who  %who_ls  %whos  %xdel  %xmode

Available cell magics:
%%!  %%HTML  %%SVG  %%bash  %%capture  %%code_wrap  %%debug  %%file  %%html  %%javascript  %%js  %%latex  %%markdown  %%perl  %%prun  %%pypy  %%python  %%python2  %%python3  %%ruby  %%script  %%sh  %%svg  %%sx  %%system  %%time  %%timeit  %%writefile

Automagic is ON, % prefix IS NOT needed for line magics.

%magic#

Prints a list of all available magic commands and their descriptions.

%magic
IPython's 'magic' functions
===========================

The magic function system provides a series of functions which allow you to
control the behavior of IPython itself, plus a lot of system-type
features. There are two kinds of magics, line-oriented and cell-oriented.

Line magics are prefixed with the % character and work much like OS
command-line calls: they get as an argument the rest of the line, where
arguments are passed without parentheses or quotes.  For example, this will
time the given statement::

        %timeit range(1000)

Cell magics are prefixed with a double %%, and they are functions that get as
an argument not only the rest of the line, but also the lines below it in a
separate argument.  These magics are called with two arguments: the rest of the
call line and the body of the cell, consisting of the lines below the first.
For example::

        %%timeit x = numpy.random.randn((100, 100))
        numpy.linalg.svd(x)

will time the execution of the numpy svd routine, running the assignment of x
as part of the setup phase, which is not timed.

In a line-oriented client (the terminal or Qt console IPython), starting a new
input with %% will automatically enter cell mode, and IPython will continue
reading input until a blank line is given.  In the notebook, simply type the
whole cell as one entity, but keep in mind that the %% escape can only be at
the very start of the cell.

NOTE: If you have 'automagic' enabled (via the command line option or with the
%automagic function), you don't need to type in the % explicitly for line
magics; cell magics always require an explicit '%%' escape.  By default,
IPython ships with automagic on, so you should only rarely need the % escape.

Example: typing '%cd mydir' (without the quotes) changes your working directory
to 'mydir', if it exists.

For a list of the available magic functions, use %lsmagic. For a description
of any of them, type %magic_name?, e.g. '%cd?'.

Currently the magic system has the following functions:
%alias:
    Define an alias for a system command.
    
    '%alias alias_name cmd' defines 'alias_name' as an alias for 'cmd'
    
    Then, typing 'alias_name params' will execute the system command 'cmd
    params' (from your underlying operating system).
    
    Aliases have lower precedence than magic functions and Python normal
    variables, so if 'foo' is both a Python variable and an alias, the
    alias can not be executed until 'del foo' removes the Python variable.
    
    You can use the %l specifier in an alias definition to represent the
    whole line when the alias is called.  For example::
    
      In [2]: alias bracket echo "Input in brackets: <%l>"
      In [3]: bracket hello world
      Input in brackets: <hello world>
    
    You can also define aliases with parameters using %s specifiers (one
    per parameter)::
    
      In [1]: alias parts echo first %s second %s
      In [2]: %parts A B
      first A second B
      In [3]: %parts A
      Incorrect number of arguments: 2 expected.
      parts is an alias to: 'echo first %s second %s'
    
    Note that %l and %s are mutually exclusive.  You can only use one or
    the other in your aliases.
    
    Aliases expand Python variables just like system calls using ! or !!
    do: all expressions prefixed with '$' get expanded.  For details of
    the semantic rules, see PEP-215:
    https://peps.python.org/pep-0215/.  This is the library used by
    IPython for variable expansion.  If you want to access a true shell
    variable, an extra $ is necessary to prevent its expansion by
    IPython::
    
      In [6]: alias show echo
      In [7]: PATH='A Python string'
      In [8]: show $PATH
      A Python string
      In [9]: show $$PATH
      /usr/local/lf9560/bin:/usr/local/intel/compiler70/ia32/bin:...
    
    You can use the alias facility to access all of $PATH.  See the %rehashx
    function, which automatically creates aliases for the contents of your
    $PATH.
    
    If called with no parameters, %alias prints the current alias table
    for your system.  For posix systems, the default aliases are 'cat',
    'cp', 'mv', 'rm', 'rmdir', and 'mkdir', and other platform-specific
    aliases are added.  For windows-based systems, the default aliases are
    'copy', 'ddir', 'echo', 'ls', 'ldir', 'mkdir', 'ren', and 'rmdir'.
    
    You can see the definition of alias by adding a question mark in the
    end::
    
      In [1]: cat?
      Repr: <alias cat for 'cat'>
%alias_magic:
    ::
    
      %alias_magic [-l] [-c] [-p PARAMS] name target
    
    Create an alias for an existing line or cell magic.
    
    Examples
    --------
    ::
    
      In [1]: %alias_magic t timeit
      Created `%t` as an alias for `%timeit`.
      Created `%%t` as an alias for `%%timeit`.
    
      In [2]: %t -n1 pass
      107 ns ± 43.6 ns per loop (mean ± std. dev. of 7 runs, 1 loop each)
    
      In [3]: %%t -n1
         ...: pass
         ...:
      107 ns ± 58.3 ns per loop (mean ± std. dev. of 7 runs, 1 loop each)
    
      In [4]: %alias_magic --cell whereami pwd
      UsageError: Cell magic function `%%pwd` not found.
      In [5]: %alias_magic --line whereami pwd
      Created `%whereami` as an alias for `%pwd`.
    
      In [6]: %whereami
      Out[6]: '/home/testuser'
    
      In [7]: %alias_magic h history -p "-l 30" --line
      Created `%h` as an alias for `%history -l 30`.
    
    positional arguments:
      name                  Name of the magic to be created.
      target                Name of the existing line or cell magic.
    
    options:
      -l, --line            Create a line magic alias.
      -c, --cell            Create a cell magic alias.
      -p PARAMS, --params PARAMS
                            Parameters passed to the magic function.
%autoawait:
    
    Allow to change the status of the autoawait option.
    
    This allow you to set a specific asynchronous code runner.
    
    If no value is passed, print the currently used asynchronous integration
    and whether it is activated.
    
    It can take a number of value evaluated in the following order:
    
    - False/false/off deactivate autoawait integration
    - True/true/on activate autoawait integration using configured default
      loop
    - asyncio/curio/trio activate autoawait integration and use integration
      with said library.
    
    - `sync` turn on the pseudo-sync integration (mostly used for
      `IPython.embed()` which does not run IPython with a real eventloop and
      deactivate running asynchronous code. Turning on Asynchronous code with
      the pseudo sync loop is undefined behavior and may lead IPython to crash.
    
    If the passed parameter does not match any of the above and is a python
    identifier, get said object from user namespace and set it as the
    runner, and activate autoawait.
    
    If the object is a fully qualified object name, attempt to import it and
    set it as the runner, and activate autoawait.
    
    The exact behavior of autoawait is experimental and subject to change
    across version of IPython and Python.
%autocall:
    Make functions callable without having to type parentheses.
    
    Usage:
    
       %autocall [mode]
    
    The mode can be one of: 0->Off, 1->Smart, 2->Full.  If not given, the
    value is toggled on and off (remembering the previous state).
    
    In more detail, these values mean:
    
    0 -> fully disabled
    
    1 -> active, but do not apply if there are no arguments on the line.
    
    In this mode, you get::
    
      In [1]: callable
      Out[1]: <built-in function callable>
    
      In [2]: callable 'hello'
      ------> callable('hello')
      Out[2]: False
    
    2 -> Active always.  Even if no arguments are present, the callable
    object is called::
    
      In [2]: float
      ------> float()
      Out[2]: 0.0
    
    Note that even with autocall off, you can still use '/' at the start of
    a line to treat the first argument on the command line as a function
    and add parentheses to it::
    
      In [8]: /str 43
      ------> str(43)
      Out[8]: '43'
    
    # all-random (note for auto-testing)
%automagic:
    Make magic functions callable without having to type the initial %.
    
    Without arguments toggles on/off (when off, you must call it as
    %automagic, of course).  With arguments it sets the value, and you can
    use any of (case insensitive):
    
     - on, 1, True: to activate
    
     - off, 0, False: to deactivate.
    
    Note that magic functions have lowest priority, so if there's a
    variable whose name collides with that of a magic fn, automagic won't
    work for that function (you get the variable instead). However, if you
    delete the variable (del var), the previously shadowed magic function
    becomes visible to automagic again.
%autosave:
    Set the autosave interval in the notebook (in seconds).
    
    The default value is 120, or two minutes.
    ``%autosave 0`` will disable autosave.
    
    This magic only has an effect when called from the notebook interface.
    It has no effect when called in a startup file.
%bookmark:
    Manage IPython's bookmark system.
    
    %bookmark <name>       - set bookmark to current dir
    %bookmark <name> <dir> - set bookmark to <dir>
    %bookmark -l           - list all bookmarks
    %bookmark -d <name>    - remove bookmark
    %bookmark -r           - remove all bookmarks
    
    You can later on access a bookmarked folder with::
    
      %cd -b <name>
    
    or simply '%cd <name>' if there is no directory called <name> AND
    there is such a bookmark defined.
    
    Your bookmarks persist through IPython sessions, but they are
    associated with each profile.
%cat:
    Alias for `!cat`
%cd:
    Change the current working directory.
    
    This command automatically maintains an internal list of directories
    you visit during your IPython session, in the variable ``_dh``. The
    command :magic:`%dhist` shows this history nicely formatted. You can
    also do ``cd -<tab>`` to see directory history conveniently.
    Usage:
    
      - ``cd 'dir'``: changes to directory 'dir'.
      - ``cd -``: changes to the last visited directory.
      - ``cd -<n>``: changes to the n-th directory in the directory history.
      - ``cd --foo``: change to directory that matches 'foo' in history
      - ``cd -b <bookmark_name>``: jump to a bookmark set by %bookmark
      - Hitting a tab key after ``cd -b`` allows you to tab-complete
        bookmark names.
    
      .. note::
        ``cd <bookmark_name>`` is enough if there is no directory
        ``<bookmark_name>``, but a bookmark with the name exists.
    
    Options:
    
    -q               Be quiet. Do not print the working directory after the
                      cd command is executed. By default IPython's cd
                      command does print this directory, since the default
                      prompts do not display path information.
    
    .. note::
       Note that ``!cd`` doesn't work for this purpose because the shell
       where ``!command`` runs is immediately discarded after executing
       'command'.
    
    Examples
    --------
    ::
    
      In [10]: cd parent/child
      /home/tsuser/parent/child
%clear:
    Clear the terminal.
%code_wrap:
    ::
    
      %code_wrap [--remove] [--list] [--list-all] [name]
    
    Simple magic to quickly define a code transformer for all IPython's future input.
    
    ``__code__`` and ``__ret__`` are special variable that represent the code to run
    and the value of the last expression of ``__code__`` respectively.
    
    Examples
    --------
    
    .. ipython::
    
        In [1]: %%code_wrap before_after
           ...: print('before')
           ...: __code__
           ...: print('after')
           ...: __ret__
    
        In [2]: 1
        before
        after
        Out[2]: 1
    
        In [3]: %code_wrap --list
        before_after
    
        In [4]: %code_wrap --list-all
        before_after :
            print('before')
            __code__
            print('after')
            __ret__
    
        In [5]: %code_wrap --remove before_after
    
    positional arguments:
      name
    
    options:
      --remove    remove the current transformer
      --list      list existing transformers name
      --list-all  list existing transformers name and code template
%colors:
    Switch color scheme/theme globally for IPython
    
    Examples
    --------
    To get a plain black and white terminal::
    
      %colors nocolor
%conda:
    Run the conda package manager within the current kernel.
    
    Usage:
      %conda install [pkgs]
%config:
    configure IPython
    
        %config Class[.trait=value]
    
    This magic exposes most of the IPython config system. Any
    Configurable class should be able to be configured with the simple
    line::
    
        %config Class.trait=value
    
    Where `value` will be resolved in the user's namespace, if it is an
    expression or variable name.
    
    Examples
    --------
    
    To see what classes are available for config, pass no arguments::
    
        In [1]: %config
        Available objects for config:
            AliasManager
            DisplayFormatter
            HistoryManager
            IPCompleter
            LoggingMagics
            MagicsManager
            OSMagics
            PrefilterManager
            ScriptMagics
            TerminalInteractiveShell
    
    To view what is configurable on a given class, just pass the class
    name::
    
        In [2]: %config LoggingMagics
        LoggingMagics(Magics) options
        ---------------------------
        LoggingMagics.quiet=<Bool>
            Suppress output of log state when logging is enabled
            Current: False
    
    but the real use is in setting values::
    
        In [3]: %config LoggingMagics.quiet = True
    
    and these values are read from the user_ns if they are variables::
    
        In [4]: feeling_quiet=False
    
        In [5]: %config LoggingMagics.quiet = feeling_quiet
%connect_info:
    Print information for connecting other clients to this kernel
    
    It will print the contents of this session's connection file, as well as
    shortcuts for local clients.
    
    In the simplest case, when called from the most recently launched kernel,
    secondary clients can be connected, simply with:
    
    $> jupyter <app> --existing
%cp:
    Alias for `!cp`
%debug:
    ::
    
      %debug [--breakpoint FILE:LINE]
    
    Activate the interactive debugger.
    
    This magic command support two ways of activating debugger.
    One is to activate debugger before executing code. This way, you
    can set a break point, to step through the code from the point.
    You can use this mode by giving statements to execute and optionally
    a breakpoint.
    
    The other one is to activate debugger in post-mortem mode. You can
    activate this mode simply running %debug without any argument.
    If an exception has just occurred, this lets you inspect its stack
    frames interactively.  Note that this will always work only on the last
    traceback that occurred, so you must call this quickly after an
    exception that you wish to inspect has fired, because if another one
    occurs, it clobbers the previous one.
    
    If you want IPython to automatically do this on every exception, see
    the %pdb magic for more details.
    
    .. versionchanged:: 7.3
        When running code, user variables are no longer expanded,
        the magic line is always left unmodified.
    
    options:
      --breakpoint <FILE:LINE>, -b <FILE:LINE>
                            Set break point at LINE in FILE.
    
    Any remaining arguments will be treated as code to run in the debugger.
%dhist:
    Print your history of visited directories.
    
    %dhist       -> print full history
    %dhist n     -> print last n entries only
    %dhist n1 n2 -> print entries between n1 and n2 (n2 not included)
    
    This history is automatically maintained by the %cd command, and
    always available as the global list variable _dh. You can use %cd -<n>
    to go to directory number <n>.
    
    Note that most of time, you should view directory history by entering
    cd -<TAB>.
%dirs:
    Return the current directory stack.
%doctest_mode:
    Toggle doctest mode on and off.
    
    This mode is intended to make IPython behave as much as possible like a
    plain Python shell, from the perspective of how its prompts, exceptions
    and output look.  This makes it easy to copy and paste parts of a
    session into doctests.  It does so by:
    
    - Changing the prompts to the classic ``>>>`` ones.
    - Changing the exception reporting mode to 'Plain'.
    - Disabling pretty-printing of output.
    
    Note that IPython also supports the pasting of code snippets that have
    leading '>>>' and '...' prompts in them.  This means that you can paste
    doctests from files or docstrings (even if they have leading
    whitespace), and the code will execute correctly.  You can then use
    '%history -t' to see the translated history; this will give you the
    input after removal of all the leading prompts and whitespace, which
    can be pasted back into an editor.
    
    With these features, you can switch into this mode easily whenever you
    need to do testing and changes to doctests, without having to leave
    your existing IPython session.
%ed:
    Alias for `%edit`.
%edit:
    Bring up an editor and execute the resulting code.
    
    Usage:
      %edit [options] [args]
    
    %edit runs an external text editor. You will need to set the command for
    this editor via the ``TerminalInteractiveShell.editor`` option in your
    configuration file before it will work.
    
    This command allows you to conveniently edit multi-line code right in
    your IPython session.
    
    If called without arguments, %edit opens up an empty editor with a
    temporary file and will execute the contents of this file when you
    close it (don't forget to save it!).
    
    Options:
    
    -n <number>
      Open the editor at a specified line number. By default, the IPython
      editor hook uses the unix syntax 'editor +N filename', but you can
      configure this by providing your own modified hook if your favorite
      editor supports line-number specifications with a different syntax.
    
    -p
      Call the editor with the same data as the previous time it was used,
      regardless of how long ago (in your current session) it was.
    
    -r
      Use 'raw' input. This option only applies to input taken from the
      user's history.  By default, the 'processed' history is used, so that
      magics are loaded in their transformed version to valid Python.  If
      this option is given, the raw input as typed as the command line is
      used instead.  When you exit the editor, it will be executed by
      IPython's own processor.
    
    Arguments:
    
    If arguments are given, the following possibilities exist:
    
    - The arguments are numbers or pairs of colon-separated numbers (like
      1 4:8 9). These are interpreted as lines of previous input to be
      loaded into the editor. The syntax is the same of the %macro command.
    
    - If the argument doesn't start with a number, it is evaluated as a
      variable and its contents loaded into the editor. You can thus edit
      any string which contains python code (including the result of
      previous edits).
    
    - If the argument is the name of an object (other than a string),
      IPython will try to locate the file where it was defined and open the
      editor at the point where it is defined. You can use ``%edit function``
      to load an editor exactly at the point where 'function' is defined,
      edit it and have the file be executed automatically.
    
      If the object is a macro (see %macro for details), this opens up your
      specified editor with a temporary file containing the macro's data.
      Upon exit, the macro is reloaded with the contents of the file.
    
      Note: opening at an exact line is only supported under Unix, and some
      editors (like kedit and gedit up to Gnome 2.8) do not understand the
      '+NUMBER' parameter necessary for this feature. Good editors like
      (X)Emacs, vi, jed, pico and joe all do.
    
    - If the argument is not found as a variable, IPython will look for a
      file with that name (adding .py if necessary) and load it into the
      editor. It will execute its contents with execfile() when you exit,
      loading any code in the file into your interactive namespace.
    
    Unlike in the terminal, this is designed to use a GUI editor, and we do
    not know when it has closed. So the file you edit will not be
    automatically executed or printed.
    
    Note that %edit is also available through the alias %ed.
%env:
    Get, set, or list environment variables.
    
    Usage:
    
      :``%env``: lists all environment variables/values
      :``%env var``: get value for var
      :``%env var val``: set value for var
      :``%env var=val``: set value for var
      :``%env var=$val``: set value for var, using python expansion if possible
%gui:
    Enable or disable IPython GUI event loop integration.
    
    %gui [GUINAME]
    
    This magic replaces IPython's threaded shells that were activated
    using the (pylab/wthread/etc.) command line flags.  GUI toolkits
    can now be enabled at runtime and keyboard
    interrupts should work without any problems.  The following toolkits
    are supported:  wxPython, PyQt4, PyGTK, Tk and Cocoa (OSX)::
    
        %gui wx      # enable wxPython event loop integration
        %gui qt      # enable PyQt/PySide event loop integration
                     # with the latest version available.
        %gui qt6     # enable PyQt6/PySide6 event loop integration
        %gui qt5     # enable PyQt5/PySide2 event loop integration
        %gui gtk     # enable PyGTK event loop integration
        %gui gtk3    # enable Gtk3 event loop integration
        %gui gtk4    # enable Gtk4 event loop integration
        %gui tk      # enable Tk event loop integration
        %gui osx     # enable Cocoa event loop integration
                     # (requires %matplotlib 1.1)
        %gui         # disable all event loop integration
    
    WARNING:  after any of these has been called you can simply create
    an application object, but DO NOT start the event loop yourself, as
    we have already handled that.
%hist:
    Alias for `%history`.
%history:
    ::
    
      %history [-n] [-o] [-p] [-t] [-f FILENAME] [-y] [-g [PATTERN ...]]
                   [-l [LIMIT]] [-u]
                   [range ...]
    
    Print input history (_i<n> variables), with most recent last.
    
    By default, input history is printed without line numbers so it can be
    directly pasted into an editor. Use -n to show them.
    
    By default, all input history from the current session is displayed.
    Ranges of history can be indicated using the syntax:
    
    ``4``
        Line 4, current session
    ``4-6``
        Lines 4-6, current session
    ``243/1-5``
        Lines 1-5, session 243
    ``~2/7``
        Line 7, session 2 before current
    ``~8/1-~6/5``
        From the first line of 8 sessions ago, to the fifth line of 6
        sessions ago.
    
    Multiple ranges can be entered, separated by spaces
    
    The same syntax is used by %macro, %save, %edit, %rerun
    
    Examples
    --------
    ::
    
      In [6]: %history -n 4-6
      4:a = 12
      5:print(a**2)
      6:%history -n 4-6
    
    positional arguments:
      range
    
    options:
      -n                  print line numbers for each input. This feature is only
                          available if numbered prompts are in use.
      -o                  also print outputs for each input.
      -p                  print classic '>>>' python prompts before each input.
                          This is useful for making documentation, and in
                          conjunction with -o, for producing doctest-ready output.
      -t                  print the 'translated' history, as IPython understands
                          it. IPython filters your input and converts it all into
                          valid Python source before executing it (things like
                          magics or aliases are turned into function calls, for
                          example). With this option, you'll see the native
                          history instead of the user-entered version: '%cd /'
                          will be seen as 'get_ipython().run_line_magic("cd",
                          "/")' instead of '%cd /'.
      -f FILENAME         FILENAME: instead of printing the output to the screen,
                          redirect it to the given file. The file is always
                          overwritten, though *when it can*, IPython asks for
                          confirmation first. In particular, running the command
                          'history -f FILENAME' from the IPython Notebook
                          interface will replace FILENAME even if it already
                          exists *without* confirmation.
      -y                  yes, overwrite filename even if exists
      -g <[PATTERN ...]>  treat the arg as a glob pattern to search for in (full)
                          history. This includes the saved history (almost all
                          commands ever written). The pattern may contain '?' to
                          match one unknown character and '*' to match any number
                          of unknown characters. Use '%hist -g' to show full saved
                          history (may be very long).
      -l <[LIMIT]>        get the last n lines from all sessions. Specify n as a
                          single arg, or the default is the last 10 lines.
      -u                  when searching history using `-g`, show only unique
                          history.
%killbgscripts:
    Kill all BG processes started by %%script and its family.
%ldir:
    Alias for `!ls -F -o --color %l | grep /$`
%less:
    Show a file through the pager.
    
    Files ending in .py are syntax-highlighted.
%lf:
    Alias for `!ls -F -o --color %l | grep ^-`
%lk:
    Alias for `!ls -F -o --color %l | grep ^l`
%ll:
    Alias for `!ls -F -o --color`
%load:
    Load code into the current frontend.
    
    Usage:
      %load [options] source
    
      where source can be a filename, URL, input history range, macro, or
      element in the user namespace
    
    If no arguments are given, loads the history of this session up to this
    point.
    
    Options:
    
      -r <lines>: Specify lines or ranges of lines to load from the source.
      Ranges could be specified as x-y (x..y) or in python-style x:y 
      (x..(y-1)). Both limits x and y can be left blank (meaning the 
      beginning and end of the file, respectively).
    
      -s <symbols>: Specify function or classes to load from python source. 
    
      -y : Don't ask confirmation for loading source above 200 000 characters.
    
      -n : Include the user's namespace when searching for source code.
    
    This magic command can either take a local filename, a URL, an history
    range (see %history) or a macro as argument, it will prompt for
    confirmation before loading source with more than 200 000 characters, unless
    -y flag is passed or if the frontend does not support raw_input::
    
    %load
    %load myscript.py
    %load 7-27
    %load myMacro
    %load http://www.example.com/myscript.py
    %load -r 5-10 myscript.py
    %load -r 10-20,30,40: foo.py
    %load -s MyClass,wonder_function myscript.py
    %load -n MyClass
    %load -n my_module.wonder_function
%load_ext:
    Load an IPython extension by its module name.
%loadpy:
    Alias of `%load`
    
    `%loadpy` has gained some flexibility and dropped the requirement of a `.py`
    extension. So it has been renamed simply into %load. You can look at
    `%load`'s docstring for more info.
%logoff:
    Temporarily stop logging.
    
    You must have previously started logging.
%logon:
    Restart logging.
    
    This function is for restarting logging which you've temporarily
    stopped with %logoff. For starting logging for the first time, you
    must use the %logstart function, which allows you to specify an
    optional log filename.
%logstart:
    Start logging anywhere in a session.
    
    %logstart [-o|-r|-t|-q] [log_name [log_mode]]
    
    If no name is given, it defaults to a file named 'ipython_log.py' in your
    current directory, in 'rotate' mode (see below).
    
    '%logstart name' saves to file 'name' in 'backup' mode.  It saves your
    history up to that point and then continues logging.
    
    %logstart takes a second optional parameter: logging mode. This can be one
    of (note that the modes are given unquoted):
    
    append
        Keep logging at the end of any existing file.
    
    backup
        Rename any existing file to name~ and start name.
    
    global
        Append to  a single logfile in your home directory.
    
    over
        Overwrite any existing log.
    
    rotate
        Create rotating logs: name.1~, name.2~, etc.
    
    Options:
    
      -o
        log also IPython's output. In this mode, all commands which
        generate an Out[NN] prompt are recorded to the logfile, right after
        their corresponding input line. The output lines are always
        prepended with a '#[Out]# ' marker, so that the log remains valid
        Python code.
    
      Since this marker is always the same, filtering only the output from
      a log is very easy, using for example a simple awk call::
    
        awk -F'#\[Out\]# ' '{if($2) {print $2}}' ipython_log.py
    
      -r
        log 'raw' input.  Normally, IPython's logs contain the processed
        input, so that user lines are logged in their final form, converted
        into valid Python.  For example, %Exit is logged as
        _ip.run_line_magic("Exit").  If the -r flag is given, all input is logged
        exactly as typed, with no transformations applied.
    
      -t
        put timestamps before each input line logged (these are put in
        comments).
    
      -q
        suppress output of logstate message when logging is invoked
%logstate:
    Print the status of the logging system.
%logstop:
    Fully stop logging and close log file.
    
    In order to start logging again, a new %logstart call needs to be made,
    possibly (though not necessarily) with a new filename, mode and other
    options.
%ls:
    Alias for `!ls -F --color`
%lsmagic:
    List currently available magic functions.
%lx:
    Alias for `!ls -F -o --color %l | grep ^-..x`
%macro:
    Define a macro for future re-execution. It accepts ranges of history,
    filenames or string objects.
    
    Usage::
    
      %macro [options] name n1-n2 n3-n4 ... n5 .. n6 ...
    
    Options:
    
    -r
      Use 'raw' input.  By default, the 'processed' history is used,
      so that magics are loaded in their transformed version to valid
      Python.  If this option is given, the raw input as typed at the
      command line is used instead.
    
    -q
      Quiet macro definition.  By default, a tag line is printed
      to indicate the macro has been created, and then the contents of
      the macro are printed.  If this option is given, then no printout
      is produced once the macro is created.
    
    This will define a global variable called `name` which is a string
    made of joining the slices and lines you specify (n1,n2,... numbers
    above) from your input history into a single string. This variable
    acts like an automatic function which re-executes those lines as if
    you had typed them. You just type 'name' at the prompt and the code
    executes.
    
    The syntax for indicating input ranges is described in %history.
    
    Note: as a 'hidden' feature, you can also use traditional python slice
    notation, where N:M means numbers N through M-1.
    
    For example, if your history contains (print using %hist -n )::
    
      44: x=1
      45: y=3
      46: z=x+y
      47: print(x)
      48: a=5
      49: print('x',x,'y',y)
    
    you can create a macro with lines 44 through 47 (included) and line 49
    called my_macro with::
    
      In [55]: %macro my_macro 44-47 49
    
    Now, typing `my_macro` (without quotes) will re-execute all this code
    in one pass.
    
    You don't need to give the line-numbers in order, and any given line
    number can appear multiple times. You can assemble macros with any
    lines from your input history in any order.
    
    The macro is a simple object which holds its value in an attribute,
    but IPython's display system checks for macros and executes them as
    code instead of printing them when you type their name.
    
    You can view a macro's contents by explicitly printing it with::
    
      print(macro_name)
%magic:
    Print information about the magic function system.
    
    Supported formats: -latex, -brief, -rest
%mamba:
    Run the mamba package manager within the current kernel.
    
    Usage:
      %mamba install [pkgs]
%man:
    Find the man page for the given command and display in pager.
%matplotlib:
    ::
    
      %matplotlib [-l] [gui]
    
    Set up matplotlib to work interactively.
    
    This function lets you activate matplotlib interactive support
    at any point during an IPython session. It does not import anything
    into the interactive namespace.
    
    If you are using the inline matplotlib backend in the IPython Notebook
    you can set which figure formats are enabled using the following::
    
        In [1]: from matplotlib_inline.backend_inline import set_matplotlib_formats
    
        In [2]: set_matplotlib_formats('pdf', 'svg')
    
    The default for inline figures sets `bbox_inches` to 'tight'. This can
    cause discrepancies between the displayed image and the identical
    image created using `savefig`. This behavior can be disabled using the
    `%config` magic::
    
        In [3]: %config InlineBackend.print_figure_kwargs = {'bbox_inches':None}
    
    In addition, see the docstrings of
    `matplotlib_inline.backend_inline.set_matplotlib_formats` and
    `matplotlib_inline.backend_inline.set_matplotlib_close` for more information on
    changing additional behaviors of the inline backend.
    
    Examples
    --------
    To enable the inline backend for usage with the IPython Notebook::
    
        In [1]: %matplotlib inline
    
    In this case, where the matplotlib default is TkAgg::
    
        In [2]: %matplotlib
        Using matplotlib backend: TkAgg
    
    But you can explicitly request a different GUI backend::
    
        In [3]: %matplotlib qt
    
    You can list the available backends using the -l/--list option::
    
       In [4]: %matplotlib --list
       Available matplotlib backends: ['osx', 'qt4', 'qt5', 'gtk3', 'gtk4', 'notebook', 'wx', 'qt', 'nbagg',
       'gtk', 'tk', 'inline']
    
    positional arguments:
      gui         Name of the matplotlib backend to use such as 'qt' or 'widget'.
                  If given, the corresponding matplotlib backend is used,
                  otherwise it will be matplotlib's default (which you can set in
                  your matplotlib config file).
    
    options:
      -l, --list  Show available matplotlib backends
%micromamba:
    Run the conda package manager within the current kernel.
    
    Usage:
      %micromamba install [pkgs]
%mkdir:
    Alias for `!mkdir`
%more:
    Show a file through the pager.
    
    Files ending in .py are syntax-highlighted.
%mv:
    Alias for `!mv`
%notebook:
    ::
    
      %notebook filename
    
    Export and convert IPython notebooks.
    
    This function can export the current IPython history to a notebook file.
    For example, to export the history to "foo.ipynb" do "%notebook foo.ipynb".
    
    positional arguments:
      filename  Notebook name or filename
%page:
    Pretty print the object and display it through a pager.
    
    %page [options] OBJECT
    
    If no object is given, use _ (last output).
    
    Options:
    
      -r: page str(object), don't pretty-print it.
%pastebin:
    Upload code to dpaste.com, returning the URL.
    
    Usage:
      %pastebin [-d "Custom description"][-e 24] 1-7
    
    The argument can be an input history range, a filename, or the name of a
    string or macro.
    
    If no arguments are given, uploads the history of this session up to
    this point.
    
    Options:
    
      -d: Pass a custom description. The default will say
          "Pasted from IPython".
      -e: Pass number of days for the link to be expired.
          The default will be 7 days.
%pdb:
    Control the automatic calling of the pdb interactive debugger.
    
    Call as '%pdb on', '%pdb 1', '%pdb off' or '%pdb 0'. If called without
    argument it works as a toggle.
    
    When an exception is triggered, IPython can optionally call the
    interactive pdb debugger after the traceback printout. %pdb toggles
    this feature on and off.
    
    The initial state of this feature is set in your configuration
    file (the option is ``InteractiveShell.pdb``).
    
    If you want to just activate the debugger AFTER an exception has fired,
    without having to type '%pdb on' and rerunning your code, you can use
    the %debug magic.
%pdef:
    Print the call signature for any callable object.
    
    If the object is a class, print the constructor information.
    
    Examples
    --------
    ::
    
      In [3]: %pdef urllib.urlopen
      urllib.urlopen(url, data=None, proxies=None)
%pdoc:
    Print the docstring for an object.
    
    If the given object is a class, it will print both the class and the
    constructor docstrings.
%pfile:
    Print (or run through pager) the file where an object is defined.
    
    The file opens at the line where the object definition begins. IPython
    will honor the environment variable PAGER if set, and otherwise will
    do its best to print the file in a convenient form.
    
    If the given argument is not an object currently defined, IPython will
    try to interpret it as a filename (automatically adding a .py extension
    if needed). You can thus use %pfile as a syntax highlighting code
    viewer.
%pinfo:
    Provide detailed information about an object.
    
    '%pinfo object' is just a synonym for object? or ?object.
%pinfo2:
    Provide extra detailed information about an object.
    
    '%pinfo2 object' is just a synonym for object?? or ??object.
%pip:
    Run the pip package manager within the current kernel.
    
    Usage:
      %pip install [pkgs]
%popd:
    Change to directory popped off the top of the stack.
%pprint:
    Toggle pretty printing on/off.
%precision:
    Set floating point precision for pretty printing.
    
    Can set either integer precision or a format string.
    
    If numpy has been imported and precision is an int,
    numpy display precision will also be set, via ``numpy.set_printoptions``.
    
    If no argument is given, defaults will be restored.
    
    Examples
    --------
    ::
    
        In [1]: from math import pi
    
        In [2]: %precision 3
        Out[2]: '%.3f'
    
        In [3]: pi
        Out[3]: 3.142
    
        In [4]: %precision %i
        Out[4]: '%i'
    
        In [5]: pi
        Out[5]: 3
    
        In [6]: %precision %e
        Out[6]: '%e'
    
        In [7]: pi**10
        Out[7]: 9.364805e+04
    
        In [8]: %precision
        Out[8]: '%r'
    
        In [9]: pi**10
        Out[9]: 93648.047476082982
%prun:
    Run a statement through the python code profiler.
    
    **Usage, in line mode**::
    
      %prun [options] statement
    
    **Usage, in cell mode**::
    
      %%prun [options] [statement]
      code...
      code...
    
    In cell mode, the additional code lines are appended to the (possibly
    empty) statement in the first line.  Cell mode allows you to easily
    profile multiline blocks without having to put them in a separate
    function.
    
    The given statement (which doesn't require quote marks) is run via the
    python profiler in a manner similar to the profile.run() function.
    Namespaces are internally managed to work correctly; profile.run
    cannot be used in IPython because it makes certain assumptions about
    namespaces which do not hold under IPython.
    
    Options:
    
    -l <limit>
      you can place restrictions on what or how much of the
      profile gets printed. The limit value can be:
    
         * A string: only information for function names containing this string
           is printed.
    
         * An integer: only these many lines are printed.
    
         * A float (between 0 and 1): this fraction of the report is printed
           (for example, use a limit of 0.4 to see the topmost 40% only).
    
      You can combine several limits with repeated use of the option. For
      example, ``-l __init__ -l 5`` will print only the topmost 5 lines of
      information about class constructors.
    
    -r
      return the pstats.Stats object generated by the profiling. This
      object has all the information about the profile in it, and you can
      later use it for further analysis or in other functions.
    
    -s <key>
      sort profile by given key. You can provide more than one key
      by using the option several times: '-s key1 -s key2 -s key3...'. The
      default sorting key is 'time'.
    
      The following is copied verbatim from the profile documentation
      referenced below:
    
      When more than one key is provided, additional keys are used as
      secondary criteria when the there is equality in all keys selected
      before them.
    
      Abbreviations can be used for any key names, as long as the
      abbreviation is unambiguous.  The following are the keys currently
      defined:
    
      ============  =====================
      Valid Arg     Meaning
      ============  =====================
      "calls"       call count
      "cumulative"  cumulative time
      "file"        file name
      "module"      file name
      "pcalls"      primitive call count
      "line"        line number
      "name"        function name
      "nfl"         name/file/line
      "stdname"     standard name
      "time"        internal time
      ============  =====================
    
      Note that all sorts on statistics are in descending order (placing
      most time consuming items first), where as name, file, and line number
      searches are in ascending order (i.e., alphabetical). The subtle
      distinction between "nfl" and "stdname" is that the standard name is a
      sort of the name as printed, which means that the embedded line
      numbers get compared in an odd way.  For example, lines 3, 20, and 40
      would (if the file names were the same) appear in the string order
      "20" "3" and "40".  In contrast, "nfl" does a numeric compare of the
      line numbers.  In fact, sort_stats("nfl") is the same as
      sort_stats("name", "file", "line").
    
    -T <filename>
      save profile results as shown on screen to a text
      file. The profile is still shown on screen.
    
    -D <filename>
      save (via dump_stats) profile statistics to given
      filename. This data is in a format understood by the pstats module, and
      is generated by a call to the dump_stats() method of profile
      objects. The profile is still shown on screen.
    
    -q
      suppress output to the pager.  Best used with -T and/or -D above.
    
    If you want to run complete programs under the profiler's control, use
    ``%run -p [prof_opts] filename.py [args to program]`` where prof_opts
    contains profiler specific options as described here.
    
    You can read the complete documentation for the profile module with::
    
      In [1]: import profile; profile.help()
    
    .. versionchanged:: 7.3
        User variables are no longer expanded,
        the magic line is always left unmodified.
%psearch:
    Search for object in namespaces by wildcard.
    
    %psearch [options] PATTERN [OBJECT TYPE]
    
    Note: ? can be used as a synonym for %psearch, at the beginning or at
    the end: both a*? and ?a* are equivalent to '%psearch a*'.  Still, the
    rest of the command line must be unchanged (options come first), so
    for example the following forms are equivalent
    
    %psearch -i a* function
    -i a* function?
    ?-i a* function
    
    Arguments:
    
      PATTERN
    
      where PATTERN is a string containing * as a wildcard similar to its
      use in a shell.  The pattern is matched in all namespaces on the
      search path. By default objects starting with a single _ are not
      matched, many IPython generated objects have a single
      underscore. The default is case insensitive matching. Matching is
      also done on the attributes of objects and not only on the objects
      in a module.
    
      [OBJECT TYPE]
    
      Is the name of a python type from the types module. The name is
      given in lowercase without the ending type, ex. StringType is
      written string. By adding a type here only objects matching the
      given type are matched. Using all here makes the pattern match all
      types (this is the default).
    
    Options:
    
      -a: makes the pattern match even objects whose names start with a
      single underscore.  These names are normally omitted from the
      search.
    
      -i/-c: make the pattern case insensitive/sensitive.  If neither of
      these options are given, the default is read from your configuration
      file, with the option ``InteractiveShell.wildcards_case_sensitive``.
      If this option is not specified in your configuration file, IPython's
      internal default is to do a case sensitive search.
    
      -e/-s NAMESPACE: exclude/search a given namespace.  The pattern you
      specify can be searched in any of the following namespaces:
      'builtin', 'user', 'user_global','internal', 'alias', where
      'builtin' and 'user' are the search defaults.  Note that you should
      not use quotes when specifying namespaces.
    
      -l: List all available object types for object matching. This function
      can be used without arguments.
    
      'Builtin' contains the python module builtin, 'user' contains all
      user data, 'alias' only contain the shell aliases and no python
      objects, 'internal' contains objects used by IPython.  The
      'user_global' namespace is only used by embedded IPython instances,
      and it contains module-level globals.  You can add namespaces to the
      search with -s or exclude them with -e (these options can be given
      more than once).
    
    Examples
    --------
    ::
    
      %psearch a*            -> objects beginning with an a
      %psearch -e builtin a* -> objects NOT in the builtin space starting in a
      %psearch a* function   -> all functions beginning with an a
      %psearch re.e*         -> objects beginning with an e in module re
      %psearch r*.e*         -> objects that start with e in modules starting in r
      %psearch r*.* string   -> all strings in modules beginning with r
    
    Case sensitive search::
    
      %psearch -c a*         list all object beginning with lower case a
    
    Show objects beginning with a single _::
    
      %psearch -a _*         list objects beginning with a single underscore
    
    List available objects::
    
      %psearch -l            list all available object types
%psource:
    Print (or run through pager) the source code for an object.
%pushd:
    Place the current dir on stack and change directory.
    
    Usage:
      %pushd ['dirname']
%pwd:
    Return the current working directory path.
    
    Examples
    --------
    ::
    
      In [9]: pwd
      Out[9]: '/home/tsuser/sprint/ipython'
%pycat:
    Show a syntax-highlighted file through a pager.
    
    This magic is similar to the cat utility, but it will assume the file
    to be Python source and will show it with syntax highlighting.
    
    This magic command can either take a local filename, an url,
    an history range (see %history) or a macro as argument.
    
    If no parameter is given, prints out history of current session up to
    this point. ::
    
    %pycat myscript.py
    %pycat 7-27
    %pycat myMacro
    %pycat http://www.example.com/myscript.py
%pylab:
    ::
    
      %pylab [--no-import-all] [gui]
    
    Load numpy and matplotlib to work interactively.
    
    This function lets you activate pylab (matplotlib, numpy and
    interactive support) at any point during an IPython session.
    
    %pylab makes the following imports::
    
        import numpy
        import matplotlib
        from matplotlib import pylab, mlab, pyplot
        np = numpy
        plt = pyplot
    
        from IPython.display import display
        from IPython.core.pylabtools import figsize, getfigs
    
        from pylab import *
        from numpy import *
    
    If you pass `--no-import-all`, the last two `*` imports will be excluded.
    
    See the %matplotlib magic for more details about activating matplotlib
    without affecting the interactive namespace.
    
    positional arguments:
      gui              Name of the matplotlib backend to use such as 'qt' or
                       'widget'. If given, the corresponding matplotlib backend is
                       used, otherwise it will be matplotlib's default (which you
                       can set in your matplotlib config file).
    
    options:
      --no-import-all  Prevent IPython from performing ``import *`` into the
                       interactive namespace. You can govern the default behavior
                       of this flag with the InteractiveShellApp.pylab_import_all
                       configurable.
%qtconsole:
    Open a qtconsole connected to this kernel.
    
    Useful for connecting a qtconsole to running notebooks, for better
    debugging.
%quickref:
    Show a quick reference sheet
%recall:
    Repeat a command, or get command to input line for editing.
    
    %recall and %rep are equivalent.
    
    - %recall (no arguments):
    
    Place a string version of last computation result (stored in the
    special '_' variable) to the next input prompt. Allows you to create
    elaborate command lines without using copy-paste::
    
         In[1]: l = ["hei", "vaan"]
         In[2]: "".join(l)
        Out[2]: heivaan
         In[3]: %recall
         In[4]: heivaan_ <== cursor blinking
    
    %recall 45
    
    Place history line 45 on the next input prompt. Use %hist to find
    out the number.
    
    %recall 1-4
    
    Combine the specified lines into one cell, and place it on the next
    input prompt. See %history for the slice syntax.
    
    %recall foo+bar
    
    If foo+bar can be evaluated in the user namespace, the result is
    placed at the next input prompt. Otherwise, the history is searched
    for lines which contain that substring, and the most recent one is
    placed at the next input prompt.
%rehashx:
    Update the alias table with all executable files in $PATH.
    
    rehashx explicitly checks that every entry in $PATH is a file
    with execute access (os.X_OK).
    
    Under Windows, it checks executability as a match against a
    '|'-separated string of extensions, stored in the IPython config
    variable win_exec_ext.  This defaults to 'exe|com|bat'.
    
    This function also resets the root module cache of module completer,
    used on slow filesystems.
%reload_ext:
    Reload an IPython extension by its module name.
%rep:
    Alias for `%recall`.
%rerun:
    Re-run previous input
    
    By default, you can specify ranges of input history to be repeated
    (as with %history). With no arguments, it will repeat the last line.
    
    Options:
    
      -l <n> : Repeat the last n lines of input, not including the
      current command.
    
      -g foo : Repeat the most recent line which contains foo
%reset:
    Resets the namespace by removing all names defined by the user, if
    called without arguments, or by removing some types of objects, such
    as everything currently in IPython's In[] and Out[] containers (see
    the parameters for details).
    
    Parameters
    ----------
    -f
        force reset without asking for confirmation.
    -s
        'Soft' reset: Only clears your namespace, leaving history intact.
        References to objects may be kept. By default (without this option),
        we do a 'hard' reset, giving you a new session and removing all
        references to objects from the current session.
    --aggressive
        Try to aggressively remove modules from sys.modules ; this
        may allow you to reimport Python modules that have been updated and
        pick up changes, but can have unintended consequences.
    
    in
        reset input history
    out
        reset output history
    dhist
        reset directory history
    array
        reset only variables that are NumPy arrays
    
    See Also
    --------
    reset_selective : invoked as ``%reset_selective``
    
    Examples
    --------
    ::
    
      In [6]: a = 1
    
      In [7]: a
      Out[7]: 1
    
      In [8]: 'a' in get_ipython().user_ns
      Out[8]: True
    
      In [9]: %reset -f
    
      In [1]: 'a' in get_ipython().user_ns
      Out[1]: False
    
      In [2]: %reset -f in
      Flushing input history
    
      In [3]: %reset -f dhist in
      Flushing directory history
      Flushing input history
    
    Notes
    -----
    Calling this magic from clients that do not implement standard input,
    such as the ipython notebook interface, will reset the namespace
    without confirmation.
%reset_selective:
    Resets the namespace by removing names defined by the user.
    
    Input/Output history are left around in case you need them.
    
    %reset_selective [-f] regex
    
    No action is taken if regex is not included
    
    Options
      -f : force reset without asking for confirmation.
    
    See Also
    --------
    reset : invoked as ``%reset``
    
    Examples
    --------
    We first fully reset the namespace so your output looks identical to
    this example for pedagogical reasons; in practice you do not need a
    full reset::
    
      In [1]: %reset -f
    
    Now, with a clean namespace we can make a few variables and use
    ``%reset_selective`` to only delete names that match our regexp::
    
      In [2]: a=1; b=2; c=3; b1m=4; b2m=5; b3m=6; b4m=7; b2s=8
    
      In [3]: who_ls
      Out[3]: ['a', 'b', 'b1m', 'b2m', 'b2s', 'b3m', 'b4m', 'c']
    
      In [4]: %reset_selective -f b[2-3]m
    
      In [5]: who_ls
      Out[5]: ['a', 'b', 'b1m', 'b2s', 'b4m', 'c']
    
      In [6]: %reset_selective -f d
    
      In [7]: who_ls
      Out[7]: ['a', 'b', 'b1m', 'b2s', 'b4m', 'c']
    
      In [8]: %reset_selective -f c
    
      In [9]: who_ls
      Out[9]: ['a', 'b', 'b1m', 'b2s', 'b4m']
    
      In [10]: %reset_selective -f b
    
      In [11]: who_ls
      Out[11]: ['a']
    
    Notes
    -----
    Calling this magic from clients that do not implement standard input,
    such as the ipython notebook interface, will reset the namespace
    without confirmation.
%rm:
    Alias for `!rm`
%rmdir:
    Alias for `!rmdir`
%run:
    Run the named file inside IPython as a program.
    
    Usage::
    
      %run [-n -i -e -G]
           [( -t [-N<N>] | -d [-b<N>] | -p [profile options] )]
           ( -m mod | filename ) [args]
    
    The filename argument should be either a pure Python script (with
    extension ``.py``), or a file with custom IPython syntax (such as
    magics). If the latter, the file can be either a script with ``.ipy``
    extension, or a Jupyter notebook with ``.ipynb`` extension. When running
    a Jupyter notebook, the output from print statements and other
    displayed objects will appear in the terminal (even matplotlib figures
    will open, if a terminal-compliant backend is being used). Note that,
    at the system command line, the ``jupyter run`` command offers similar
    functionality for executing notebooks (albeit currently with some
    differences in supported options).
    
    Parameters after the filename are passed as command-line arguments to
    the program (put in sys.argv). Then, control returns to IPython's
    prompt.
    
    This is similar to running at a system prompt ``python file args``,
    but with the advantage of giving you IPython's tracebacks, and of
    loading all variables into your interactive namespace for further use
    (unless -p is used, see below).
    
    The file is executed in a namespace initially consisting only of
    ``__name__=='__main__'`` and sys.argv constructed as indicated. It thus
    sees its environment as if it were being run as a stand-alone program
    (except for sharing global objects such as previously imported
    modules). But after execution, the IPython interactive namespace gets
    updated with all variables defined in the program (except for ``__name__``
    and ``sys.argv``). This allows for very convenient loading of code for
    interactive work, while giving each program a 'clean sheet' to run in.
    
    Arguments are expanded using shell-like glob match.  Patterns
    '*', '?', '[seq]' and '[!seq]' can be used.  Additionally,
    tilde '~' will be expanded into user's home directory.  Unlike
    real shells, quotation does not suppress expansions.  Use
    *two* back slashes (e.g. ``\\*``) to suppress expansions.
    To completely disable these expansions, you can use -G flag.
    
    On Windows systems, the use of single quotes `'` when specifying
    a file is not supported. Use double quotes `"`.
    
    Options:
    
    -n
      __name__ is NOT set to '__main__', but to the running file's name
      without extension (as python does under import).  This allows running
      scripts and reloading the definitions in them without calling code
      protected by an ``if __name__ == "__main__"`` clause.
    
    -i
      run the file in IPython's namespace instead of an empty one. This
      is useful if you are experimenting with code written in a text editor
      which depends on variables defined interactively.
    
    -e
      ignore sys.exit() calls or SystemExit exceptions in the script
      being run.  This is particularly useful if IPython is being used to
      run unittests, which always exit with a sys.exit() call.  In such
      cases you are interested in the output of the test results, not in
      seeing a traceback of the unittest module.
    
    -t
      print timing information at the end of the run.  IPython will give
      you an estimated CPU time consumption for your script, which under
      Unix uses the resource module to avoid the wraparound problems of
      time.clock().  Under Unix, an estimate of time spent on system tasks
      is also given (for Windows platforms this is reported as 0.0).
    
      If -t is given, an additional ``-N<N>`` option can be given, where <N>
      must be an integer indicating how many times you want the script to
      run.  The final timing report will include total and per run results.
    
      For example (testing the script uniq_stable.py)::
    
          In [1]: run -t uniq_stable
    
          IPython CPU timings (estimated):
            User  :    0.19597 s.
            System:        0.0 s.
    
          In [2]: run -t -N5 uniq_stable
    
          IPython CPU timings (estimated):
          Total runs performed: 5
            Times :      Total       Per run
            User  :   0.910862 s,  0.1821724 s.
            System:        0.0 s,        0.0 s.
    
    -d
      run your program under the control of pdb, the Python debugger.
      This allows you to execute your program step by step, watch variables,
      etc.  Internally, what IPython does is similar to calling::
    
          pdb.run('execfile("YOURFILENAME")')
    
      with a breakpoint set on line 1 of your file.  You can change the line
      number for this automatic breakpoint to be <N> by using the -bN option
      (where N must be an integer). For example::
    
          %run -d -b40 myscript
    
      will set the first breakpoint at line 40 in myscript.py.  Note that
      the first breakpoint must be set on a line which actually does
      something (not a comment or docstring) for it to stop execution.
    
      Or you can specify a breakpoint in a different file::
    
          %run -d -b myotherfile.py:20 myscript
    
      When the pdb debugger starts, you will see a (Pdb) prompt.  You must
      first enter 'c' (without quotes) to start execution up to the first
      breakpoint.
    
      Entering 'help' gives information about the use of the debugger.  You
      can easily see pdb's full documentation with "import pdb;pdb.help()"
      at a prompt.
    
    -p
      run program under the control of the Python profiler module (which
      prints a detailed report of execution times, function calls, etc).
    
      You can pass other options after -p which affect the behavior of the
      profiler itself. See the docs for %prun for details.
    
      In this mode, the program's variables do NOT propagate back to the
      IPython interactive namespace (because they remain in the namespace
      where the profiler executes them).
    
      Internally this triggers a call to %prun, see its documentation for
      details on the options available specifically for profiling.
    
    There is one special usage for which the text above doesn't apply:
    if the filename ends with .ipy[nb], the file is run as ipython script,
    just as if the commands were written on IPython prompt.
    
    -m
      specify module name to load instead of script path. Similar to
      the -m option for the python interpreter. Use this option last if you
      want to combine with other %run options. Unlike the python interpreter
      only source modules are allowed no .pyc or .pyo files.
      For example::
    
          %run -m example
    
      will run the example module.
    
    -G
      disable shell-like glob expansion of arguments.
%save:
    Save a set of lines or a macro to a given filename.
    
    Usage:
      %save [options] filename [history]
    
    Options:
    
      -r: use 'raw' input.  By default, the 'processed' history is used,
      so that magics are loaded in their transformed version to valid
      Python.  If this option is given, the raw input as typed at the
      command line is used instead.
    
      -f: force overwrite.  If file exists, %save will prompt for overwrite
      unless -f is given.
    
      -a: append to the file instead of overwriting it.
    
    The history argument uses the same syntax as %history for input ranges,
    then saves the lines to the filename you specify.
    
    If no ranges are specified, saves history of the current session up to
    this point.
    
    It adds a '.py' extension to the file if you don't do so yourself, and
    it asks for confirmation before overwriting existing files.
    
    If `-r` option is used, the default extension is `.ipy`.
%sc:
    Shell capture - run shell command and capture output (DEPRECATED use !).
    
    DEPRECATED. Suboptimal, retained for backwards compatibility.
    
    You should use the form 'var = !command' instead. Example:
    
     "%sc -l myfiles = ls ~" should now be written as
    
     "myfiles = !ls ~"
    
    myfiles.s, myfiles.l and myfiles.n still apply as documented
    below.
    
    --
    %sc [options] varname=command
    
    IPython will run the given command using commands.getoutput(), and
    will then update the user's interactive namespace with a variable
    called varname, containing the value of the call.  Your command can
    contain shell wildcards, pipes, etc.
    
    The '=' sign in the syntax is mandatory, and the variable name you
    supply must follow Python's standard conventions for valid names.
    
    (A special format without variable name exists for internal use)
    
    Options:
    
      -l: list output.  Split the output on newlines into a list before
      assigning it to the given variable.  By default the output is stored
      as a single string.
    
      -v: verbose.  Print the contents of the variable.
    
    In most cases you should not need to split as a list, because the
    returned value is a special type of string which can automatically
    provide its contents either as a list (split on newlines) or as a
    space-separated string.  These are convenient, respectively, either
    for sequential processing or to be passed to a shell command.
    
    For example::
    
        # Capture into variable a
        In [1]: sc a=ls *py
    
        # a is a string with embedded newlines
        In [2]: a
        Out[2]: 'setup.py\nwin32_manual_post_install.py'
    
        # which can be seen as a list:
        In [3]: a.l
        Out[3]: ['setup.py', 'win32_manual_post_install.py']
    
        # or as a whitespace-separated string:
        In [4]: a.s
        Out[4]: 'setup.py win32_manual_post_install.py'
    
        # a.s is useful to pass as a single command line:
        In [5]: !wc -l $a.s
          146 setup.py
          130 win32_manual_post_install.py
          276 total
    
        # while the list form is useful to loop over:
        In [6]: for f in a.l:
           ...:      !wc -l $f
           ...:
        146 setup.py
        130 win32_manual_post_install.py
    
    Similarly, the lists returned by the -l option are also special, in
    the sense that you can equally invoke the .s attribute on them to
    automatically get a whitespace-separated string from their contents::
    
        In [7]: sc -l b=ls *py
    
        In [8]: b
        Out[8]: ['setup.py', 'win32_manual_post_install.py']
    
        In [9]: b.s
        Out[9]: 'setup.py win32_manual_post_install.py'
    
    In summary, both the lists and strings used for output capture have
    the following special attributes::
    
        .l (or .list) : value as list.
        .n (or .nlstr): value as newline-separated string.
        .s (or .spstr): value as space-separated string.
%set_env:
    Set environment variables.  Assumptions are that either "val" is a
    name in the user namespace, or val is something that evaluates to a
    string.
    
    Usage:
      :``%set_env var val``: set value for var
      :``%set_env var=val``: set value for var
      :``%set_env var=$val``: set value for var, using python expansion if possible
%store:
    Lightweight persistence for python variables.
    
    Example::
    
      In [1]: l = ['hello',10,'world']
      In [2]: %store l
      Stored 'l' (list)
      In [3]: exit
    
      (IPython session is closed and started again...)
    
      ville@badger:~$ ipython
      In [1]: l
      NameError: name 'l' is not defined
      In [2]: %store -r
      In [3]: l
      Out[3]: ['hello', 10, 'world']
    
    Usage:
    
    * ``%store``          - Show list of all variables and their current
                            values
    * ``%store spam bar`` - Store the *current* value of the variables spam
                            and bar to disk
    * ``%store -d spam``  - Remove the variable and its value from storage
    * ``%store -z``       - Remove all variables from storage
    * ``%store -r``       - Refresh all variables, aliases and directory history
                            from store (overwrite current vals)
    * ``%store -r spam bar`` - Refresh specified variables and aliases from store
                               (delete current val)
    * ``%store foo >a.txt``  - Store value of foo to new file a.txt
    * ``%store foo >>a.txt`` - Append value of foo to file a.txt
    
    It should be noted that if you change the value of a variable, you
    need to %store it again if you want to persist the new value.
    
    Note also that the variables will need to be pickleable; most basic
    python types can be safely %store'd.
    
    Also aliases can be %store'd across sessions.
    To remove an alias from the storage, use the %unalias magic.
%subshell:
    
    List all current subshells
%sx:
    Shell execute - run shell command and capture output (!! is short-hand).
    
    %sx command
    
    IPython will run the given command using commands.getoutput(), and
    return the result formatted as a list (split on '\n').  Since the
    output is _returned_, it will be stored in ipython's regular output
    cache Out[N] and in the '_N' automatic variables.
    
    Notes:
    
    1) If an input line begins with '!!', then %sx is automatically
    invoked.  That is, while::
    
      !ls
    
    causes ipython to simply issue system('ls'), typing::
    
      !!ls
    
    is a shorthand equivalent to::
    
      %sx ls
    
    2) %sx differs from %sc in that %sx automatically splits into a list,
    like '%sc -l'.  The reason for this is to make it as easy as possible
    to process line-oriented shell output via further python commands.
    %sc is meant to provide much finer control, but requires more
    typing.
    
    3) Just like %sc -l, this is a list with special attributes:
    ::
    
      .l (or .list) : value as list.
      .n (or .nlstr): value as newline-separated string.
      .s (or .spstr): value as whitespace-separated string.
    
    This is very useful when trying to use such lists as arguments to
    system commands.
%system:
    Shell execute - run shell command and capture output (!! is short-hand).
    
    %sx command
    
    IPython will run the given command using commands.getoutput(), and
    return the result formatted as a list (split on '\n').  Since the
    output is _returned_, it will be stored in ipython's regular output
    cache Out[N] and in the '_N' automatic variables.
    
    Notes:
    
    1) If an input line begins with '!!', then %sx is automatically
    invoked.  That is, while::
    
      !ls
    
    causes ipython to simply issue system('ls'), typing::
    
      !!ls
    
    is a shorthand equivalent to::
    
      %sx ls
    
    2) %sx differs from %sc in that %sx automatically splits into a list,
    like '%sc -l'.  The reason for this is to make it as easy as possible
    to process line-oriented shell output via further python commands.
    %sc is meant to provide much finer control, but requires more
    typing.
    
    3) Just like %sc -l, this is a list with special attributes:
    ::
    
      .l (or .list) : value as list.
      .n (or .nlstr): value as newline-separated string.
      .s (or .spstr): value as whitespace-separated string.
    
    This is very useful when trying to use such lists as arguments to
    system commands.
%tb:
    Print the last traceback.
    
    Optionally, specify an exception reporting mode, tuning the
    verbosity of the traceback. By default the currently-active exception
    mode is used. See %xmode for changing exception reporting modes.
    
    Valid modes: Plain, Context, Verbose, and Minimal.
%time:
    ::
    
      %time [--no-raise-error]
    
    Time execution of a Python statement or expression.
    
    The CPU and wall clock times are printed, and the value of the
    expression (if any) is returned.  Note that under Win32, system time
    is always reported as 0, since it can not be measured.
    
    This function can be used both as a line and cell magic:
    
    - In line mode you can time a single-line statement (though multiple
      ones can be chained with using semicolons).
    
    - In cell mode, you can time the cell body (a directly
      following statement raises an error).
    
    This function provides very basic timing functionality. Use the timeit
    magic for more control over the measurement.
    
    .. versionchanged:: 7.3
        User variables are no longer expanded,
        the magic line is always left unmodified.
    
    .. versionchanged:: 8.3
        The time magic now correctly propagates system-exiting exceptions
        (such as ``KeyboardInterrupt`` invoked when interrupting execution)
        rather than just printing out the exception traceback.
        The non-system-exception will still be caught as before.
    
    Examples
    --------
    ::
    
      In [1]: %time 2**128
      CPU times: user 0.00 s, sys: 0.00 s, total: 0.00 s
      Wall time: 0.00
      Out[1]: 340282366920938463463374607431768211456L
    
      In [2]: n = 1000000
    
      In [3]: %time sum(range(n))
      CPU times: user 1.20 s, sys: 0.05 s, total: 1.25 s
      Wall time: 1.37
      Out[3]: 499999500000L
    
      In [4]: %time print('hello world')
      hello world
      CPU times: user 0.00 s, sys: 0.00 s, total: 0.00 s
      Wall time: 0.00
    
    .. note::
        The time needed by Python to compile the given expression will be
        reported if it is more than 0.1s.
    
        In the example below, the actual exponentiation is done by Python
        at compilation time, so while the expression can take a noticeable
        amount of time to compute, that time is purely due to the
        compilation::
    
            In [5]: %time 3**9999;
            CPU times: user 0.00 s, sys: 0.00 s, total: 0.00 s
            Wall time: 0.00 s
    
            In [6]: %time 3**999999;
            CPU times: user 0.00 s, sys: 0.00 s, total: 0.00 s
            Wall time: 0.00 s
            Compiler : 0.78 s
    
    options:
      --no-raise-error  If given, don't re-raise exceptions
    
    Any remaining arguments will be treated as code to run.
%timeit:
    Time execution of a Python statement or expression
    
    **Usage, in line mode**::
    
      %timeit [-n<N> -r<R> [-t|-c] -q -p<P> [-o|-v <V>]] statement
    
    **or in cell mode**::
    
      %%timeit [-n<N> -r<R> [-t|-c] -q -p<P> [-o|-v <V>]] setup_code
      code
      code...
    
    Time execution of a Python statement or expression using the timeit
    module.  This function can be used both as a line and cell magic:
    
    - In line mode you can time a single-line statement (though multiple
      ones can be chained with using semicolons).
    
    - In cell mode, the statement in the first line is used as setup code
      (executed but not timed) and the body of the cell is timed.  The cell
      body has access to any variables created in the setup code.
    
    Options:
    
    -n<N>
      Execute the given statement N times in a loop. If N is not
      provided, N is determined so as to get sufficient accuracy.
    
    -r<R>
      Number of repeats R, each consisting of N loops, and take the
      average result.
      Default: 7
    
    -t
      Use ``time.time`` to measure the time, which is the default on Unix.
      This function measures wall time.
    
    -c
      Use ``time.clock`` to measure the time, which is the default on
      Windows and measures wall time. On Unix, ``resource.getrusage`` is used
      instead and returns the CPU user time.
    
    -p<P>
      Use a precision of P digits to display the timing result.
      Default: 3
    
    -q
      Quiet, do not print result.
    
    -o
      Return a ``TimeitResult`` that can be stored in a variable to inspect
      the result in more details.
    
    -v <V>
      Like ``-o``, but save the ``TimeitResult`` directly to variable <V>.
    
    .. versionchanged:: 7.3
        User variables are no longer expanded,
        the magic line is always left unmodified.
    
    Examples
    --------
    ::
    
      In [1]: %timeit pass
      8.26 ns ± 0.12 ns per loop (mean ± std. dev. of 7 runs, 100000000 loops each)
    
      In [2]: u = None
    
      In [3]: %timeit u is None
      29.9 ns ± 0.643 ns per loop (mean ± std. dev. of 7 runs, 10000000 loops each)
    
      In [4]: %timeit -r 4 u == None
    
      In [5]: import time
    
      In [6]: %timeit -n1 time.sleep(2)
    
    The times reported by ``%timeit`` will be slightly higher than those
    reported by the timeit.py script when variables are accessed. This is
    due to the fact that ``%timeit`` executes the statement in the namespace
    of the shell, compared with timeit.py, which uses a single setup
    statement to import function or create variables. Generally, the bias
    does not matter as long as results from timeit.py are not mixed with
    those from ``%timeit``.
%unalias:
    Remove an alias
%unload_ext:
    Unload an IPython extension by its module name.
    
    Not all extensions can be unloaded, only those which define an
    ``unload_ipython_extension`` function.
%uv:
    Run the uv package manager within the current kernel.
    
    Usage:
      %uv pip install [pkgs]
%who:
    Print all interactive variables, with some minimal formatting.
    
    If any arguments are given, only variables whose type matches one of
    these are printed.  For example::
    
      %who function str
    
    will only list functions and strings, excluding all other types of
    variables.  To find the proper type names, simply use type(var) at a
    command line to see how python prints type names.  For example:
    
    ::
    
      In [1]: type('hello')
      Out[1]: <type 'str'>
    
    indicates that the type name for strings is 'str'.
    
    ``%who`` always excludes executed names loaded through your configuration
    file and things which are internal to IPython.
    
    This is deliberate, as typically you may load many modules and the
    purpose of %who is to show you only what you've manually defined.
    
    Examples
    --------
    
    Define two variables and list them with who::
    
      In [1]: alpha = 123
    
      In [2]: beta = 'test'
    
      In [3]: %who
      alpha   beta
    
      In [4]: %who int
      alpha
    
      In [5]: %who str
      beta
%who_ls:
    Return a sorted list of all interactive variables.
    
    If arguments are given, only variables of types matching these
    arguments are returned.
    
    Examples
    --------
    Define two variables and list them with who_ls::
    
      In [1]: alpha = 123
    
      In [2]: beta = 'test'
    
      In [3]: %who_ls
      Out[3]: ['alpha', 'beta']
    
      In [4]: %who_ls int
      Out[4]: ['alpha']
    
      In [5]: %who_ls str
      Out[5]: ['beta']
%whos:
    Like %who, but gives some extra information about each variable.
    
    The same type filtering of %who can be applied here.
    
    For all variables, the type is printed. Additionally it prints:
    
      - For {},[],(): their length.
    
      - For numpy arrays, a summary with shape, number of
        elements, typecode and size in memory.
    
      - For DataFrame and Series types: their shape.
    
      - Everything else: a string representation, snipping their middle if
        too long.
    
    Examples
    --------
    Define two variables and list them with whos::
    
      In [1]: alpha = 123
    
      In [2]: beta = 'test'
    
      In [3]: df = pd.DataFrame({"a": range(10), "b": range(10,20)})
    
      In [4]: s = df["a"]
    
      In [5]: %whos
      Variable   Type        Data/Info
      --------------------------------
      alpha      int         123
      beta       str         test
      df         DataFrame   Shape: (10, 2)
      s          Series      Shape: (10, )
%xdel:
    Delete a variable, trying to clear it from anywhere that
    IPython's machinery has references to it. By default, this uses
    the identity of the named object in the user namespace to remove
    references held under other names. The object is also removed
    from the output history.
    
    Options
      -n : Delete the specified name from all namespaces, without
      checking their identity.
%xmode:
    Switch modes for the exception handlers.
    
    Valid modes: Plain, Context, Verbose, and Minimal.
    
    If called without arguments, acts as a toggle.
    
    When in verbose mode the value `--show` (and `--hide`)
    will respectively show (or hide) frames with ``__tracebackhide__ =
    True`` value set.
%%!:
    Shell execute - run shell command and capture output (!! is short-hand).
    
    %sx command
    
    IPython will run the given command using commands.getoutput(), and
    return the result formatted as a list (split on '\n').  Since the
    output is _returned_, it will be stored in ipython's regular output
    cache Out[N] and in the '_N' automatic variables.
    
    Notes:
    
    1) If an input line begins with '!!', then %sx is automatically
    invoked.  That is, while::
    
      !ls
    
    causes ipython to simply issue system('ls'), typing::
    
      !!ls
    
    is a shorthand equivalent to::
    
      %sx ls
    
    2) %sx differs from %sc in that %sx automatically splits into a list,
    like '%sc -l'.  The reason for this is to make it as easy as possible
    to process line-oriented shell output via further python commands.
    %sc is meant to provide much finer control, but requires more
    typing.
    
    3) Just like %sc -l, this is a list with special attributes:
    ::
    
      .l (or .list) : value as list.
      .n (or .nlstr): value as newline-separated string.
      .s (or .spstr): value as whitespace-separated string.
    
    This is very useful when trying to use such lists as arguments to
    system commands.
%%HTML:
    Alias for `%%html`.
%%SVG:
    Alias for `%%svg`.
%%bash:
    %%bash script magic
    
    Run cells with bash in a subprocess.
    
    This is a shortcut for `%%script bash`
%%capture:
    ::
    
      %capture [--no-stderr] [--no-stdout] [--no-display] [output]
    
    run the cell, capturing stdout, stderr, and IPython's rich display() calls.
    
    positional arguments:
      output        The name of the variable in which to store output. This is a
                    ``utils.io.CapturedIO`` object with stdout/err attributes for
                    the text of the captured output. CapturedOutput also has a
                    ``show()`` method for displaying the output, and ``__call__``
                    as well, so you can use that to quickly display the output. If
                    unspecified, captured output is discarded.
    
    options:
      --no-stderr   Don't capture stderr.
      --no-stdout   Don't capture stdout.
      --no-display  Don't capture IPython's rich display.
%%code_wrap:
    ::
    
      %code_wrap [--remove] [--list] [--list-all] [name]
    
    Simple magic to quickly define a code transformer for all IPython's future input.
    
    ``__code__`` and ``__ret__`` are special variable that represent the code to run
    and the value of the last expression of ``__code__`` respectively.
    
    Examples
    --------
    
    .. ipython::
    
        In [1]: %%code_wrap before_after
           ...: print('before')
           ...: __code__
           ...: print('after')
           ...: __ret__
    
        In [2]: 1
        before
        after
        Out[2]: 1
    
        In [3]: %code_wrap --list
        before_after
    
        In [4]: %code_wrap --list-all
        before_after :
            print('before')
            __code__
            print('after')
            __ret__
    
        In [5]: %code_wrap --remove before_after
    
    positional arguments:
      name
    
    options:
      --remove    remove the current transformer
      --list      list existing transformers name
      --list-all  list existing transformers name and code template
%%debug:
    ::
    
      %debug [--breakpoint FILE:LINE]
    
    Activate the interactive debugger.
    
    This magic command support two ways of activating debugger.
    One is to activate debugger before executing code. This way, you
    can set a break point, to step through the code from the point.
    You can use this mode by giving statements to execute and optionally
    a breakpoint.
    
    The other one is to activate debugger in post-mortem mode. You can
    activate this mode simply running %debug without any argument.
    If an exception has just occurred, this lets you inspect its stack
    frames interactively.  Note that this will always work only on the last
    traceback that occurred, so you must call this quickly after an
    exception that you wish to inspect has fired, because if another one
    occurs, it clobbers the previous one.
    
    If you want IPython to automatically do this on every exception, see
    the %pdb magic for more details.
    
    .. versionchanged:: 7.3
        When running code, user variables are no longer expanded,
        the magic line is always left unmodified.
    
    options:
      --breakpoint <FILE:LINE>, -b <FILE:LINE>
                            Set break point at LINE in FILE.
    
    Any remaining arguments will be treated as code to run in the debugger.
%%file:
    Alias for `%%writefile`.
%%html:
    ::
    
      %html [--isolated]
    
    Render the cell as a block of HTML
    
    options:
      --isolated  Annotate the cell as 'isolated'. Isolated cells are rendered
                  inside their own <iframe> tag
%%javascript:
    Run the cell block of Javascript code
    
    Starting with IPython 8.0 %%javascript is pending deprecation to be replaced
    by a more flexible system
    
    Please See https://github.com/ipython/ipython/issues/13376
%%js:
    Run the cell block of Javascript code
    
    Alias of `%%javascript`
    
    Starting with IPython 8.0 %%javascript is pending deprecation to be replaced
    by a more flexible system
    
    Please See https://github.com/ipython/ipython/issues/13376
%%latex:
    Render the cell as a block of LaTeX
    
    The subset of LaTeX which is supported depends on the implementation in
    the client.  In the Jupyter Notebook, this magic only renders the subset
    of LaTeX defined by MathJax
    [here](https://docs.mathjax.org/en/v2.5-latest/tex.html).
%%markdown:
    Render the cell as Markdown text block
%%perl:
    %%perl script magic
    
    Run cells with perl in a subprocess.
    
    This is a shortcut for `%%script perl`
%%prun:
    Run a statement through the python code profiler.
    
    **Usage, in line mode**::
    
      %prun [options] statement
    
    **Usage, in cell mode**::
    
      %%prun [options] [statement]
      code...
      code...
    
    In cell mode, the additional code lines are appended to the (possibly
    empty) statement in the first line.  Cell mode allows you to easily
    profile multiline blocks without having to put them in a separate
    function.
    
    The given statement (which doesn't require quote marks) is run via the
    python profiler in a manner similar to the profile.run() function.
    Namespaces are internally managed to work correctly; profile.run
    cannot be used in IPython because it makes certain assumptions about
    namespaces which do not hold under IPython.
    
    Options:
    
    -l <limit>
      you can place restrictions on what or how much of the
      profile gets printed. The limit value can be:
    
         * A string: only information for function names containing this string
           is printed.
    
         * An integer: only these many lines are printed.
    
         * A float (between 0 and 1): this fraction of the report is printed
           (for example, use a limit of 0.4 to see the topmost 40% only).
    
      You can combine several limits with repeated use of the option. For
      example, ``-l __init__ -l 5`` will print only the topmost 5 lines of
      information about class constructors.
    
    -r
      return the pstats.Stats object generated by the profiling. This
      object has all the information about the profile in it, and you can
      later use it for further analysis or in other functions.
    
    -s <key>
      sort profile by given key. You can provide more than one key
      by using the option several times: '-s key1 -s key2 -s key3...'. The
      default sorting key is 'time'.
    
      The following is copied verbatim from the profile documentation
      referenced below:
    
      When more than one key is provided, additional keys are used as
      secondary criteria when the there is equality in all keys selected
      before them.
    
      Abbreviations can be used for any key names, as long as the
      abbreviation is unambiguous.  The following are the keys currently
      defined:
    
      ============  =====================
      Valid Arg     Meaning
      ============  =====================
      "calls"       call count
      "cumulative"  cumulative time
      "file"        file name
      "module"      file name
      "pcalls"      primitive call count
      "line"        line number
      "name"        function name
      "nfl"         name/file/line
      "stdname"     standard name
      "time"        internal time
      ============  =====================
    
      Note that all sorts on statistics are in descending order (placing
      most time consuming items first), where as name, file, and line number
      searches are in ascending order (i.e., alphabetical). The subtle
      distinction between "nfl" and "stdname" is that the standard name is a
      sort of the name as printed, which means that the embedded line
      numbers get compared in an odd way.  For example, lines 3, 20, and 40
      would (if the file names were the same) appear in the string order
      "20" "3" and "40".  In contrast, "nfl" does a numeric compare of the
      line numbers.  In fact, sort_stats("nfl") is the same as
      sort_stats("name", "file", "line").
    
    -T <filename>
      save profile results as shown on screen to a text
      file. The profile is still shown on screen.
    
    -D <filename>
      save (via dump_stats) profile statistics to given
      filename. This data is in a format understood by the pstats module, and
      is generated by a call to the dump_stats() method of profile
      objects. The profile is still shown on screen.
    
    -q
      suppress output to the pager.  Best used with -T and/or -D above.
    
    If you want to run complete programs under the profiler's control, use
    ``%run -p [prof_opts] filename.py [args to program]`` where prof_opts
    contains profiler specific options as described here.
    
    You can read the complete documentation for the profile module with::
    
      In [1]: import profile; profile.help()
    
    .. versionchanged:: 7.3
        User variables are no longer expanded,
        the magic line is always left unmodified.
%%pypy:
    %%pypy script magic
    
    Run cells with pypy in a subprocess.
    
    This is a shortcut for `%%script pypy`
%%python:
    %%python script magic
    
    Run cells with python in a subprocess.
    
    This is a shortcut for `%%script python`
%%python2:
    %%python2 script magic
    
    Run cells with python2 in a subprocess.
    
    This is a shortcut for `%%script python2`
%%python3:
    %%python3 script magic
    
    Run cells with python3 in a subprocess.
    
    This is a shortcut for `%%script python3`
%%ruby:
    %%ruby script magic
    
    Run cells with ruby in a subprocess.
    
    This is a shortcut for `%%script ruby`
%%script:
    ::
    
      %shebang [--no-raise-error] [--proc PROC] [--bg] [--err ERR] [--out OUT]
    
    Run a cell via a shell command
    
    The `%%script` line is like the #! line of script,
    specifying a program (bash, perl, ruby, etc.) with which to run.
    
    The rest of the cell is run by that program.
    
    .. versionchanged:: 9.0
      Interrupting the script executed without `--bg` will end in
      raising an exception (unless `--no-raise-error` is passed).
    
    Examples
    --------
    ::
    
        In [1]: %%script bash
           ...: for i in 1 2 3; do
           ...:   echo $i
           ...: done
        1
        2
        3
    
    options:
      --no-raise-error  Whether you should raise an error message in addition to a
                        stream on stderr if you get a nonzero exit code.
      --proc PROC       The variable in which to store Popen instance. This is
                        used only when --bg option is given.
      --bg              Whether to run the script in the background. If given, the
                        only way to see the output of the command is with
                        --out/err.
      --err ERR         The variable in which to store stderr from the script. If
                        the script is backgrounded, this will be the stderr
                        *pipe*, instead of the stderr text itself and will not be
                        autoclosed.
      --out OUT         The variable in which to store stdout from the script. If
                        the script is backgrounded, this will be the stdout
                        *pipe*, instead of the stderr text itself and will not be
                        auto closed.
%%sh:
    %%sh script magic
    
    Run cells with sh in a subprocess.
    
    This is a shortcut for `%%script sh`
%%svg:
    Render the cell as an SVG literal
%%sx:
    Shell execute - run shell command and capture output (!! is short-hand).
    
    %sx command
    
    IPython will run the given command using commands.getoutput(), and
    return the result formatted as a list (split on '\n').  Since the
    output is _returned_, it will be stored in ipython's regular output
    cache Out[N] and in the '_N' automatic variables.
    
    Notes:
    
    1) If an input line begins with '!!', then %sx is automatically
    invoked.  That is, while::
    
      !ls
    
    causes ipython to simply issue system('ls'), typing::
    
      !!ls
    
    is a shorthand equivalent to::
    
      %sx ls
    
    2) %sx differs from %sc in that %sx automatically splits into a list,
    like '%sc -l'.  The reason for this is to make it as easy as possible
    to process line-oriented shell output via further python commands.
    %sc is meant to provide much finer control, but requires more
    typing.
    
    3) Just like %sc -l, this is a list with special attributes:
    ::
    
      .l (or .list) : value as list.
      .n (or .nlstr): value as newline-separated string.
      .s (or .spstr): value as whitespace-separated string.
    
    This is very useful when trying to use such lists as arguments to
    system commands.
%%system:
    Shell execute - run shell command and capture output (!! is short-hand).
    
    %sx command
    
    IPython will run the given command using commands.getoutput(), and
    return the result formatted as a list (split on '\n').  Since the
    output is _returned_, it will be stored in ipython's regular output
    cache Out[N] and in the '_N' automatic variables.
    
    Notes:
    
    1) If an input line begins with '!!', then %sx is automatically
    invoked.  That is, while::
    
      !ls
    
    causes ipython to simply issue system('ls'), typing::
    
      !!ls
    
    is a shorthand equivalent to::
    
      %sx ls
    
    2) %sx differs from %sc in that %sx automatically splits into a list,
    like '%sc -l'.  The reason for this is to make it as easy as possible
    to process line-oriented shell output via further python commands.
    %sc is meant to provide much finer control, but requires more
    typing.
    
    3) Just like %sc -l, this is a list with special attributes:
    ::
    
      .l (or .list) : value as list.
      .n (or .nlstr): value as newline-separated string.
      .s (or .spstr): value as whitespace-separated string.
    
    This is very useful when trying to use such lists as arguments to
    system commands.
%%time:
    ::
    
      %time [--no-raise-error]
    
    Time execution of a Python statement or expression.
    
    The CPU and wall clock times are printed, and the value of the
    expression (if any) is returned.  Note that under Win32, system time
    is always reported as 0, since it can not be measured.
    
    This function can be used both as a line and cell magic:
    
    - In line mode you can time a single-line statement (though multiple
      ones can be chained with using semicolons).
    
    - In cell mode, you can time the cell body (a directly
      following statement raises an error).
    
    This function provides very basic timing functionality. Use the timeit
    magic for more control over the measurement.
    
    .. versionchanged:: 7.3
        User variables are no longer expanded,
        the magic line is always left unmodified.
    
    .. versionchanged:: 8.3
        The time magic now correctly propagates system-exiting exceptions
        (such as ``KeyboardInterrupt`` invoked when interrupting execution)
        rather than just printing out the exception traceback.
        The non-system-exception will still be caught as before.
    
    Examples
    --------
    ::
    
      In [1]: %time 2**128
      CPU times: user 0.00 s, sys: 0.00 s, total: 0.00 s
      Wall time: 0.00
      Out[1]: 340282366920938463463374607431768211456L
    
      In [2]: n = 1000000
    
      In [3]: %time sum(range(n))
      CPU times: user 1.20 s, sys: 0.05 s, total: 1.25 s
      Wall time: 1.37
      Out[3]: 499999500000L
    
      In [4]: %time print('hello world')
      hello world
      CPU times: user 0.00 s, sys: 0.00 s, total: 0.00 s
      Wall time: 0.00
    
    .. note::
        The time needed by Python to compile the given expression will be
        reported if it is more than 0.1s.
    
        In the example below, the actual exponentiation is done by Python
        at compilation time, so while the expression can take a noticeable
        amount of time to compute, that time is purely due to the
        compilation::
    
            In [5]: %time 3**9999;
            CPU times: user 0.00 s, sys: 0.00 s, total: 0.00 s
            Wall time: 0.00 s
    
            In [6]: %time 3**999999;
            CPU times: user 0.00 s, sys: 0.00 s, total: 0.00 s
            Wall time: 0.00 s
            Compiler : 0.78 s
    
    options:
      --no-raise-error  If given, don't re-raise exceptions
    
    Any remaining arguments will be treated as code to run.
%%timeit:
    Time execution of a Python statement or expression
    
    **Usage, in line mode**::
    
      %timeit [-n<N> -r<R> [-t|-c] -q -p<P> [-o|-v <V>]] statement
    
    **or in cell mode**::
    
      %%timeit [-n<N> -r<R> [-t|-c] -q -p<P> [-o|-v <V>]] setup_code
      code
      code...
    
    Time execution of a Python statement or expression using the timeit
    module.  This function can be used both as a line and cell magic:
    
    - In line mode you can time a single-line statement (though multiple
      ones can be chained with using semicolons).
    
    - In cell mode, the statement in the first line is used as setup code
      (executed but not timed) and the body of the cell is timed.  The cell
      body has access to any variables created in the setup code.
    
    Options:
    
    -n<N>
      Execute the given statement N times in a loop. If N is not
      provided, N is determined so as to get sufficient accuracy.
    
    -r<R>
      Number of repeats R, each consisting of N loops, and take the
      average result.
      Default: 7
    
    -t
      Use ``time.time`` to measure the time, which is the default on Unix.
      This function measures wall time.
    
    -c
      Use ``time.clock`` to measure the time, which is the default on
      Windows and measures wall time. On Unix, ``resource.getrusage`` is used
      instead and returns the CPU user time.
    
    -p<P>
      Use a precision of P digits to display the timing result.
      Default: 3
    
    -q
      Quiet, do not print result.
    
    -o
      Return a ``TimeitResult`` that can be stored in a variable to inspect
      the result in more details.
    
    -v <V>
      Like ``-o``, but save the ``TimeitResult`` directly to variable <V>.
    
    .. versionchanged:: 7.3
        User variables are no longer expanded,
        the magic line is always left unmodified.
    
    Examples
    --------
    ::
    
      In [1]: %timeit pass
      8.26 ns ± 0.12 ns per loop (mean ± std. dev. of 7 runs, 100000000 loops each)
    
      In [2]: u = None
    
      In [3]: %timeit u is None
      29.9 ns ± 0.643 ns per loop (mean ± std. dev. of 7 runs, 10000000 loops each)
    
      In [4]: %timeit -r 4 u == None
    
      In [5]: import time
    
      In [6]: %timeit -n1 time.sleep(2)
    
    The times reported by ``%timeit`` will be slightly higher than those
    reported by the timeit.py script when variables are accessed. This is
    due to the fact that ``%timeit`` executes the statement in the namespace
    of the shell, compared with timeit.py, which uses a single setup
    statement to import function or create variables. Generally, the bias
    does not matter as long as results from timeit.py are not mixed with
    those from ``%timeit``.
%%writefile:
    ::
    
      %writefile [-a] filename
    
    Write the contents of the cell to a file.
    
    The file will be overwritten unless the -a (--append) flag is specified.
    
    positional arguments:
      filename      file to write
    
    options:
      -a, --append  Append contents of the cell to an existing file. The file will
                    be created if it does not exist.

Summary of magic functions (from %lsmagic):
Available line magics:
%alias  %alias_magic  %autoawait  %autocall  %automagic  %autosave  %bookmark  %cat  %cd  %clear  %code_wrap  %colors  %conda  %config  %connect_info  %cp  %debug  %dhist  %dirs  %doctest_mode  %ed  %edit  %env  %gui  %hist  %history  %killbgscripts  %ldir  %less  %lf  %lk  %ll  %load  %load_ext  %loadpy  %logoff  %logon  %logstart  %logstate  %logstop  %ls  %lsmagic  %lx  %macro  %magic  %mamba  %man  %matplotlib  %micromamba  %mkdir  %more  %mv  %notebook  %page  %pastebin  %pdb  %pdef  %pdoc  %pfile  %pinfo  %pinfo2  %pip  %popd  %pprint  %precision  %prun  %psearch  %psource  %pushd  %pwd  %pycat  %pylab  %qtconsole  %quickref  %recall  %rehashx  %reload_ext  %rep  %rerun  %reset  %reset_selective  %rm  %rmdir  %run  %save  %sc  %set_env  %store  %subshell  %sx  %system  %tb  %time  %timeit  %unalias  %unload_ext  %uv  %who  %who_ls  %whos  %xdel  %xmode

Available cell magics:
%%!  %%HTML  %%SVG  %%bash  %%capture  %%code_wrap  %%debug  %%file  %%html  %%javascript  %%js  %%latex  %%markdown  %%perl  %%prun  %%pypy  %%python  %%python2  %%python3  %%ruby  %%script  %%sh  %%svg  %%sx  %%system  %%time  %%timeit  %%writefile

Automagic is ON, % prefix IS NOT needed for line magics.

%quickref#

Gives a quick reference of the magic commands available in the Jupyter Notebook.

%quickref
IPython -- An enhanced Interactive Python - Quick Reference Card
================================================================

obj?, obj??      : Get help, or more help for object (also works as
                   ?obj, ??obj).
?foo.*abc*       : List names in 'foo' containing 'abc' in them.
%magic           : Information about IPython's 'magic' % functions.

Magic functions are prefixed by % or %%, and typically take their arguments
without parentheses, quotes or even commas for convenience.  Line magics take a
single % and cell magics are prefixed with two %%.

Example magic function calls:

%alias d ls -F   : 'd' is now an alias for 'ls -F'
alias d ls -F    : Works if 'alias' not a python name
alist = %alias   : Get list of aliases to 'alist'
cd /usr/share    : Obvious. cd -<tab> to choose from visited dirs.
%cd??            : See help AND source for magic %cd
%timeit x=10     : time the 'x=10' statement with high precision.
%%timeit x=2**100
x**100           : time 'x**100' with a setup of 'x=2**100'; setup code is not
                   counted.  This is an example of a cell magic.

System commands:

!cp a.txt b/     : System command escape, calls os.system()
cp a.txt b/      : after %rehashx, most system commands work without !
cp ${f}.txt $bar : Variable expansion in magics and system commands
files = !ls /usr : Capture system command output
files.s, files.l, files.n: "a b c", ['a','b','c'], 'a\nb\nc'

History:

_i, _ii, _iii    : Previous, next previous, next next previous input
_i4, _ih[2:5]    : Input history line 4, lines 2-4
exec(_i81)       : Execute input history line #81 again
%rep 81          : Edit input history line #81
_, __, ___       : previous, next previous, next next previous output
_dh              : Directory history
_oh              : Output history
%hist            : Command history of current session.
%hist -g foo     : Search command history of (almost) all sessions for 'foo'.
%hist -g         : Command history of (almost) all sessions.
%hist 1/2-8      : Command history containing lines 2-8 of session 1.
%hist 1/ ~2/     : Command history of session 1 and 2 sessions before current.
%hist ~8/1-~6/5  : Command history from line 1 of 8 sessions ago to
                   line 5 of 6 sessions ago.
%edit 0/         : Open editor to execute code with history of current session.

Autocall:

f 1,2            : f(1,2)  # Off by default, enable with %autocall magic.
/f 1,2           : f(1,2) (forced autoparen)
,f 1 2           : f("1","2")
;f 1 2           : f("1 2")

Remember: TAB completion works in many contexts, not just file names
or python names.

The following magic functions are currently available:

%alias:
    Define an alias for a system command.
%alias_magic:
    ::
%autoawait:
    
%autocall:
    Make functions callable without having to type parentheses.
%automagic:
    Make magic functions callable without having to type the initial %.
%autosave:
    Set the autosave interval in the notebook (in seconds).
%bookmark:
    Manage IPython's bookmark system.
%cat:
    Alias for `!cat`
%cd:
    Change the current working directory.
%clear:
    Clear the terminal.
%code_wrap:
    ::
%colors:
    Switch color scheme/theme globally for IPython
%conda:
    Run the conda package manager within the current kernel.
%config:
    configure IPython
%connect_info:
    Print information for connecting other clients to this kernel
%cp:
    Alias for `!cp`
%debug:
    ::
%dhist:
    Print your history of visited directories.
%dirs:
    Return the current directory stack.
%doctest_mode:
    Toggle doctest mode on and off.
%ed:
    Alias for `%edit`.
%edit:
    Bring up an editor and execute the resulting code.
%env:
    Get, set, or list environment variables.
%gui:
    Enable or disable IPython GUI event loop integration.
%hist:
    Alias for `%history`.
%history:
    ::
%killbgscripts:
    Kill all BG processes started by %%script and its family.
%ldir:
    Alias for `!ls -F -o --color %l | grep /$`
%less:
    Show a file through the pager.
%lf:
    Alias for `!ls -F -o --color %l | grep ^-`
%lk:
    Alias for `!ls -F -o --color %l | grep ^l`
%ll:
    Alias for `!ls -F -o --color`
%load:
    Load code into the current frontend.
%load_ext:
    Load an IPython extension by its module name.
%loadpy:
    Alias of `%load`
%logoff:
    Temporarily stop logging.
%logon:
    Restart logging.
%logstart:
    Start logging anywhere in a session.
%logstate:
    Print the status of the logging system.
%logstop:
    Fully stop logging and close log file.
%ls:
    Alias for `!ls -F --color`
%lsmagic:
    List currently available magic functions.
%lx:
    Alias for `!ls -F -o --color %l | grep ^-..x`
%macro:
    Define a macro for future re-execution. It accepts ranges of history,
%magic:
    Print information about the magic function system.
%mamba:
    Run the mamba package manager within the current kernel.
%man:
    Find the man page for the given command and display in pager.
%matplotlib:
    ::
%micromamba:
    Run the conda package manager within the current kernel.
%mkdir:
    Alias for `!mkdir`
%more:
    Show a file through the pager.
%mv:
    Alias for `!mv`
%notebook:
    ::
%page:
    Pretty print the object and display it through a pager.
%pastebin:
    Upload code to dpaste.com, returning the URL.
%pdb:
    Control the automatic calling of the pdb interactive debugger.
%pdef:
    Print the call signature for any callable object.
%pdoc:
    Print the docstring for an object.
%pfile:
    Print (or run through pager) the file where an object is defined.
%pinfo:
    Provide detailed information about an object.
%pinfo2:
    Provide extra detailed information about an object.
%pip:
    Run the pip package manager within the current kernel.
%popd:
    Change to directory popped off the top of the stack.
%pprint:
    Toggle pretty printing on/off.
%precision:
    Set floating point precision for pretty printing.
%prun:
    Run a statement through the python code profiler.
%psearch:
    Search for object in namespaces by wildcard.
%psource:
    Print (or run through pager) the source code for an object.
%pushd:
    Place the current dir on stack and change directory.
%pwd:
    Return the current working directory path.
%pycat:
    Show a syntax-highlighted file through a pager.
%pylab:
    ::
%qtconsole:
    Open a qtconsole connected to this kernel.
%quickref:
    Show a quick reference sheet 
%recall:
    Repeat a command, or get command to input line for editing.
%rehashx:
    Update the alias table with all executable files in $PATH.
%reload_ext:
    Reload an IPython extension by its module name.
%rep:
    Alias for `%recall`.
%rerun:
    Re-run previous input
%reset:
    Resets the namespace by removing all names defined by the user, if
%reset_selective:
    Resets the namespace by removing names defined by the user.
%rm:
    Alias for `!rm`
%rmdir:
    Alias for `!rmdir`
%run:
    Run the named file inside IPython as a program.
%save:
    Save a set of lines or a macro to a given filename.
%sc:
    Shell capture - run shell command and capture output (DEPRECATED use !).
%set_env:
    Set environment variables.  Assumptions are that either "val" is a
%store:
    Lightweight persistence for python variables.
%subshell:
    
%sx:
    Shell execute - run shell command and capture output (!! is short-hand).
%system:
    Shell execute - run shell command and capture output (!! is short-hand).
%tb:
    Print the last traceback.
%time:
    ::
%timeit:
    Time execution of a Python statement or expression
%unalias:
    Remove an alias
%unload_ext:
    Unload an IPython extension by its module name.
%uv:
    Run the uv package manager within the current kernel.
%who:
    Print all interactive variables, with some minimal formatting.
%who_ls:
    Return a sorted list of all interactive variables.
%whos:
    Like %who, but gives some extra information about each variable.
%xdel:
    Delete a variable, trying to clear it from anywhere that
%xmode:
    Switch modes for the exception handlers.
%%!:
    Shell execute - run shell command and capture output (!! is short-hand).
%%HTML:
    Alias for `%%html`.
%%SVG:
    Alias for `%%svg`.
%%bash:
    %%bash script magic
%%capture:
    ::
%%code_wrap:
    ::
%%debug:
    ::
%%file:
    Alias for `%%writefile`.
%%html:
    ::
%%javascript:
    Run the cell block of Javascript code
%%js:
    Run the cell block of Javascript code
%%latex:
    Render the cell as a block of LaTeX
%%markdown:
    Render the cell as Markdown text block
%%perl:
    %%perl script magic
%%prun:
    Run a statement through the python code profiler.
%%pypy:
    %%pypy script magic
%%python:
    %%python script magic
%%python2:
    %%python2 script magic
%%python3:
    %%python3 script magic
%%ruby:
    %%ruby script magic
%%script:
    ::
%%sh:
    %%sh script magic
%%svg:
    Render the cell as an SVG literal
%%sx:
    Shell execute - run shell command and capture output (!! is short-hand).
%%system:
    Shell execute - run shell command and capture output (!! is short-hand).
%%time:
    ::
%%timeit:
    Time execution of a Python statement or expression
%%writefile:
    ::

2.2 Directory Operation Magics and Alternatives#

Certain magic commands allow interaction with the operating system, enabling tasks like displaying the contents of a directory or switching the current working directory. The following are some of the most commonly used commands for these purposes:

%pwd#

As its name suggests, this magic command prints the current working directory of the Jupyter Notebook.

%pwd
'/home/jovyan/Git_repositories/neurodeskedu/books/examples/workflows'

!pwd is an alternative command on Linux that can also print the current working directory, but it is not a magic command.

!pwd
/home/jovyan/Git_repositories/neurodeskedu/books/examples/workflows

The difference between the two commands on Linux is that %pwd is provided by the IPython kernel, while !pwd is provided by Jupyter, which allows shell commands to be run within cells. However, on Windows, !pwd is not recognized as an internal or external command, operable program or batch file, so it is not a valid alternative to %pwd.

%ls#

This command is used to list the files and directories in the current working directory. We can also use !ls command in Linux, but again, it is not recognized on Windows.

%ls
AA_Neurodesk_demo_tour.ipynb  intro.md
MRIQC.ipynb                   ipyniivue_ipywidgets.ipynb
Magic_commands.ipynb          nipype_full.ipynb
PyBIDS.ipynb                  nipype_short.ipynb
RISE_slideshow.ipynb          papermill-slurm-submission-example.ipynb
bids_conversion.ipynb         pydra_preproc_ants.ipynb

If you want to display one type of files, you can for example use ls *.ipynb to list all Jupyter Notebook files in the current directory.

%ls *.ipynb
AA_Neurodesk_demo_tour.ipynb  ipyniivue_ipywidgets.ipynb
MRIQC.ipynb                   nipype_full.ipynb
Magic_commands.ipynb          nipype_short.ipynb
PyBIDS.ipynb                  papermill-slurm-submission-example.ipynb
RISE_slideshow.ipynb          pydra_preproc_ants.ipynb
bids_conversion.ipynb

%mkdir#

This magic command is used to create a new directory in the current working directory. If the directory already exists, it will raise an error.

%mkdir data_dir

%rmdir#

This magic command does the opposite and is used to remove a directory in the current working directory.

%rmdir data_dir

In Jupyter notebooks, the %mkdir and %rmdir magic commands have limited functionality: %mkdir will raise an error if the directory already exists, and %rmdir can only remove empty directories.

To safely create a directory without error if it exists, or to remove a directory and all its contents, you can use shell commands with the ! operator.

For example, !mkdir -p data_dir will create the directory only if it does not already exist, and !rm -rf data_dir will remove the directory and all its contents.

These commands can be used directly in notebook cells as a more robust alternative to the magic commands.

%cd#

This magic command is used to change the current working directory to a specified path. The shell command !cd works both on Linux and Windows.

On linux, we use /, whereas on Windows, we use \ or \\ to separate directories.

%bookmark#

This magic command is used to create a bookmark, an alias, for a directory, which can be used later to quickly navigate to that directory. We can run %bookmark?to see more options. This magic is especially useful for frequently changing between different directories.

%bookmark?
Docstring:
Manage IPython's bookmark system.

%bookmark <name>       - set bookmark to current dir
%bookmark <name> <dir> - set bookmark to <dir>
%bookmark -l           - list all bookmarks
%bookmark -d <name>    - remove bookmark
%bookmark -r           - remove all bookmarks

You can later on access a bookmarked folder with::

  %cd -b <name>

or simply '%cd <name>' if there is no directory called <name> AND
there is such a bookmark defined.

Your bookmarks persist through IPython sessions, but they are
associated with each profile.
File:      /opt/conda/lib/python3.13/site-packages/IPython/core/magics/osm.py

Let’s make a new directory named test, switch to it, and set a bookmark for easy access and change directory back to the current working directory.

pwd = %pwd
%mkdir test
%cd test
/home/jovyan/Git_repositories/neurodeskedu/books/examples/workflows/test
%bookmark test
%cd $pwd
/home/jovyan/Git_repositories/neurodeskedu/books/examples/workflows
%cd test
/home/jovyan/Git_repositories/neurodeskedu/books/examples/workflows/test
%cd $pwd
/home/jovyan/Git_repositories/neurodeskedu/books/examples/workflows

2.3. System Operation Magics#

There are some magics for system opeartions, such as package installation or checking package versions and other information.

%pip magic#

It is used to install Python packages in the Jupyter Notebook. It can be used the following way:

%pip intall <packageName>

Package versions and informations can be checked with:

%pip show <packageName>

We can also use them as Shell commands both on Linux and Winows:

!pip install <packageName>
!pip show <packageName>

Besides, it also works without % and !:

pip install <packageName>
pip show <packageName>

2.4. Magics on Python files#

The following run magic can be used to run python (.py) and external Jupyter Notebook (.ipynb) files.

%run

The %load command is used to insert the contents of a .py file into the current Jupyter Notebook cell, allowing you to edit and run the code directly within the notebook. We will demonstrate these commands together with some cell magics.

%load

2.5. Variable Magics#

%who, %whos and %who_ls#

who and whos are used to list the variables in the current namespace; %whos gives more detailed information about the variables, such as their type. who_ls is an alternative command that returns a sorted list of all interactive variables in the current namespace as a list.

a = 1
b = 'hello'
c = 1.5
%who
a	 b	 c	 pwd
%who str
b	 pwd
%whos
Variable   Type     Data/Info
-----------------------------
a          int      1
b          str      hello
c          float    1.5
pwd        str      /home/jovyan/Git_reposito<...>/books/examples/workflows
%who_ls
['a', 'b', 'c', 'pwd']

2.6. Timing Magics#

There are two timing magics that can be used to measure the execution time of a line of code.

%time magic#

The %time magic measures the execution time of a single run of the code. It gives you the information about the wall time of execution.

%time result= [i**2 for i in range(10000)]
CPU times: user 592 μs, sys: 282 μs, total: 874 μs
Wall time: 880 μs

%timeit#

The %timeit magic uses the Python timeit module, which runs a statement of 7 runs, 1000 loops each and then provides the best of each iteration in each round and gives time measurement with the range of standard deviation.

%timeit result= [i**2 for i in range(10000)]
593 μs ± 840 ns per loop (mean ± std. dev. of 7 runs, 1,000 loops each)

History magics#

The %history magic is used to display the command history of the Jupyter Notebook. It can be limited to a specific number of lines or a specific range of lines.

%history -l 5
%who str
%whos
%who_ls
%time result= [i**2 for i in range(10000)]
%timeit result= [i**2 for i in range(10000)]

The %dhist command displays a history of all visited directories:

%dhist
Directory history (kept in _dh)
0: /home/jovyan/Git_repositories/neurodeskedu/books/examples/workflows
1: /home/jovyan/Git_repositories/neurodeskedu/books/examples/workflows/test
2: /home/jovyan/Git_repositories/neurodeskedu/books/examples/workflows
3: /home/jovyan/Git_repositories/neurodeskedu/books/examples/workflows/test
4: /home/jovyan/Git_repositories/neurodeskedu/books/examples/workflows

3. Cell Magics#

As its name suggested, a cell magic is a command working for the whole cell, which is prefixed with two %% characters.

3.1. Bash code magics#

They work on linux, but not on Windows.

%%!#

This executes the whole cell in a bash an returns a list:

%%!
ls
['AA_Neurodesk_demo_tour.ipynb',
 'MRIQC.ipynb',
 'Magic_commands.ipynb',
 'PyBIDS.ipynb',
 'RISE_slideshow.ipynb',
 'bids_conversion.ipynb',
 'intro.md',
 'ipyniivue_ipywidgets.ipynb',
 'nipype_full.ipynb',
 'nipype_short.ipynb',
 'papermill-slurm-submission-example.ipynb',
 'pydra_preproc_ants.ipynb',
 'test']

%%bash#

The %%bash is an extension of the ! shell prefix. It lets you run multiline bash code in the Notebook.

%%bash
ls
AA_Neurodesk_demo_tour.ipynb
MRIQC.ipynb
Magic_commands.ipynb
PyBIDS.ipynb
RISE_slideshow.ipynb
bids_conversion.ipynb
intro.md
ipyniivue_ipywidgets.ipynb
nipype_full.ipynb
nipype_short.ipynb
papermill-slurm-submission-example.ipynb
pydra_preproc_ants.ipynb
test

3.2. Programming Magics#

The basic structure is %%+language. Here are some pointers to resources:

Running R in Jupyter Notebooks:#

There are different ways to set up a Jupyter Notebook for R. Two straigt forward ways are to

    1. Install the Python rpy2 library and use the Python Kernel with %%R magic commands

    1. Install the R kernel (IRkernel) for Jupyter Notebooks

The differences between these methods are that we can run Python code and R in the same Jupyter notebook for the first method, while we can only run R code in a separate Jupyter notebook for the second method.

1. Use Python Kernel#

Install R runtime and packages via mamba:

# r-essentials: R runtime; rpy2 library: Python↔R bridge
!mamba install -c conda-forge r-essentials rpy2 -y
conda-forge/linux-64                                        Using cache
conda-forge/noarch                                          Using cache
?25l?25h?25l?25h
Pinned packages:

  - python=3.13

Pinned packages:

  - python=3.13


Transaction

  Prefix: /opt/conda

  All requested packages already installed


Transaction starting
?25l?25h
Transaction finished

Enable %%R magic commands:

You only need to run this once. After installation, your Jupyter Notebook will support running both Python and R code in the same environment.

%load_ext rpy2.ipython

Installing R packages

R packages can be installed directly in a Jupyter notebook. By setting the CRAN (Comprehensive R Archive Network) mirror via options(repos = ...), we ensure that install.packages() runs non-interactively and uses a consitent repository. This improves reproducibility and avoids mirror selection prompts.

%%R
options(repos = c(CRAN = "https://cloud.r-project.org"))
install.packages("ggplot2",
                 quiet = TRUE)
Updating HTML index of packages in '.Library'
Making 'packages.html' ... done

We can then load the package with:

%%R
library(ggplot2)

Example with Python and R

Let’s look at an example where we create a Pandas DataFrame in Python and then use it in R code within the same notebook.

%%capture
!pip install pandas
import pandas as pd
df = pd.DataFrame({
    'x_var': [0, 1, 2, 3, 4, 5, 6, 7, 8, 9],
    'y_var': [3, 5, 7, 6, 9, 8, 10, 12, 13, 11]
})
df
x_var y_var
0 0 3
1 1 5
2 2 7
3 3 6
4 4 9
5 5 8
6 6 10
7 7 12
8 8 13
9 9 11

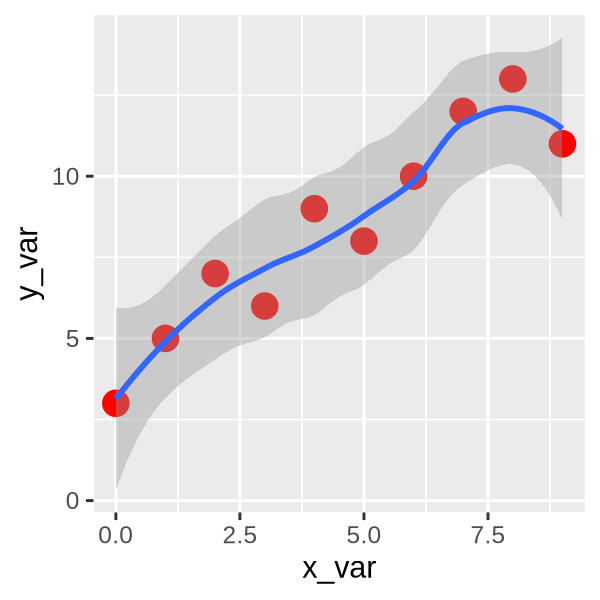
Next, we use R to make a plot using ggplot2 for the above dataframe.

In the first line, we call R using %%R magic where

  • -i is our dataframe input

  • -w and -h define figure size

  • -units in -r define size units in resolution, e.g. 200 dpi in this example. Unit can be changed to px, cm, etc.

Then, we’ll create the plot using the packageggplot2.

%%R -i df -w 3 -h 3 --units in -r 200

ggplot(data = df, aes(x = x_var, y = y_var)) +
  geom_point(color = 'red', size = 4) +
    stat_smooth()
`geom_smooth()` using method = 'loess' and formula = 'y ~ x'
../../_images/2ff29b6ae6d0171549f6f823dfb0ff9d6635dda13383d1d1d77a121151b6d4dd.png

2. Use a native R kernel#

For a full R notebook experience, install the IRkernel:

Install the IRkernel) package

IRkernel can be installed from CRAN. Run this in a cell with R magic:

%%R
install.packages('IRkernel')

Register the kernel with Jupyter

After installation, make the R kernel available to Jupyter:

%%R
IRkernel::installspec()        # Install kernel for the current user

This registers a new kernel with the name ir and display name R.

To install system-wide, set user to FALSE in the installspec command:

%%R
IRkernel::installspec(user = FALSE) # to register the kernel in the current R installation

Create an R notebook

After installation, create a new notebook and select the R kernel from the kernel dropdown menu. You can now write R code directly without %%R magic.

Which approach should you use?#

  • Use R Magic if you want to use both Python and R in the same notebook without switching kernels

  • Use R Kernel if you’re doing extensive R analysis and want a native R notebook experience

3.3. Magics on Python#

%%writefile Magic

Start Python coding with %%writefile filename.py.

To create a hello.py file (including the function hello), type:

%%writefile hello.py
def hello(name):
  print(f"Hello, {name}!")
Writing hello.py

This will save the script to hello.py into your working directory.

Now, to run the code you’ve just saved, use the following in a new cell:

%run hello.py
hello("World")
Hello, World!

This will execute the hello.py file and call the hello function with “World” as the argument.

You can also load the contents of hello.py directly into a notebook cell using the %load magic command. When you run the cell with %load hello.py, the code from hello.py will be inserted into the cell, allowing you to edit or run it interactively.

# %load hello.py
def hello(name):
  print(f"Hello, {name}!")

%%file Magic

%%file magic works similarly to %%writefile. Let’s create a greeting.py file. Type and run the following code:

%%file greeting.py
def hello(fname,lname):
    print(f"Hello, {fname} {lname}!")
Writing greeting.py

This will save the function to greeting.py in your workspace. You can then run this file again using the %run magic command, which executes the code in the file as if it were a script.

%run greeting.py
hello("Neurodesk", "User")
Hello, Neurodesk User!

Dependencies in Jupyter/Python#

  • Using the package watermark to document system environment and software versions used in this notebook

%load_ext watermark

%watermark
%watermark --iversions
Last updated: 2026-01-22T13:33:05.929236+00:00

Python implementation: CPython
Python version       : 3.13.9
IPython version      : 9.7.0

Compiler    : GCC 14.3.0
OS          : Linux
Release     : 5.15.0-164-generic
Machine     : x86_64
Processor   : x86_64
CPU cores   : 32
Architecture: 64bit

IPython: 9.7.0
pandas : 2.3.3
%%R
cat("=== R Session Information ===\n\n")
sessionInfo()
=== R Session Information ===

R version 4.5.2 (2025-10-31)
Platform: x86_64-conda-linux-gnu
Running under: Ubuntu 24.04.3 LTS

Matrix products: default
BLAS/LAPACK: /opt/conda/lib/libopenblasp-r0.3.30.so;  LAPACK version 3.12.0

locale:
 [1] LC_CTYPE=C.UTF-8    LC_NUMERIC=C        LC_TIME=C          
 [4] LC_COLLATE=C        LC_MONETARY=C       LC_MESSAGES=C      
 [7] LC_PAPER=C          LC_NAME=C           LC_ADDRESS=C       
[10] LC_TELEPHONE=C      LC_MEASUREMENT=C    LC_IDENTIFICATION=C

time zone: Etc/UTC
tzcode source: system (glibc)

attached base packages:
[1] tools     stats     graphics  grDevices utils     datasets  methods  
[8] base     

other attached packages:
[1] ggplot2_4.0.1

loaded via a namespace (and not attached):
 [1] labeling_0.4.3     RColorBrewer_1.1-3 R6_2.6.1           Matrix_1.7-4      
 [5] mgcv_1.9-4         tidyselect_1.2.1   lattice_0.22-7     farver_2.1.2      
 [9] magrittr_2.0.4     splines_4.5.2      gtable_0.3.6       glue_1.8.0        
[13] tibble_3.3.1       pkgconfig_2.0.3    dplyr_1.1.4        generics_0.1.4    
[17] lifecycle_1.0.5    cli_3.6.5          S7_0.2.1           scales_1.4.0      
[21] grid_4.5.2         vctrs_0.6.5        withr_3.0.2        compiler_4.5.2    
[25] nlme_3.1-168       pillar_1.11.1      rlang_1.1.7