Conda environments#
A tutorial for setting up your conda environments on Neurodesk.
This tutorial was created by Fernanda L. Ribeiro.
Email: fernanda.ribeiro@uq.edu.au
Github: @felenitaribeiro
Twitter: @NandaRibeiro93
This tutorial documents how to create conda environments on Neurodesk.
Conda/Mamba environment#
The default conda environment is not persistent across sessions, so this means any packages you install in the standard environment will disappear after you restart the Jupyterlab instance. However, you can create your own conda environment, which will be stored in your homedirectory, by following the steps on this page. This method can also be used to install additional kernels, such as an R kernel.
In a Terminal window, type in:

For Python:
mamba create -n myenv ipykernel
#OR
conda create -n myenv ipykernel
or for R:
mamba create -n r_env r-irkernel
#OR
conda create -n r_env r-irkernel
Important: For Python environments, you have to set the ipykernel explicitly or a Python version (like “conda create -n myenv python=3.8”), since a kernel is required. Alternatively, in case it was forgotten, you can add a kernel with:
conda install ipykernel
To check the list of environments you have created, run the following:
mamba env list
#OR
conda env list
To activate your conda environment and install the required packages from a provided txt file, run: For Python:
conda activate myenv
pip install -r requirements.txt
or for R:
conda activate r_env
pip install -r requirements.txt
Given the available environment, when you open a new Launcher tab, there will be a new Notebook option for launching a Jupyter Notebook with that environment active.

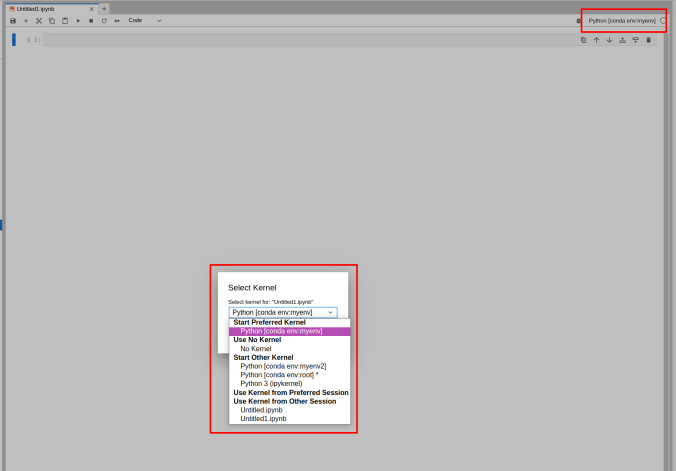
Switching the environment on a Jupyter Notebook is also possible on the top right corner dropdown menu.