Run this notebook
Date: 1 May 2025
License:
Note: If this notebook uses neuroimaging tools from Neurocontainers, those tools retain their original licenses. Please see Neurodesk citation guidelines for details.
Citation and Resources:
Tools included in this workflow
AFNI
Cox RW (1996). AFNI: software for analysis and visualization of functional magnetic resonance neuroimages. Comput Biomed Res 29(3):162-173. doi:10
.1006 /cbmr .1996 .0014 RW Cox, JS Hyde (1997). Software tools for analysis and visualization of FMRI Data. NMR in Biomedicine, 10: 171-178. https://
pubmed .ncbi .nlm .nih .gov /9430344/ 15.1.2. Methods: General func
Educational Resources
Andy’s Brain Book:
This AFNI example is based on the AFNI Tutorial: Commands and Preprocessing from Andy’s Brain Book (Jahn, 2022. doi:10
.5281 /zenodo .5879293)
Dataset
Flanker Dataset from OpenNeuro:
Kelly AMC and Uddin LQ and Biswal BB and Castellanos FX and Milham MP (2018). Flanker task (event-related). OpenNeuro Dataset ds000102. [Dataset] doi: null
Kelly AM, Uddin LQ, Biswal BB, Castellanos FX, Milham MP. Competition between functional brain networks mediates behavioral variability. Neuroimage. 2008 Jan 1;39(1):527-37. doi: Kelly et al. (2008). Epub 2007 Aug 23. PMID: 17919929.
Mennes, M., Kelly, C., Zuo, X.N., Di Martino, A., Biswal, B.B., Castellanos, F.X., Milham, M.P. (2010). Inter-individual differences in resting-state functional connectivity predict task-induced BOLD activity. Neuroimage, 50(4):1690-701. doi: Mennes et al. (2010). Epub 2010 Jan 15. Erratum in: Neuroimage. 2011 Mar 1;55(1):434
Mennes, M., Zuo, X.N., Kelly, C., Di Martino, A., Zang, Y.F., Biswal, B., Castellanos, F.X., Milham, M.P. (2011). Linking inter-individual differences in neural activation and behavior to intrinsic brain dynamics. Neuroimage, 54(4):2950-9. doi: Mennes et al. (2011)
Introduction
Single Subject fMRI Preprocessing with AFNI
This notebook demonstrates a single-subject preprocessing pipeline using AFNI (Analysis of Functional NeuroImages). Preprocessing prepares the raw fMRI data for statistical analysis by correcting for acquisition artefacts such as head motion, slice timing differences, and anatomical variability across subjects. The workflow follows the approach outlined in Andy’s Brain Book’s AFNI Tutorial: Commands and Preprocessing.
We will work with data from subject sub-08 of the DS000102 dataset (a Flanker task experiment), covering both basic AFNI commands and an automated preprocessing pipeline using afni_proc.py.
By the end of this notebook, you will be able to:
Use basic AFNI commands
Set up and run an automated preprocessing pipeline with
afni_proc.pyUnderstand each preprocessing step and how to inspect neuroimaging data and preprocessing results
Load AFNI
import module
await module.load('afni/25.2.03')
await module.list()['afni/25.2.03']Import Python Modules
%%capture
!pip install nibabel==5.3.3 numpy==2.3.5 nilearn==0.13.1
import os
import nibabel as nib
import numpy as np
import matplotlib.pyplot as plt
from ipyniivue import NiiVue
from IPython.display import display
from ipywidgets import VBox, Dropdown
import ipywidgets as widgets
from IPython.display import Image
from nilearn.image import index_imgData preparation
PATTERN = "sub-08"%%bash -s "$PATTERN"
set -euo pipefail
# Retry transient network failures, then fail the cell instead of continuing without data.
retry() { for i in 1 2 3 4 5; do "$@" && return 0; echo "Attempt $i failed: $*" >&2; [ "$i" -lt 5 ] && sleep $((i * 15)); done; return 1; }
PATTERN=$1
[ -d ds000102 ] || retry datalad install https://github.com/OpenNeuroDatasets/ds000102.git
cd ds000102 && retry datalad get $PATTERNCloning: 0%| | 0.00/2.00 [00:00<?, ? candidates/s]
Enumerating: 0.00 Objects [00:00, ? Objects/s]
Counting: 0%| | 0.00/27.0 [00:00<?, ? Objects/s]
Compressing: 0%| | 0.00/23.0 [00:00<?, ? Objects/s]
Receiving: 0%| | 0.00/2.15k [00:00<?, ? Objects/s]
Resolving: 0%| | 0.00/537 [00:00<?, ? Deltas/s]
[INFO ] Remote origin not usable by git-annex; setting annex-ignore
[INFO ] https://github.com/OpenNeuroDatasets/ds000102.git/config download failed: Not Found
[INFO ] access to 1 dataset sibling s3-PRIVATE not auto-enabled, enable with:
| datalad siblings -d "/home/jovyan/neurodeskedu/books/examples/functional_imaging/ds000102" enable -s s3-PRIVATE
install(ok): /home/jovyan/neurodeskedu/books/examples/functional_imaging/ds000102 (dataset)
Total: 0%| | 0.00/67.8M [00:00<?, ? Bytes/s]
Get sub-08/a .. 8_T1w.nii.gz: 0%| | 0.00/10.6M [00:00<?, ? Bytes/s]
Get sub-08/a .. 8_T1w.nii.gz: 0%| | 33.4k/10.6M [00:00<01:07, 155k Bytes/s]
Get sub-08/a .. 8_T1w.nii.gz: 1%| | 85.6k/10.6M [00:00<00:51, 205k Bytes/s]
Get sub-08/a .. 8_T1w.nii.gz: 1%| | 155k/10.6M [00:00<00:40, 255k Bytes/s]
Get sub-08/a .. 8_T1w.nii.gz: 3%|▏ | 277k/10.6M [00:00<00:27, 373k Bytes/s]
Get sub-08/a .. 8_T1w.nii.gz: 5%|▎ | 538k/10.6M [00:01<00:15, 661k Bytes/s]
Get sub-08/a .. 8_T1w.nii.gz: 10%|▎ | 1.04M/10.6M [00:01<00:07, 1.20M Bytes/s]
Get sub-08/a .. 8_T1w.nii.gz: 18%|▌ | 1.95M/10.6M [00:01<00:05, 1.57M Bytes/s]
Get sub-08/a .. 8_T1w.nii.gz: 31%|▉ | 3.32M/10.6M [00:01<00:02, 2.83M Bytes/s]
Get sub-08/a .. 8_T1w.nii.gz: 47%|█▍ | 4.93M/10.6M [00:02<00:01, 3.18M Bytes/s]
Get sub-08/a .. 8_T1w.nii.gz: 63%|█▉ | 6.62M/10.6M [00:02<00:00, 4.85M Bytes/s]
Get sub-08/a .. 8_T1w.nii.gz: 76%|██▎| 7.98M/10.6M [00:02<00:00, 4.54M Bytes/s]
Get sub-08/a .. 8_T1w.nii.gz: 84%|██▌| 8.86M/10.6M [00:02<00:00, 5.12M Bytes/s]
Get sub-08/a .. 8_T1w.nii.gz: 93%|██▊| 9.81M/10.6M [00:03<00:00, 4.88M Bytes/s]
Get sub-08/a .. 8_T1w.nii.gz: 0%| | 0.00/10.6M [00:00<?, ? Bytes/s]
Total: 16%|████ | 10.6M/67.8M [00:04<00:24, 2.36M Bytes/s]
Get sub-08/f .. _bold.nii.gz: 0%| | 0.00/28.6M [00:00<?, ? Bytes/s]
Get sub-08/f .. _bold.nii.gz: 4%| | 1.02M/28.6M [00:00<00:05, 4.72M Bytes/s]
Get sub-08/f .. _bold.nii.gz: 7%|▏ | 2.05M/28.6M [00:00<00:05, 4.62M Bytes/s]
Get sub-08/f .. _bold.nii.gz: 11%|▎ | 3.09M/28.6M [00:00<00:05, 4.87M Bytes/s]
Get sub-08/f .. _bold.nii.gz: 15%|▍ | 4.16M/28.6M [00:00<00:05, 4.68M Bytes/s]
Get sub-08/f .. _bold.nii.gz: 18%|▌ | 5.23M/28.6M [00:01<00:04, 4.75M Bytes/s]
Get sub-08/f .. _bold.nii.gz: 22%|▋ | 6.29M/28.6M [00:01<00:04, 4.80M Bytes/s]
Get sub-08/f .. _bold.nii.gz: 26%|▊ | 7.37M/28.6M [00:01<00:04, 4.81M Bytes/s]
Get sub-08/f .. _bold.nii.gz: 30%|▉ | 8.47M/28.6M [00:01<00:04, 4.84M Bytes/s]
Get sub-08/f .. _bold.nii.gz: 33%|█ | 9.58M/28.6M [00:01<00:03, 4.96M Bytes/s]
Get sub-08/f .. _bold.nii.gz: 37%|█ | 10.7M/28.6M [00:02<00:03, 5.38M Bytes/s]
Get sub-08/f .. _bold.nii.gz: 39%|█▏ | 11.3M/28.6M [00:02<00:03, 5.53M Bytes/s]
Get sub-08/f .. _bold.nii.gz: 45%|█▎ | 12.7M/28.6M [00:02<00:02, 5.43M Bytes/s]
Get sub-08/f .. _bold.nii.gz: 49%|█▍ | 14.1M/28.6M [00:02<00:03, 4.72M Bytes/s]
Get sub-08/f .. _bold.nii.gz: 53%|█▌ | 15.2M/28.6M [00:03<00:02, 4.89M Bytes/s]
Get sub-08/f .. _bold.nii.gz: 57%|█▋ | 16.3M/28.6M [00:03<00:02, 4.97M Bytes/s]
Get sub-08/f .. _bold.nii.gz: 61%|█▊ | 17.5M/28.6M [00:03<00:02, 5.04M Bytes/s]
Get sub-08/f .. _bold.nii.gz: 65%|█▉ | 18.5M/28.6M [00:03<00:01, 5.83M Bytes/s]
Get sub-08/f .. _bold.nii.gz: 68%|██ | 19.6M/28.6M [00:03<00:01, 5.58M Bytes/s]
Get sub-08/f .. _bold.nii.gz: 72%|██▏| 20.5M/28.6M [00:04<00:01, 5.10M Bytes/s]
Get sub-08/f .. _bold.nii.gz: 76%|██▎| 21.7M/28.6M [00:04<00:01, 5.25M Bytes/s]
Get sub-08/f .. _bold.nii.gz: 80%|██▍| 22.9M/28.6M [00:04<00:01, 5.29M Bytes/s]
Get sub-08/f .. _bold.nii.gz: 83%|██▍| 23.9M/28.6M [00:04<00:00, 4.99M Bytes/s]
Get sub-08/f .. _bold.nii.gz: 88%|██▋| 25.1M/28.6M [00:04<00:00, 5.26M Bytes/s]
Get sub-08/f .. _bold.nii.gz: 92%|██▊| 26.3M/28.6M [00:05<00:00, 5.31M Bytes/s]
Get sub-08/f .. _bold.nii.gz: 96%|██▉| 27.6M/28.6M [00:05<00:00, 5.44M Bytes/s]
Get sub-08/f .. _bold.nii.gz: 0%| | 0.00/28.6M [00:00<?, ? Bytes/s]
Total: 58%|███████████████ | 39.2M/67.8M [00:10<00:07, 3.75M Bytes/s]
Get sub-08/f .. _bold.nii.gz: 0%| | 0.00/28.6M [00:00<?, ? Bytes/s]
Get sub-08/f .. _bold.nii.gz: 3%|▏ | 912k/28.6M [00:00<00:06, 4.02M Bytes/s]
Get sub-08/f .. _bold.nii.gz: 6%|▏ | 1.68M/28.6M [00:00<00:11, 2.36M Bytes/s]
Get sub-08/f .. _bold.nii.gz: 9%|▎ | 2.51M/28.6M [00:00<00:09, 2.85M Bytes/s]
Get sub-08/f .. _bold.nii.gz: 12%|▎ | 3.35M/28.6M [00:01<00:07, 3.17M Bytes/s]
Get sub-08/f .. _bold.nii.gz: 15%|▍ | 4.23M/28.6M [00:01<00:07, 3.43M Bytes/s]
Get sub-08/f .. _bold.nii.gz: 18%|▌ | 5.12M/28.6M [00:01<00:06, 3.63M Bytes/s]
Get sub-08/f .. _bold.nii.gz: 21%|▋ | 6.02M/28.6M [00:01<00:05, 4.31M Bytes/s]
Get sub-08/f .. _bold.nii.gz: 24%|▋ | 6.99M/28.6M [00:01<00:05, 3.79M Bytes/s]
Get sub-08/f .. _bold.nii.gz: 28%|▊ | 7.92M/28.6M [00:02<00:05, 4.11M Bytes/s]
Get sub-08/f .. _bold.nii.gz: 31%|▉ | 8.92M/28.6M [00:02<00:04, 4.05M Bytes/s]
Get sub-08/f .. _bold.nii.gz: 35%|█ | 9.90M/28.6M [00:02<00:04, 4.17M Bytes/s]
Get sub-08/f .. _bold.nii.gz: 38%|█▏ | 10.9M/28.6M [00:02<00:04, 4.31M Bytes/s]
Get sub-08/f .. _bold.nii.gz: 42%|█▎ | 11.9M/28.6M [00:03<00:03, 4.40M Bytes/s]
Get sub-08/f .. _bold.nii.gz: 45%|█▎ | 13.0M/28.6M [00:03<00:03, 4.51M Bytes/s]
Get sub-08/f .. _bold.nii.gz: 49%|█▍ | 14.0M/28.6M [00:03<00:03, 4.57M Bytes/s]
Get sub-08/f .. _bold.nii.gz: 53%|█▌ | 15.1M/28.6M [00:03<00:02, 5.14M Bytes/s]
Get sub-08/f .. _bold.nii.gz: 56%|█▋ | 16.2M/28.6M [00:03<00:02, 4.57M Bytes/s]
Get sub-08/f .. _bold.nii.gz: 60%|█▊ | 17.2M/28.6M [00:04<00:02, 4.73M Bytes/s]
Get sub-08/f .. _bold.nii.gz: 64%|█▉ | 18.3M/28.6M [00:04<00:02, 4.73M Bytes/s]
Get sub-08/f .. _bold.nii.gz: 68%|██ | 19.4M/28.6M [00:04<00:01, 4.78M Bytes/s]
Get sub-08/f .. _bold.nii.gz: 72%|██▏| 20.6M/28.6M [00:04<00:01, 4.92M Bytes/s]
Get sub-08/f .. _bold.nii.gz: 76%|██▎| 21.7M/28.6M [00:05<00:01, 4.94M Bytes/s]
Get sub-08/f .. _bold.nii.gz: 80%|██▍| 22.8M/28.6M [00:05<00:01, 5.85M Bytes/s]
Get sub-08/f .. _bold.nii.gz: 84%|██▌| 23.9M/28.6M [00:05<00:00, 4.84M Bytes/s]
Get sub-08/f .. _bold.nii.gz: 87%|██▌| 25.0M/28.6M [00:05<00:00, 5.26M Bytes/s]
Get sub-08/f .. _bold.nii.gz: 90%|██▋| 25.8M/28.6M [00:05<00:00, 5.69M Bytes/s]
Get sub-08/f .. _bold.nii.gz: 95%|██▊| 27.3M/28.6M [00:06<00:00, 4.80M Bytes/s]
Get sub-08/f .. _bold.nii.gz: 99%|██▉| 28.5M/28.6M [00:06<00:00, 4.93M Bytes/s]
Get sub-08/f .. _bold.nii.gz: 0%| | 0.00/28.6M [00:00<?, ? Bytes/s]
get(ok): sub-08/anat/sub-08_T1w.nii.gz (file) [from s3-PUBLIC...]
get(ok): sub-08/func/sub-08_task-flanker_run-1_bold.nii.gz (file) [from s3-PUBLIC...]
get(ok): sub-08/func/sub-08_task-flanker_run-2_bold.nii.gz (file) [from s3-PUBLIC...]
get(ok): sub-08 (directory)
action summary:
get (ok: 4)
The data is structured in BIDS format:
!tree -L 4 ds000102Inspecting the anatomical and functional images
To use the AFNI graphical user interface, you would type:
afni sub-08_T1w.nii.gzWe will use ipyniivue to look at the data:
Many of the quality checks for the functional images are similar to those for the anatomical images. Look out for excessively bright or dark spots in the grey or white matter, as well as any image distortions, such as abnormal stretching or warping. A common area where slight distortion may occur is in the orbitofrontal region, just above the eyeballs.
Additionally, it’s important to check for excessive motion during the scan.
#take the one volume to visualize for file size reasons
index_img("./ds000102/sub-08/func/sub-08_task-flanker_run-1_bold.nii.gz", 0).to_filename("./sub-08_task-flanker_run-1_bold_vol0.nii.gz")
index_img("./ds000102/sub-08/func/sub-08_task-flanker_run-2_bold.nii.gz", 0).to_filename("./sub-08_task-flanker_run-2_bold_vol0.nii.gz")
anat_image = './ds000102/sub-08/anat/sub-08_T1w.nii.gz'
func1_image = './ds000102/sub-08/func/sub-08_task-flanker_run-1_bold.nii.gz'
func2_image = './ds000102/sub-08/func/sub-08_task-flanker_run-2_bold.nii.gz'# anatomical image
nv = NiiVue()
nv.load_volumes([{"path": anat_image}])
nv# functional run 1
nv = NiiVue()
nv.load_volumes([{"path": "./sub-08_task-flanker_run-1_bold_vol0.nii.gz"}])
nvAFNI Commands and Preprocessing
We will be working with the data from subject sub-08. First, we’ll introduce basic AFNI commands. Then, we’ll create a processing script using afni_proc.py, which automates the entire preprocessing workflow. AFNI also provides graphical user interfaces (GUIs), such as uber_subject.py and uber_ttest.py (for group analysis), which help build processing scripts by combining many commands in the correct order. However, since GUIs cannot be used within a Jupyter Notebook environment, we will focus on writing the scripts directly.
After setting up the automated script, we’ll walk through each preprocessing step individually and discuss how to check data quality before and after each step.
1: AFNI Commands
2: Preprocessing with
afni_prc.pyRegistration and Normalization
Alignment and Motion Correction
Smoothing
Masking and Scaling
Checking Preprocessing
1. AFNI commands
AFNI commands typicallly require at least one argument, or input, and they also usually require you to specify what to call the output of the command.
Let’s take skull-stripping, for example - a common preprocessing step that removes the skull from the brain. The AFNI command to do this step is called 3dSkullStrip. Use the -h flag to print the help page.
!3dSkullStrip -h
Usage: A program to extract the brain from surrounding.
  tissue from MRI T1-weighted images.
  The simplest command would be:
        3dSkullStrip <-input DSET>

  Also consider the script @SSwarper, which combines the use of
  3dSkullStrip and nonlinear warping to an MNI template to produce
  a skull-stripped dataset in MNI space, plus the nonlinear warp
  that can used to transform other datasets from the same subject
  (e.g., EPI) to MNI space. (This script only applies to human brain
  images.)

  The fully automated process consists of three steps:
  1- Preprocessing of volume to remove gross spatial image
  non-uniformity artifacts and reposition the brain in
  a reasonable manner for convenience.
    ** Note that in many cases, using 3dUnifize before **
    ** using 3dSkullStrip will give better results.    **
  2- Expand a spherical surface iteratively until it envelopes
  the brain. This is a modified version of the BET algorithm:
     Fast robust automated brain extraction,
      by Stephen M. Smith, HBM 2002 v 17:3 pp 143-155
    Modifications include the use of:
     . outer brain surface
     . expansion driven by data inside and outside the surface
     . avoidance of eyes and ventricles
     . a set of operations to avoid the clipping of certain brain
       areas and reduce leakage into the skull in heavily shaded
       data
     . two additional processing stages to ensure convergence and
       reduction of clipped areas.
     . use of 3d edge detection, see Deriche and Monga references
       in 3dedge3 -help.
  3- The creation of various masks and surfaces modeling brain
     and portions of the skull

  Common examples of usage:
  -------------------------
  o 3dSkullStrip -input VOL -prefix VOL_PREFIX
     Vanilla mode, should work for most datasets.
  o 3dSkullStrip -input VOL -prefix VOL_PREFIX -push_to_edge
     Adds an aggressive push to brain edges. Use this option
     when the chunks of gray matter are not included. This option
     might cause the mask to leak into non-brain areas.
  o 3dSkullStrip -input VOL -surface_coil -prefix VOL_PREFIX -monkey
     Vanilla mode, for use with monkey data.
  o 3dSkullStrip -input VOL -prefix VOL_PREFIX -ld 30
     Use a denser mesh, in the cases where you have lots of
     csf between gyri. Also helps when some of the brain is clipped
     close to regions of high curvature.

  Tips:
  -----
     I ran the program with the default parameters on 200+ datasets.
     The results were quite good in all but a couple of instances, here
     are some tips on fixing trouble spots:

     Clipping in frontal areas, close to the eye balls:
        + Try -push_to_edge option first.
          Can also try -no_avoid_eyes option.
     Clipping in general:
        + Try -push_to_edge option first.
          Can also use lower -shrink_fac, start with 0.5 then 0.4
     Problems down below:
        + Piece of cerebellum missing, reduce -shrink_fac_bot_lim
          from default value.
        + Leakage in lower areas, increase -shrink_fac_bot_lim
          from default value.
     Some lobules are not included:
        + Use a denser mesh. Start with -ld 30. If that still fails,
        try even higher density (like -ld 50) and increase iterations
        (say to -niter 750).
        Expect the program to take much longer in that case.
        + Instead of using denser meshes, you could try blurring the data
        before skull stripping. Something like -blur_fwhm 2 did
        wonders for some of my data with the default options of 3dSkullStrip
        Blurring is a lot faster than increasing mesh density.
        + Use also a smaller -shrink_fac is you have lots of CSF between
        gyri.
     Massive chunks missing:
        + If brain has very large ventricles and lots of CSF between gyri,
        the ventricles will keep attracting the surface inwards.
        This often happens with older brains. In such
        cases, use the -visual option to see what is happening.
        For example, the options below did the trick in various
        instances.
            -blur_fwhm 2 -use_skull
        or for more stubborn cases increase csf avoidance with this cocktail
            -blur_fwhm 2 -use_skull -avoid_vent -avoid_vent -init_radius 75
        + Too much neck in the volume might throw off the initialization
          step. You can fix this by clipping tissue below the brain with
                 @clip_volume -below ZZZ -input INPUT
          where ZZZ is a Z coordinate somewhere below the brain.

     Large regions outside brain included:
       + Usually because noise level is high. Try @NoisySkullStrip.

  Make sure that brain orientation is correct. This means the image in
  AFNI's axial slice viewer should be close to the brain's axial plane.
  The same goes for the other planes. Otherwise, the program might do a lousy
  job removing the skull.

  Eye Candy Mode:
  ---------------
  You can run 3dSkullStrip and have it send successive iterations
 to SUMA and AFNI. This is very helpful in following the
 progression of the algorithm and determining the source
 of trouble, if any.
  Example:
     afni -niml -yesplugouts &
     suma -niml &
     3dSkullStrip -input Anat+orig -o_ply anat_brain -visual

  Help section for the intrepid:
  ------------------------------
  3dSkullStrip  < -input VOL >
             [< -o_TYPE PREFIX >] [< -prefix VOL_PREFIX >]
             [< -spatnorm >] [< -no_spatnorm >] [< -write_spatnorm >]
             [< -niter N_ITER >] [< -ld LD >]
             [< -shrink_fac SF >] [< -var_shrink_fac >]
             [< -no_var_shrink_fac >] [< -shrink_fac_bot_lim SFBL >]
             [< -pushout >] [< -no_pushout >] [< -exp_frac FRAC]
             [< -touchup >] [< -no_touchup >]
             [< -fill_hole R >] [< -NN_smooth NN_SM >]
             [< -smooth_final SM >] [< -avoid_vent >] [< -no_avoid_vent >]
             [< -use_skull >] [< -no_use_skull >]
             [< -avoid_eyes >] [< -no_avoid_eyes >]
             [< -use_edge >] [< -no_use_edge >]
             [< -push_to_edge >] [<-no_push_to_edge>]
             [< -perc_int PERC_INT >]
             [< -max_inter_iter MII >] [-mask_vol | -orig_vol | -norm_vol]
             [< -debug DBG >] [< -node_debug NODE_DBG >]
             [< -demo_pause >]
             [< -monkey >] [< -marmoset >] [<-rat>]

  NOTE: Please report bugs and strange failures
        to saadz@mail.nih.gov

  Mandatory parameters:
     -input VOL: Input AFNI (or AFNI readable) volume.


  Optional Parameters:
     -monkey: the brain of a monkey.
     -marmoset: the brain of a marmoset.
                this one was tested on one dataset
                and may not work with non default
                options. Check your results!
     -rat: the brain of a rat.
           By default, no_touchup is used with the rat.
     -surface_coil: Data acquired with a surface coil.
     -o_TYPE PREFIX: prefix of output surface.
        where TYPE specifies the format of the surface
        and PREFIX is, well, the prefix.
        TYPE is one of: fs, 1d (or vec), sf, ply.
        More on that below.
     -skulls: Output surface models of the skull.
     -4Tom:   The output surfaces are named based
             on PREFIX following -o_TYPE option below.
     -prefix VOL_PREFIX: prefix of output volume.
        If not specified, the prefix is the same
        as the one used with -o_TYPE.
        The output volume is skull stripped version
        of the input volume. In the earlier version
        of the program, a mask volume was written out.
        You can still get that mask volume instead of the
        skull-stripped volume with the option -mask_vol .
        NOTE: In the default setting, the output volume does not
              have values identical to those in the input.
              In particular, the range might be larger
              and some low-intensity values are set to 0.
              If you insist on having the same range of values as in
              the input, then either use option -orig_vol, or run:
         3dcalc -nscale -a VOL+VIEW -b VOL_PREFIX+VIEW \
                -expr 'a*step(b)' -prefix VOL_SAME_RANGE
              With the command above, you can preserve the range
              of values of the input but some low-intensity voxels would
              still be masked. If you want to preserve them, then use
              -mask_vol in the 3dSkullStrip command that would produce
              VOL_MASK_PREFIX+VIEW. Then run 3dcalc masking with voxels
              inside the brain surface envelope:
         3dcalc -nscale -a VOL+VIEW -b VOL_MASK_PREFIX+VIEW \
                -expr 'a*step(b-3.01)' -prefix VOL_SAME_RANGE_KEEP_LOW
     -norm_vol: Output a masked and somewhat intensity normalized and
                thresholded version of the input. This is the default,
                and you can use -orig_vol to override it.
     -orig_vol: Output a masked version of the input AND do not modify
                the values inside the brain as -norm_vol would.
     -mask_vol: Output a mask volume instead of a skull-stripped
                volume.
                The mask volume contains:
                 0: Voxel outside surface
                 1: Voxel just outside the surface. This means the voxel
                    center is outside the surface but inside the
                    bounding box of a triangle in the mesh.
                 2: Voxel intersects the surface (a triangle), but center
                    lies outside.
                 3: Voxel contains a surface node.
                 4: Voxel intersects the surface (a triangle), center lies
                    inside surface.
                 5: Voxel just inside the surface. This means the voxel
                    center is inside the surface and inside the
                    bounding box of a triangle in the mesh.
                 6: Voxel inside the surface.
     -spat_norm: (Default) Perform spatial normalization first.
                 This is a necessary step unless the volume has
                 been 'spatnormed' already.
     -no_spatnorm: Do not perform spatial normalization.
                   Use this option only when the volume
                   has been run through the 'spatnorm' process
     -spatnorm_dxyz DXYZ: Use DXY for the spatial resolution of the
                          spatially normalized volume. The default
                          is the lowest of all three dimensions.
                          For human brains, use DXYZ of 1.0, for
                          primate brain, use the default setting.
     -write_spatnorm: Write the 'spatnormed' volume to disk.
     -niter N_ITER: Number of iterations. Default is 250
        For denser meshes, you need more iterations
        N_ITER of 750 works for LD of 50.
     -ld LD: Parameter to control the density of the surface.
             Default is 20 if -no_use_edge is used,
             30 with -use_edge. See CreateIcosahedron -help
             for details on this option.
     -shrink_fac SF: Parameter controlling the brain vs non-brain
             intensity threshold (tb). Default is 0.6.
              tb = (Imax - t2) SF + t2
             where t2 is the 2 percentile value and Imax is the local
             maximum, limited to the median intensity value.
             For more information on tb, t2, etc. read the BET paper
             mentioned above. Note that in 3dSkullStrip, SF can vary across
             iterations and might be automatically clipped in certain areas.
             SF can vary between 0 and 1.
             0: Intensities < median inensity are considered non-brain
             1: Intensities < t2 are considered non-brain
     -var_shrink_fac: Vary the shrink factor with the number of
             iterations. This reduces the likelihood of a surface
             getting stuck on large pools of CSF before reaching
             the outer surface of the brain. (Default)
     -no_var_shrink_fac: Do not use var_shrink_fac.
     -shrink_fac_bot_lim SFBL: Do not allow the varying SF to go
             below SFBL . Default 0.65, 0.4 when edge detection is used.
             This option helps reduce potential for leakage below
             the cerebellum.
             In certain cases where you have severe non-uniformity resulting
             in low signal towards the bottom of the brain, you will need to
             reduce this parameter.
     -pushout: Consider values above each node in addition to values
               below the node when deciding on expansion. (Default)
     -no_pushout: Do not use -pushout.
     -exp_frac FRAC: Speed of expansion (see BET paper). Default is 0.1.
     -touchup: Perform touchup operations at end to include
               areas not covered by surface expansion.
               Use -touchup -touchup for aggressive makeup.
               (Default is -touchup)
     -no_touchup: Do not use -touchup
     -fill_hole R: Fill small holes that can result from small surface
                   intersections caused by the touchup operation.
                   R is the maximum number of pixels on the side of a hole
                   that can be filled. Big holes are not filled.
                   If you use -touchup, the default R is 10. Otherwise
                   the default is 0.
                   This is a less than elegant solution to the small
                   intersections which are usually eliminated
                   automatically.
     -NN_smooth NN_SM: Perform Nearest Neighbor coordinate interpolation
                       every few iterations. Default is 72
     -smooth_final SM: Perform final surface smoothing after all iterations.
                       Default is 20 smoothing iterations.
                       Smoothing is done using Taubin's method,
                       see SurfSmooth -help for detail.
     -avoid_vent: avoid ventricles. Default.
                  Use this option twice to make the avoidance more
                  aggressive. That is at times needed with old brains.
     -no_avoid_vent: Do not use -avoid_vent.
     -init_radius RAD: Use RAD for the initial sphere radius.
                       For the automatic setting, there is an
                       upper limit of 100mm for humans.
                       For older brains with lots of CSF, you
                       might benefit from forcing the radius
                       to something like 75mm
     -avoid_eyes: avoid eyes. Default
     -no_avoid_eyes: Do not use -avoid_eyes.
     -use_edge: Use edge detection to reduce leakage into meninges and eyes.
                Default.
     -no_use_edge: Do no use edges.
     -push_to_edge: Perform aggressive push to edge at the end.
                    This option might cause leakage.
     -no_push_to_edge: (Default).
     -use_skull: Use outer skull to limit expansion of surface into
                 the skull due to very strong shading artifacts.
                 This option is buggy at the moment, use it only
                 if you have leakage into skull.
     -no_use_skull: Do not use -use_skull (Default).
     -send_no_skull: Do not send the skull surface to SUMA if you are
                     using  -talk_suma
     -perc_int PERC_INT: Percentage of segments allowed to intersect
                         surface. Ideally this should be 0 (Default).
                         However, few surfaces might have small stubborn
                         intersections that produce a few holes.
                         PERC_INT should be a small number, typically
                         between 0 and 0.1. A -1 means do not do
                         any testing for intersection.
     -max_inter_iter N_II: Number of iteration to remove intersection
                           problems. With each iteration, the program
                           automatically increases the amount of smoothing
                           to get rid of intersections. Default is 4
     -blur_fwhm FWHM: Blur dset after spatial normalization.
                      Recommended when you have lots of CSF in brain
                      and when you have protruding gyri (finger like)
                      Recommended value is 2..4.
     -interactive: Make the program stop at various stages in the
                   segmentation process for a prompt from the user
                   to continue or skip that stage of processing.
                   This option is best used in conjunction with options
                   -talk_suma and -feed_afni
     -demo_pause: Pause at various step in the process to facilitate
                  interactive demo while 3dSkullStrip is communicating
                  with AFNI and SUMA. See 'Eye Candy' mode below and
                  -talk_suma option.
     -fac FAC: Multiply input dataset by FAC if range of values is too
               small.

     -visual: Equivalent to using -talk_suma -feed_afni -send_kth 5

     -debug DBG: debug levels of 0 (default), 1, 2, 3.
        This is no Rick Reynolds debug, which is oft nicer
        than the results, but it will do.
     -node_debug NODE_DBG: Output lots of parameters for node
                         NODE_DBG for each iteration.
     The next 3 options are for specifying surface coordinates
     to keep the program from having to recompute them.
     The options are only useful for saving time during debugging.
     -brain_contour_xyz_file BRAIN_CONTOUR_XYZ.1D
     -brain_hull_xyz_file BRAIN_HULL_XYZ.1D
     -skull_outer_xyz_file SKULL_OUTER_XYZ.1D
     -help: The help you need


Compile Date:
   Jul  4 2025

       Ziad S. Saad SSCC/NIMH/NIH saadz@mail.nih.gov
One of AFNI’s major advantages is the quality of its documentation and help resources. Each command’s usage is thoroughly described, and the purpose behind various options is clearly explained. Example commands are provided to illustrate how to handle different situations — for instance, if too much skull remains after skull-stripping, you might be advised to use a flag like -push_to_edge.
The simplest way to run 3dSkullStrip is by using the -input option to specify the anatomical dataset for processing. The -prefix option is also used to output a NIfTI image for visualization with ipyniivue.
if not os.path.exists('anat_ss.nii.gz'):
    !3dSkullStrip -input $anat_image -prefix anat_ss.nii.gz
else:
    print("anat_ss.nii.gz already exists, skipping skull stripping")
The intensity in the output dataset is a modified version
of the intensity in the input volume.
To obtain a masked version of the input with identical values inside
the brain, you can either use 3dSkullStrip's -orig_vol option
or run the following command:
3dcalc -a ./ds000102/sub-08/anat/sub-08_T1w.nii.gz -b ./anat_ss.nii.gz+orig -expr 'a*step(b)' \
-prefix ./anat_ss.nii.gz_orig_vol
to generate a new masked version of the input.
volumes = [{"path": anat_image},
        {"path": "./anat_ss.nii.gz", "colormap": "red"}]

nv = NiiVue()
nv.load_volumes(volumes)
nv2. Preprocessing
To automate preprocessing in AFNI, the powerful afni_proc.py tool is used. This command generates a fully customizable tcsh script that includes all necessary preprocessing steps, from slice timing correction to scaling.
The basic idea is:
Specify which processing blocks to apply.
afni_proc.pywrites a script to carry them out in the correct order.The generated script can be reviewed and run, or modified if needed.
Several options are added beyond the defaults to improve alignment quality
(-align_unifize_epi, -cost lpc+ZZ, -check_flip), add QC outputs
(-radial_correlate_blocks, -volreg_compute_tsnr), and ensure a consistent
final voxel size (-volreg_warp_dxyz 3.0).
The processing blocks include both automatic steps (such as setup and initial time concatenation) and default blocks that you can customize, skip, or reorder. For example:
Automatic blocks (the tcsh script will always perform these):
-setup: Set up subject information, create output directory (subj_id, script, out_dir)
-tcat: Remove unwanted initial TRs.
Default blocks (the user may skip these, or alter their order):
-tshift: Slice timing correction.
-volreg: Volume registration (motion correction).
-blur: Spatial smoothing.
-mask: Create a brain mask from EPI data.
-scale: Normalize voxel-wise signal intensities.
-regress: (optional) Regression analysis for task-based designs.
Optional blocks (the default is to not apply these blocks):
-align: EPI-to-anatomical alignment.
-tlrc: Warp anatomical to MNI standard space.
A full list of options and help can be found in the AFNI documentation.
The following command specifies key preprocessing steps for sub-08, including slice timing correction, EPI-to-anatomical alignment, normalization to MNI space, motion correction, smoothing, and scaling. Several options are added to improve alignment quality (-align_unifize_epi, -cost lpc+ZZ, -check_flip), add QC outputs (-radial_correlate_blocks, -volreg_compute_tsnr), and ensure a consistent final voxel size (-volreg_warp_dxyz 3.0).
➡️
setup ➡️ tcat ➡️ tshift ➡️ align ➡️ tlrc ➡️ volreg ➡️ blur ➡️ mask ➡️ scale ➡️ 🧠✅ outputs: preprocessed EPI, brain mask, tSNR map, motion parameters, and QC reports.
!afni_proc.py                                                                \
    -subj_id                 sub_08                                          \
    -script                  proc.sub_08                                     \
    -scr_overwrite                                                           \
    -out_dir                 ./afni_processing/sub_08.results                \
    -blocks                  tshift align tlrc volreg blur mask scale        \
    -copy_anat               $anat_image                                     \
    -dsets                                                                   \
                             $func1_image                                    \
                             $func2_image                                    \
    -radial_correlate_blocks tcat volreg                                     \
    -tcat_remove_first_trs   0                                               \
    -align_unifize_epi       local                                           \
    -align_opts_aea          -cost lpc+ZZ                                    \
                             -giant_move                                     \
                             -check_flip                                     \
    -tlrc_base               MNI152_2009_template_SSW.nii.gz                 \
    -tlrc_opts_at            -init_xform AUTO_CENTER                         \
    -volreg_align_to         MIN_OUTLIER                                     \
    -volreg_align_e2a                                                        \
    -volreg_tlrc_warp                                                        \
    -volreg_compute_tsnr     yes                                             \
    -volreg_warp_dxyz        3.0                                             \
    -mask_epi_anat           yes                                             \
    -blur_size               5.0
-- applying input view as +orig
-- template = 'MNI152_2009_template_SSW.nii.gz', exists = 1
-- will use min outlier volume as motion base
-- including default: -find_var_line_blocks tcat
-- tcat: reps is now 146
++ updating polort to 2, from run len 292.0 s
-- volreg: using base dset vr_base_min_outlier+orig
++ volreg: applying volreg/epi2anat/tlrc xforms to isotropic 3 mm tlrc voxels
-- applying anat warps to 1 dataset(s): sub-08_T1w
++ mask: using epi_anat mask in place of EPI one
-- masking: group anat = 'MNI152_2009_template_SSW.nii.gz', exists = 1
-- have 1 ROI dict entries ...
-- no regress block, skipping gen_ss_review_scripts.py
-- using default: will not apply EPI Automask
(see 'MASKING NOTE' from the -help for details)
--> script is file: proc.sub_08
to execute via tcsh:
tcsh -xef proc.sub_08 |& tee output.proc.sub_08
to execute via bash:
tcsh -xef proc.sub_08 2>&1 | tee output.proc.sub_08
Run the Preprocessing Script and Inspect the Output
Now that we have generated our preprocessing script proc.sub_08, we can execute it via tcsh and save a full record of the output in a file called output.proc.sub_08.
! tcsh -xef proc.sub_08 |& tee output.proc.sub_08🔔 While running, pay attention to the following warnings and notes:
3dTshift Warning:
+ WARNING: dataset is already aligned in time!
+ WARNING: ==>> output dataset is just a copy of input dataset
✅ No action needed — this simply means no time-shifting was necessary. You could re-analyze this data by omitting both the 3dTcat and 3dTshift preprocessing steps, and it would get the same result.
Visual alignment:
++ ###########################################################
++ #   PLEASE check results VISUALLY for alignment quality   #
++ ###########################################################


*+ WARNING: -cmass was turned off, but might have been needed :(
 +           Please check your results - PLEASE PLEASE PLEASE
⚠️ We will inspect registration quality to confirm acceptable alignment in the results section.
While the preprocessing is running, here’s a brief overview of the key steps. For a more detailed explanation of each preprocessing stage, have another look at Andy’s Brain Book’s excellent tutorial.
Slice Time Correction
Even though slice timing correction is included as a block (tshift), in this dataset the slices were already aligned in time, as noted in the warning above. AFNI detected this and simply created a copy of the input data without modification.
The step is kept in the pipeline for completeness and generalizability to other datasets where slice timing correction would be needed.
Note: Although slice-timing correction is common, there are some general objections: it involves interpolating the data (which is best avoided when possible), it may not significantly improve results when the TR is short (e.g., around 1 second), and timing differences can sometimes be modeled later using a temporal derivative during model fitting.
# =================== tshift ===================
# time shift data so all slice timing is the same
foreach run ( $runs )
    3dTshift -tzero 0 -quintic -prefix pb01.$subj.r$run.tshift \
             pb00.$subj.r$run.tcat+orig
end
Registration and Normalization
Registration aligns the functional and anatomical images. It usually begins by assuming the images are roughly in the same space; if not, their outlines are aligned.
To fine-tune the alignment, the algorithm uses differences in contrast. AFNI’s
improved cost function lpc+ZZ builds on the standard Local Pearson Correlation
(LPC) method, which gives greater weight to brighter areas in the functional data,
with additional regularization for more robust alignment — particularly useful when
initial EPI-to-anatomical overlap is low.
Once a good alignment is found, the same transformations can later be applied to warp the functional images to a standard template.
In this example, AFNI’s align_epi_anat.py command is used to perform the registration. Although this tool can also handle slice-timing correction and functional volume alignment, it will be used here only for registration.
The key options used are:
3dLocalUnifize: Applies local intensity uniformization to the EPI base volume before alignment, improving registration quality by reducing signal inhomogeneity.-anat2epi: Aligns the anatomical image to the functional image (not the other way around), minimizing changes to the functional data.-suffix _al_junk: Adds a suffix to intermediate files, useful for later steps.-epi,-epi_base,-epi_strip: Chooses the functional volume with least variability as the reference and strips non-brain tissue using3dAutomask.-cost lpc+ZZ: Improved cost function for more robust EPI-to-anatomical alignment.-giant_move: Helps find an initial rough alignment if the images are very misaligned.-check_flip: Checks whether the EPI has been accidentally left-right flipped relative to the anatomical.-volreg off,-tshift off: Alignment and slice-timing correction are handled separately, not within this command.
Registration with align_epi_anat.py
# ================================= align ==================================
# run (localized) uniformity correction on EPI base
3dLocalUnifize -input vr_base_min_outlier+orig -prefix \
    vr_base_min_outlier_unif
align_epi_anat.py -anat2epi -anat sub-08_T1w+orig      \
     -save_skullstrip -suffix _al_junk                 \
     -epi vr_base_min_outlier_unif+orig -epi_base 0    \
     -epi_strip 3dAutomask                             \
     -cost lpc+ZZ -giant_move -check_flip              \
     -volreg off -tshift off
Normalization with @auto_tlrc
After registration, the anatomical image is normalized to a standard template (MNI152_2009_template_SSW.nii.gz) using AFNI’s @auto_tlrc command. Since the anatomical image has already been skull-stripped, the -no_ss option is used. Because the centers of the anatomical and template images are far apart, the -init_xform AUTO_CENTER option is included, , which roughly aligns the centers of the two images before the fine registration step.
The transformation needed to align the anatomical image to the template is stored as an affine matrix in the header of the anatomical image.
This matrix is then extracted with the cat_matvec command and saved as warp.anat.Xat.1D, so it can later be applied to the functional images as well.
#warp anatomy to standard space
@auto_tlrc -base MNI152_2009_template_SSW.nii.gz -input sub-08_T1w_ns+orig -no_ss \
    -init_xform AUTO_CENTER
#store forward transformation matrix in a text file
cat_matvec sub-08_T1w_ns+tlrc::WARP_DATA -I > warp.anat.Xat.1D
Alignment and Motion Correction
Motion correction is done with AFNI’s 3dvolreg command.
The functional volumes are aligned to a reference image, which is selected as the volume with the fewest outliers (identified using 3dToutcount earlier).
Motion parameters are saved into a text file (-1Dfile) and the corresponding affine transformation matrices into another file (-1Dmatrix_save).
# =================== volreg ===================
#register and warp
foreach run ( $runs )
    # register each volume to the base image
    3dvolreg -verbose -zpad 1 -base vr_base_min_outlier+orig   \
           -1Dfile dfile.r$run.1D -prefix rm.epi.volreg.r$run  \
           -cubic                                              \
           -1Dmatrix_save mat.r$run.vr.aff12.1D                \
            pb01.$subj.r$run.tshift+orig
These motion correction matrices are then concatenated with the matrices from
anatomical registration and normalization into a single combined transform using
cat_matvec.
#catenate volreg/epi2anat/tlrc xforms
    cat_matvec -ONELINE                                         \
               sub-08_T1w_ns+tlrc::WARP_DATA -I                 \
               sub-08_T1w_al_junk_mat.aff12.1D -I               \
               mat.r$run.vr.aff12.1D > mat.r$run.warp.aff12.1D
Using 3dAllineate and the -1Dmatrix_apply option, motion correction,
EPI-to-anatomical alignment, and normalization to MNI space are all applied
to the functional images in a single step, resampling to 3mm isotropic voxels
(-mast_dxyz 3). This single-step approach avoids accumulating interpolation
errors that would occur if each transformation were applied separately.
#warp the all-1 dataset for extents masking
3dAllineate -base sub-08_T1w_ns+tlrc                            \
            -input pb01.$subj.r$run.tshift+orig                 \
            -1Dmatrix_apply mat.r$run.warp.aff12.1D             \
            -mast_dxyz 3                                        \
            -prefix rm.epi.nomask.r$run
A tSNR (temporal signal-to-noise ratio) map is computed from run 1 by dividing the mean signal by the standard deviation of the detrended noise. This serves as a QC metric for assessing data quality after motion correction — higher tSNR indicates cleaner data.
# create tSNR dataset from run 1 for QC
3dTstat -mean -prefix rm.signal.vreg.r01 pb02.$subj.r01.volreg+tlrc
3dDetrend -polort 2 -prefix rm.noise.det -overwrite pb02.$subj.r01.volreg+tlrc
3dTstat -stdev -prefix rm.noise.vreg.r01 rm.noise.det+tlrc
3dcalc -a rm.signal.vreg.r01+tlrc                               \
       -b rm.noise.vreg.r01+tlrc                                \
       -c mask_epi_extents+tlrc                                 \
       -expr 'c*a/b' -prefix TSNR.vreg.r01.$subj
Radial correlation maps are then generated as an additional QC step, checking for coil artifacts or systematic alignment problems across the brain volume.
# QC: radial correlation maps
@radial_correlate -nfirst 0 -polort 2 -do_clean yes             \
                  -rdir radcor.pb02.volreg                      \
pb02.$subj.r*.volreg+tlrc.HEADSmoothing
Smoothing is done with AFNI’s 3dmerge command, which can be found under the “blur” header.
The -1blur_fwhm option applies spatial smoothing with a 5mm kernel, and -doall ensures smoothing is done across all volumes. After smoothing, the images are scaled to a mean intensity of 100, allowing changes to be interpreted as percent signal change. Finally, a brain mask, intersection of the EPI brain mask and the anatomical brain mask (-mask_epi_anat yes), is applied to remove non-brain voxels, preparing the data for statistical analysis.
# ==================== blur ====================
#blur each volume of each run
foreach run ( $runs )
    3dmerge -1blur_fwhm 5.0 -doall -prefix pb03.$subj.r$run.blur \
            pb02.$subj.r$run.volreg+tlrc
end
Masking and Scaling
Masking
fMRI datasets include not only brain voxels but also irrelevant areas like the skull, neck, and air. A mask is applied to focus analysis on brain voxels only.
The masking pipeline creates three masks:
EPI union mask:
3dAutomaskcreates a brain mask per run, combined into a union mask across runs.Anatomical mask: The anatomical image is resampled to the EPI grid and converted to a binary mask with holes filled.
EPI+anat intersection mask: The two masks are intersected to produce a tighter final mask, retaining only voxels present in both.
Overlap and Dice coefficients between masks are computed as a QC check on registration quality.
# ==================== mask ====================
# create 'full_mask' dataset (union mask)
foreach run ( $runs )
    3dAutomask -prefix rm.mask_r$run pb03.$subj.r$run.blur+tlrc
end
# create union of inputs, output type is byte
3dmask_tool -inputs rm.mask_r*+tlrc.HEAD -union -prefix full_mask.$subj
# create subject anatomy mask, mask_anat.$subj+tlrc (resampled from tlrc anat)
3dresample -master full_mask.$subj+tlrc -input sub-08_T1w_ns+tlrc \
-prefix rm.resam.anat
# convert to binary anat mask; fill gaps and holes
3dmask_tool -dilate_input 5 -5 -fill_holes -input rm.resam.anat+tlrc \
-prefix mask_anat.$subj# compute tighter EPI mask by intersecting with anat mask + QC
3dmask_tool -input full_mask.$subj+tlrc mask_anat.$subj+tlrc \
-inter -prefix mask_epi_anat.$subj
3dABoverlap -no_automask full_mask.$subj+tlrc mask_anat.$subj+tlrc \
|& tee out.mask_ae_overlap.txt
3ddot -dodice full_mask.$subj+tlrc mask_anat.$subj+tlrc \
|& tee out.mask_ae_dice.txt# create group mask from MNI template + QC
3dresample -master mask_epi_anat.$subj+tlrc -prefix ./rm.resam.group \
-input /usr/local/abin/MNI152_2009_template_SSW.nii.gz'[0]'
3dmask_tool -dilate_input 5 -5 -fill_holes -input rm.resam.group+tlrc \
-prefix mask_group
3ddot -dodice mask_anat.$subj+tlrc mask_group+tlrc \
|& tee out.mask_at_dice.txtScaling
fMRI signal intensities are arbitrary and vary between subjects and runs. To make meaningful comparisons, AFNI scales each voxel’s time series to a mean of 100, allowing for consistent signal intensity contrasts between conditions and across subjects.
# ==================== scale ====================
# scale each voxel time series to have a mean of 100
# (be sure no negatives creep in)
# (subject to a range of [0,200])
foreach run ( $runs )
    3dTstat -prefix rm.mean_r$run pb03.$subj.r$run.blur+tlrc
    3dcalc -a pb03.$subj.r$run.blur+tlrc -b rm.mean_r$run+tlrc \
           -c mask_epi_extents+tlrc                            \
           -expr 'c * min(200, a/b*100)*step(a)*step(b)'       \
           -prefix pb04.$subj.r$run.scale
end
Effect of Scaling: Before scaling, time-series values are arbitrary and vary between subjects. After scaling, each subject’s data is normalized to the same mean, enabling consistent comparisons across runs and subjects. To visualize both the original and scaled data with Matplotlib, the AFNI format needs to be converted to NIfTI format using the 3dAFNItonNIFI command.
The following plot compares the signal intensity time series from a voxel at the center of the brain, before and after scaling. The red dashed line indicates the mean signal intensity for each time series.
!3dAFNItoNIFTI -prefix ./afni_processing/sub_08.results/pb03.sub_08.r01.blur.nii.gz ./afni_processing/sub_08.results/pb03.sub_08.r01.blur+tlrc
!3dAFNItoNIFTI -prefix ./afni_processing/sub_08.results/pb04.sub_08.r01.scale.nii.gz ./afni_processing/sub_08.results/pb04.sub_08.r01.scale+tlrc
++ 3dAFNItoNIFTI: AFNI version=AFNI_25.2.03 (Jul 4 2025) [64-bit]
*+ WARNING: varying brick factors, writing NIfTI as float
++ 3dAFNItoNIFTI: AFNI version=AFNI_25.2.03 (Jul 4 2025) [64-bit]
*+ WARNING: varying brick factors, writing NIfTI as float
blur_nii = nib.load("./afni_processing/sub_08.results/pb03.sub_08.r01.blur.nii.gz").get_fdata()
scale_nii = nib.load("./afni_processing/sub_08.results/pb04.sub_08.r01.scale.nii.gz").get_fdata()

# Choose a voxel (e.g., center)
x, y, z = blur_nii.shape[0]//2, blur_nii.shape[1]//2, blur_nii.shape[2]//2
time_series1 = blur_nii[x, y, z, :]
time_series2 = scale_nii[x, y, z, :]
n_timepoints = time_series1.shape[0]

# Calculate the means of the time series
mean_time_series1 = time_series1.mean()
mean_time_series2 = time_series2.mean()

# Create subplots
fig, axs = plt.subplots(2, 1, figsize=(10, 6), sharex=True)

axs[0].plot(time_series1, color='blue')
axs[0].set_title("Signal intensity before scaling")
axs[0].set_ylabel("Signal Intensity")
axs[0].axhline(mean_time_series1, color='red', linestyle='--', linewidth=0.7, label=f"Mean: {mean_time_series1:.2f}")
axs[0].grid(True)
axs[0].legend()
axs[0].set_xlim(0, n_timepoints - 1)

axs[1].plot(time_series2, color='orange')
axs[1].set_title("Signal intensity after scaling")
axs[1].set_xlabel("Timepoint")
axs[1].set_ylabel("Signal Intensity")
axs[1].axhline(mean_time_series2, color='red', linestyle='--', linewidth=0.7, label=f"Mean: {mean_time_series2:.2f}")
axs[1].grid(True)
axs[1].legend()
axs[0].set_xlim(0, n_timepoints - 1)

plt.tight_layout()
plt.show()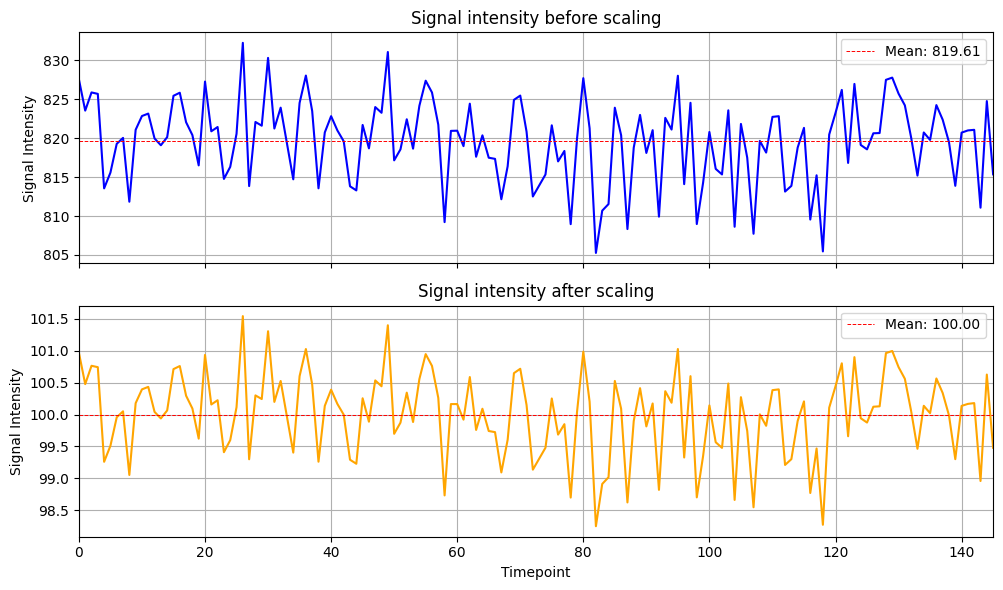
Results: Checking Preprocessing
Let’s have a look at the results directory. The files containing the pb string are the preprocessed functional images at each preprocessing step, and the files with the T1w string are the preprocessed anatomical images. Auxiliary functional images are created to assist with specific preprocessing steps, and auxiliary text files contain information about transformation matrices and movement parameter:
!ls ./afni_processing/sub_08.results@epi_review.sub_08
MNI152_2009_template_SSW.nii.gz
TSNR.vreg.r01.sub_08+tlrc.BRIK
TSNR.vreg.r01.sub_08+tlrc.HEAD
__tt_lr_flipcosts.1D
__tt_lr_noflipcosts.1D
aea_checkflip_results.txt
anat_final.sub_08+tlrc.BRIK
anat_final.sub_08+tlrc.HEAD
anat_w_skull_warped+tlrc.BRIK
anat_w_skull_warped+tlrc.HEAD
dfile.r01.1D
dfile.r02.1D
dfile_rall.1D
final_epi_vr_base_min_outlier+tlrc.BRIK
final_epi_vr_base_min_outlier+tlrc.HEAD
full_mask.sub_08+tlrc.BRIK
full_mask.sub_08+tlrc.HEAD
mask_anat.sub_08+tlrc.BRIK
mask_anat.sub_08+tlrc.HEAD
mask_epi_anat.sub_08+tlrc.BRIK
mask_epi_anat.sub_08+tlrc.HEAD
mask_epi_extents+tlrc.BRIK
mask_epi_extents+tlrc.HEAD
mask_group+tlrc.BRIK
mask_group+tlrc.HEAD
mat.basewarp.aff12.1D
mat.r01.vr.aff12.1D
mat.r01.warp.aff12.1D
mat.r02.vr.aff12.1D
mat.r02.warp.aff12.1D
motion_sub_08_enorm.1D
out.4095_all.txt
out.4095_warn.txt
out.allcostX.txt
out.mask_ae_dice.txt
out.mask_ae_overlap.txt
out.mask_at_dice.txt
out.min_outlier.txt
out.pre_ss_warn.txt
out.vlines.pb00.tcat.txt
outcount.r01.1D
outcount.r02.1D
outcount_rall.1D
pb00.sub_08.r01.tcat+orig.BRIK
pb00.sub_08.r01.tcat+orig.HEAD
pb00.sub_08.r02.tcat+orig.BRIK
pb00.sub_08.r02.tcat+orig.HEAD
pb01.sub_08.r01.tshift+orig.BRIK
pb01.sub_08.r01.tshift+orig.HEAD
pb01.sub_08.r02.tshift+orig.BRIK
pb01.sub_08.r02.tshift+orig.HEAD
pb02.sub_08.r01.volreg+tlrc.BRIK
pb02.sub_08.r01.volreg+tlrc.HEAD
pb02.sub_08.r02.volreg+tlrc.BRIK
pb02.sub_08.r02.volreg+tlrc.HEAD
pb03.sub_08.r01.blur+tlrc.BRIK
pb03.sub_08.r01.blur+tlrc.HEAD
pb03.sub_08.r01.blur.nii.gz
pb03.sub_08.r02.blur+tlrc.BRIK
pb03.sub_08.r02.blur+tlrc.HEAD
pb04.sub_08.r01.scale+tlrc.BRIK
pb04.sub_08.r01.scale+tlrc.HEAD
pb04.sub_08.r01.scale.nii.gz
pb04.sub_08.r02.scale+tlrc.BRIK
pb04.sub_08.r02.scale+tlrc.HEAD
pre.sub-08_T1w_ns+orig.BRIK
pre.sub-08_T1w_ns+orig.HEAD
pre.sub-08_T1w_ns_WarpDrive.log
radcor.pb00.tcat
radcor.pb02.volreg
stimuli
sub-08_T1w+orig.BRIK
sub-08_T1w+orig.HEAD
sub-08_T1w_al_junk+orig.BRIK
sub-08_T1w_al_junk+orig.HEAD
sub-08_T1w_al_junk_mat.aff12.1D
sub-08_T1w_flip__al_junk_mat.aff12.1D
sub-08_T1w_flip_al_junk+orig.BRIK
sub-08_T1w_flip_al_junk+orig.HEAD
sub-08_T1w_ns+orig.BRIK
sub-08_T1w_ns+orig.HEAD
sub-08_T1w_ns+tlrc.BRIK
sub-08_T1w_ns+tlrc.HEAD
sub-08_T1w_ns.Xaff12.1D
sub-08_T1w_ns.Xat.1D
sub-08_T1w_ns.maskwarp.Xat.1D
sub-08_T1w_ns_shft.1D
sub-08_T1w_unflipped+orig.BRIK
sub-08_T1w_unflipped+orig.HEAD
sub-08_T1w_unflipped_ns+orig.BRIK
sub-08_T1w_unflipped_ns+orig.HEAD
sub-08_T1w_unflipped_ns_al_junk_wtal+orig.BRIK
sub-08_T1w_unflipped_ns_al_junk_wtal+orig.HEAD
vlines.pb00.tcat
volumized+tlrc.BRIK
volumized+tlrc.HEAD
vr_base_min_outlier+orig.BRIK
vr_base_min_outlier+orig.HEAD
vr_base_min_outlier_unif+orig.BRIK
vr_base_min_outlier_unif+orig.HEAD
vr_base_min_outlier_unif_ts_ns+orig.BRIK
vr_base_min_outlier_unif_ts_ns+orig.HEAD
vr_base_min_outlier_unif_ts_ns_wt+orig.BRIK
vr_base_min_outlier_unif_ts_ns_wt+orig.HEAD
warp.anat.Xat.1D
In AFNI, a +tlrc extension (and the "Talairach View") indicates that the image has been normalized. However, this does not necessarily mean the image is in Talairach space. The Talairach label is retained for legacy reasons, ensuring compatibility with older versions of the software. To verify which space the image has been warped to, you can use the 3dinfo command and check the "Template Space" field. The three possibilities are: "ORIG" (the image has not been warped), "TLRC" (normalized to Talairach space), and "MNI" (normalized to MNI space).
Visualizations
Registration QC
First, we will check EPI-to-anatomical registration quality using @snapshot_volreg, which overlays the edges of the EPI on the anatomical image.
%%bash
@snapshot_volreg ./afni_processing/sub_08.results/anat_final.sub_08+tlrc \
                ./afni_processing/sub_08.results/pb02.sub_08.r01.volreg+tlrc
-- trying to start Xvfb :400
[1] 18194
++ Start GUI to snapshot
@snapshot_volreg output image = ./anat_final.sub_08.pb02.sub_08.r01.volreg.jpg
++ 3dAutobox: AFNI version=AFNI_25.2.03 (Jul  4 2025) [64-bit]
++ Auto bbox: x=5..192  y=7..224  z=-3..180
++ 3dAutobox: output dataset = ./zzerm.X400-90388.acrop.nii
++ 3dAllineate: AFNI version=AFNI_25.2.03 (Jul  4 2025) [64-bit]
++ Authored by: Zhark the Registrator
++ Source dataset: ./afni_processing/sub_08.results/pb02.sub_08.r01.volreg+tlrc.HEAD
++ Base dataset:   (not given)
++ Loading datasets into memory
 +        -cmass x y z shifts =    0.000    0.000    0.000
 +  shift search range is +/- =   60.669   72.225   60.669
++ OpenMP thread count = 12
++ ========== Applying transformation to 1 sub-bricks ==========
++ Output dataset ./zzerm.X400-90388.epiR.nii
++ 3dAllineate: total CPU time = 0.0 sec  Elapsed = 30.8
++ ###########################################################
++ 3dMedianFilter: AFNI version=AFNI_25.2.03 (Jul  4 2025) [64-bit]
++ Output dataset ./zzerm.X400-90388.epiRS.nii
++ 3dedge3: AFNI version=AFNI_25.2.03 (Jul  4 2025) [64-bit]
++ 3dAutomask: AFNI version=AFNI_25.2.03 (Jul  4 2025) [64-bit]
++ Authored by: Emperor Zhark
++ 3dcalc: AFNI version=AFNI_25.2.03 (Jul  4 2025) [64-bit]
++ Authored by: A cast of thousands
++ Output dataset ./zzerm.X400-90388.epiEM.nii
++ Writing one 1308x368 image to filter '/usr/local/abin/cjpeg -quality 95 > zzerm.X400-90388.sag.jpg'
++ Writing one 1128x368 image to filter '/usr/local/abin/cjpeg -quality 95 > zzerm.X400-90388.cor.jpg'
++ Writing one 1128x436 image to filter '/usr/local/abin/cjpeg -quality 95 > zzerm.X400-90388.axi.jpg'

AFNI QUITTs!
Image("./anat_final.sub_08.pb02.sub_08.r01.volreg.jpg")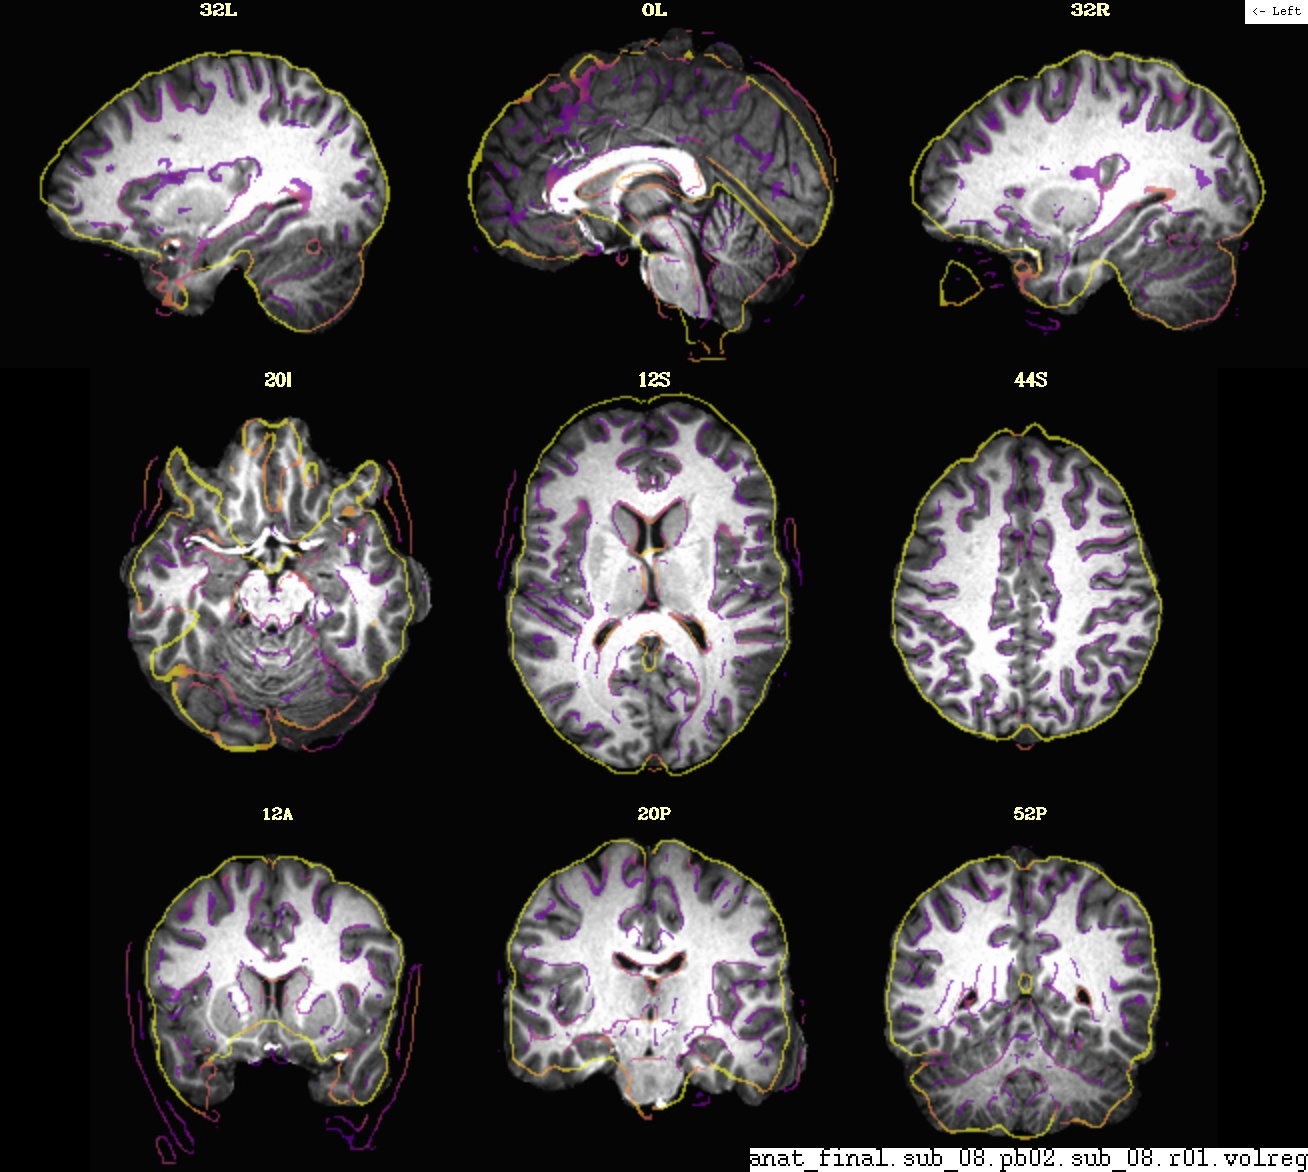
Preprocessing outputs
To visualize the preprocessing outputs with ipyniivue, we will first extract one volume from the functional image. Then, we’ll check whether the functional and anatomical images are properly aligned to MNI space. Misalignments could indicate issues with the preprocessing steps. Smoothed images will generally appear less detailed than the original images due to the blurring effect; this is expected, but they should not be excessively blurry or too sharp. The scaled functional image will have less anatomical definition, as the signal intensity has been normalized across time, making it more uniform across brain voxels. When reviewing the masks, ensure they appropriately cover the brain regions of
interest. The full_mask is the union of EPI masks across runs. The mask_epi_anat is a tighter intersection of the EPI and anatomical masks — this is the mask used in the analysis. The mask_group is derived from the MNI template and is typically the most liberal of the three.
%%bash
3dTcat -overwrite -prefix ./afni_processing/sub_08.results/volreg_example+tlrc \
    "./afni_processing/sub_08.results/pb02.sub_08.r01.volreg+tlrc[0]"
++ 3dTcat: AFNI version=AFNI_25.2.03 (Jul 4 2025) [64-bit]
++ elapsed time = 1.2 s
results_dir = "./afni_processing/sub_08.results"

nv = NiiVue()
volumes = [
    {
        "path": f"{results_dir}/MNI152_2009_template_SSW.nii.gz",
        "colormap": "gray",
        "opacity": 1.0,
    },
    {
        "path": f"{results_dir}/anat_final.sub_08+tlrc.HEAD",
        "paired_img_path": f"{results_dir}/anat_final.sub_08+tlrc.BRIK",
        "colormap": "gold",
        "opacity": 0.7,
    },
    {
        "path": f"{results_dir}/volreg_example+tlrc.HEAD",
        "paired_img_path": f"{results_dir}/volreg_example+tlrc.BRIK",
        "colormap": "red",
        "opacity": 0.0,
    },
    {
        "path": f"{results_dir}/full_mask.sub_08+tlrc.HEAD",
        "paired_img_path": f"{results_dir}/full_mask.sub_08+tlrc.BRIK",
        "colormap": "green",
        "opacity": 0.0,
    },
    {
        "path": f"{results_dir}/mask_epi_anat.sub_08+tlrc.HEAD",
        "paired_img_path": f"{results_dir}/mask_epi_anat.sub_08+tlrc.BRIK",
        "colormap": "winter",
        "opacity": 0.0,
    },
    {
        "path": f"{results_dir}/mask_group+tlrc.HEAD",
        "paired_img_path": f"{results_dir}/mask_group+tlrc.BRIK",
        "colormap": "blue",
        "opacity": 0.0,
    },


]

# Load all volumes into viewer
nv.load_volumes(volumes)

# Dropdown options
overlay_dropdown = widgets.Dropdown(
    options=[
        ("Anatomical aligned to MNI", 1),
        ("Motion-corrected functional to MNI", 2),
        ("Union of functional masks (full_mask)", 3),
        ("EPI+anat intersection mask (mask_epi_anat)", 4),
        ("Dilated group mask (group_mask)", 5)
    ],
    value=1,
    description='Overlay:',
    style={'description_width': 'initial'},
    layout=widgets.Layout(width='350px')
)

# Update function
def update_overlay(change):
    selected_idx = change.new

    # Set all overlays to 0 opacity
    for idx in range(1, len(volumes)):
        nv.volumes[idx].opacity = 0.0

    # Activate the selected one
    nv.volumes[selected_idx].opacity = 0.7

# Attach the observer
overlay_dropdown.observe(update_overlay, names='value')

# Show viewer and dropdown
display(VBox([overlay_dropdown, nv]))⚠️ Note: ipywidgets that rely on Python callbacks (observe, on_click) require a running kernel and do not function in the static HTML version of this notebook. Widgets using client-side trait linking (jslink) remain interactive without a kernel.
Dependencies in Jupyter/Python
Using the package watermark to document system environment and software versions used in this notebook, alongside the Neurodesktop version extracted from the
JUPYTER_IMAGEorNEURODESKTOP_VERSION(Neurodesk App) environment variable.
import os

%load_ext watermark

%watermark
%watermark --iversions

neurodesktop_version = (
    os.environ.get('JUPYTER_IMAGE', '').split(':')[-1] or
    os.environ.get('NEURODESKTOP_VERSION', 'unknown')
)
print(f"Neurodesktop version: {neurodesktop_version}")
Last updated: 2026-04-09T04:21:07.331941+00:00
Python implementation: CPython
Python version : 3.13.11
IPython version : 9.9.0
Compiler : GCC 14.3.0
OS : Linux
Release : 5.15.0-173-generic
Machine : x86_64
Processor : x86_64
CPU cores : 30
Architecture: 64bit
IPython : 9.9.0
ipyniivue : 2.4.4
ipywidgets: 7.8.5
matplotlib: 3.10.8
nibabel : 5.4.2
nilearn : 0.12.1
numpy : 2.4.3
Neurodesktop version: 2026-03-27
- Kelly, A. M. C., Uddin, L. Q., Biswal, B. B., Castellanos, F. X., & Milham, M. P. (2008). Competition between functional brain networks mediates behavioral variability. NeuroImage, 39(1), 527–537. 10.1016/j.neuroimage.2007.08.008
- Mennes, M., Kelly, C., Zuo, X.-N., Di Martino, A., Biswal, B. B., Castellanos, F. X., & Milham, M. P. (2010). Inter-individual differences in resting-state functional connectivity predict task-induced BOLD activity. NeuroImage, 50(4), 1690–1701. 10.1016/j.neuroimage.2010.01.002
- Mennes, M., Zuo, X.-N., Kelly, C., Di Martino, A., Zang, Y.-F., Biswal, B., Castellanos, F. X., & Milham, M. P. (2011). Linking inter-individual differences in neural activation and behavior to intrinsic brain dynamics. NeuroImage, 54(4), 2950–2959. 10.1016/j.neuroimage.2010.10.046