OpenRecon
Building an OpenRecon Container
These instructions were tested on GitHub Codespaces, and we recommend Codespaces as a starting point.
For a local setup, install Docker, Python 3, and neurodocker. If neurodocker is not already on your PATH, add it:
python -m pip install neurodocker

# Check whether neurodocker is already on PATH:
which neurodocker

# If not, add the appropriate local install path.
# The path depends on your local setup.
export PATH=$PATH:~/.local/lib/python3.12/site-packages/bin
export PATH=$PATH:~/.local/bin
1. Add the Python MRD server to a Neurocontainers recipe
Add the OpenRecon macro to any recipe in the neurocontainers recipes directory:
- include: macros/openrecon/neurodocker.yamlMake sure to adjust invertcontrast.py for your pipeline, or replace it with the files your pipeline needs from the Python MRD server.
Here is an example Neurocontainers recipe.
Then build the recipe:
sf-login openreconexample --architecture x86_64
# Or:
./builder/build.py generate openreconexample --recreate --build --login --architecture x86_64 --offline_mode true
2. Test the tool inside the container and then through the MRD server
Convert data to MRD test data
Note: enhanced DICOM and NIfTI-to-MRD conversion scripts are not yet merged into the main branch of python-ismrmrd-server.
In the meantime, get the scripts here:
Then add them to the image in build.yaml:
        - copy: enhanceddicom2mrd.py /opt/code/python-ismrmrd-server/enhanceddicom2mrd.py
        - copy: nifti2mrd.py /opt/code/python-ismrmrd-server/nifti2mrd.py
The directory that the container is built from is mounted automatically under /buildhostdirectory.
cd /opt/code/python-ismrmrd-server

# For legacy DICOM data:
python3 dicom2mrd.py -o input_data.h5 PATH_TO_YOUR_DICOM_FILES

# For enhanced DICOM data:
python /opt/code/python-ismrmrd-server/enhanceddicom2mrd.py -o /buildhostdirectory/input.h5 /buildhostdirectory/enhanced_dicom_data

# For converting NIfTI data to MRD:
python3 nifti2mrd.py -i /buildhostdirectory/input_Se1_Res0.8_0.8_Spac0.8.nii -o /buildhostdirectory/input_fromNIFTI.h5
Start the server and client, then test the application:
python3 /opt/code/python-ismrmrd-server/main.py -v -r -H=0.0.0.0 -p=9002 -s -S=/tmp/share/saved_data &
sleep 2
python3 /opt/code/python-ismrmrd-server/client.py -G dataset -o openrecon_output.h5 input_data.h5 -c openreconexample
3. Submit the container recipe to Neurocontainers
Submit the container recipe to the neurocontainers repository.
Here is an example: openreconexample.
The container is built automatically. If the build is successful, a pull request will be opened automatically for step 4.
4. Submit the container to OpenRecon
Submit the container to the openrecon repository.
Here is an example: openreconexample.
Detailed instructions for building on GitHub directly
Contributed by Kerrin Pine.
Prerequisites
You need a public GitHub account so the container can be submitted to the public Neurodesk OpenRecon repository and built.
Process
Fork
neurodesk/neurocontainersto your personal GitHub account. In the upper-right corner, clickFork. If prompted, fork to your personal GitHub account.After forking, go to your forked repository, for example
github.com/YOUR_GITHUB_USERNAME/neurocontainers.Create a new codespace. In your forked repository, click the green
<> Codebutton, then selectCreate codespace on main.In the terminal, run
neurodocker --version. You should see a version such as2.0.0.Still in the terminal, run
cd recipes, create a project directory withmkdir projectname, and copy the files fromrecipes/openreconexampleinto this new directory.In
build.yamlandtest.yaml, change all occurrences ofopenreconexampleto your own project name, and changeopenreconexample.pytoprojectname.py.Follow the instructions in
build.yamlto build.Building drops you into the container itself. Follow the instructions in
test.yamlto import your own test DICOM data into an.h5file for testing. In Codespaces, you can drag data from another window into the folder.Continue following the instructions in
test.yamlto start the server and send demo data to it. For example:python3 /opt/code/python-ismrmrd-server/client.py \ -G dataset \ -o /buildhostdirectory/output.h5 \ /buildhostdirectory/b0map.h5 \ -c openreconexampleYou should see the expected number of images sent from the client to the server and returned by the server. The output in
output.h5can be viewed with the built-in H5Web viewer.To check intermediate outputs for troubleshooting, open Extensions with
Ctrl+Shift+Xor the Extensions icon on the left, then installniivuefor NIfTI image viewing in Codespaces.Once the container has been thoroughly tested and you are happy with it, commit the new files and push them if you were not working on
github.com. Do not include your demo data.To build a container ready for the scanner, first open a pull request. For example:
Add projectname container for OpenRecon MRD server. In the pull request description, include theneurodocker.yamlbuild instructions, the customized MRD Python scripts, and the Codespaces testing notes.The second step is to write a recipe for
neurodesk/openrecon. Because it is a separate repository, fork it, navigate torecipes, create a folder for your project, and addOpenReconLabel.jsonandparams.shwith the version number.OpenReconLabel.jsondefines how the container description and UI options appear on the scanner. Then open a pull request. Updating the version number will trigger the container to be rebuilt, and instructions for downloading and installing the container will appear as an issue in that repository.
Tips, tricks, and troubleshooting for OpenRecon
Installing and testing a new OpenRecon package
Make sure that no protocol is open, because an open protocol can prevent installation of a new package.
Copy the OpenRecon zip file into C:\Program Files\Siemens\Numaris\OperationalManagement\FileTransfer\incoming.
Wait for the file to disappear.
Check whether it is being installed by watching C:\ProgramData\Siemens\Numaris\log\syngo.MR.HostInfra.OpenRecon.Watcher.
It should first create a 0 KB text file with the container name and version.
The text file then fills to about 100-200 KB.
Once the log file is written, you can open a protocol and check whether the package is available.
Run the sequence with OpenRecon enabled and check for errors in the log viewer at C:\ProgramData\Siemens\Numaris\log\OpenRecon.utr.
Sent image values must fit within a 4096-value range
OpenRecon can send a maximum integer range of 4096 values back to the scanner.
If the returned images exceed that range, the values can wrap around instead of clipping. The symptom is that the sent images show repeating integer wraps and can look a bit like phase images.
Scale or clamp derived image data into the scanner-safe range before sending it from the MRD server.
Choice parameters need a non-empty default
If a choice parameter in OpenReconLabel.json has an empty default value, the OpenRecon package validates OK and can still install successfully, but the tool will not be selectable in the sequence tab (it shows in the list, but when clicking on it nothing happens).
For example, this can fail because "default": "" does not match any entry in values:
{
  "id": "metricsregion",
  "label": { "en": "Metrics Region" },
  "type": "choice",
  "values": [
    {
      "id": "wholebody",
      "name": { "en": "wholebody" }
    },
    {
      "id": "abdomen",
      "name": { "en": "abdomen" }
    },
    {
      "id": "pelvis",
      "name": { "en": "pelvis" }
    },
    {
      "id": "thigh",
      "name": { "en": "thigh" }
    },
    {
      "id": "leg",
      "name": { "en": "leg" }
    }
  ],
  "default": "",
  "information": { "en": "Region passed to MuscleMap metrics" }
}
Set the default to one of the available values IDs instead:
{
  "id": "metricsregion",
  "label": { "en": "Metrics Region" },
  "type": "choice",
  "values": [
    {
      "id": "wholebody",
      "name": { "en": "wholebody" }
    },
    {
      "id": "abdomen",
      "name": { "en": "abdomen" }
    },
    {
      "id": "pelvis",
      "name": { "en": "pelvis" }
    },
    {
      "id": "thigh",
      "name": { "en": "thigh" }
    },
    {
      "id": "leg",
      "name": { "en": "leg" }
    }
  ],
  "default": "wholebody",
  "information": { "en": "Region passed to MuscleMap metrics" }
}
Do not use Prio Recon with OpenRecon
This option has to be disabled in an OpenRecon sequence:
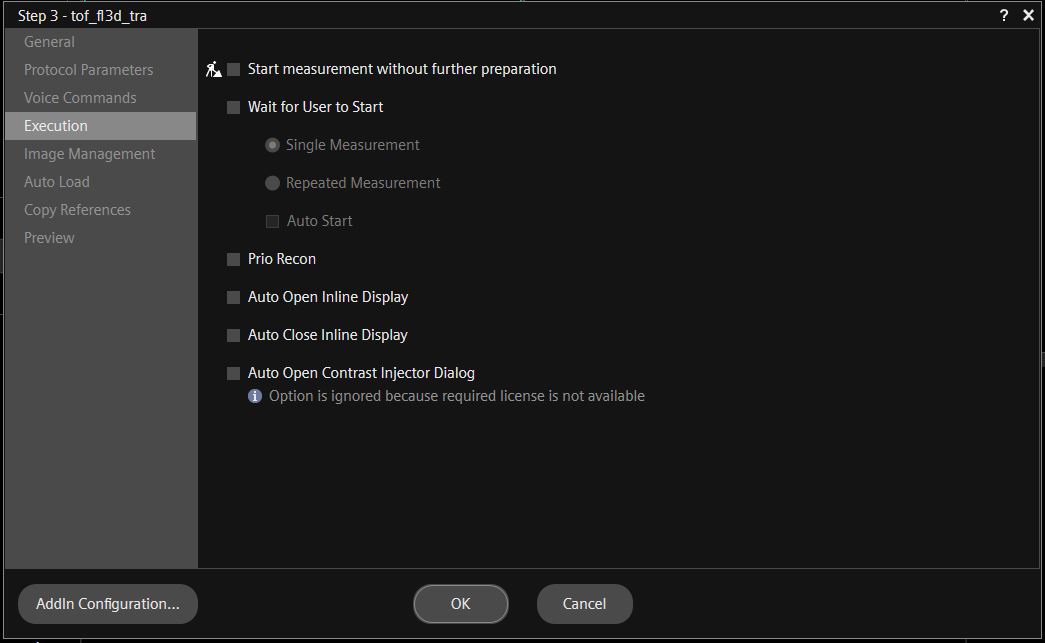
Right-click Sequence in the Scan Queue, then select Edit Properties (Alt+Enter) and Execution.
CUDA version
Make sure that you install the correct CUDA version in the container and that it does not get overwritten by a pip install. OpenRecon only supports CUDA 11.x.
Always double-check in the container with:
# Check that the CUDA version is valid for MARS; it must be CUDA 11.x.
python -c "import torch; print(torch.version.cuda)"
Versioning of containers
OpenRecon requires container versions. For example, on the scanner, version 1.2.3 only shows the major version in the selection box, but hovering over the name shows the full version:
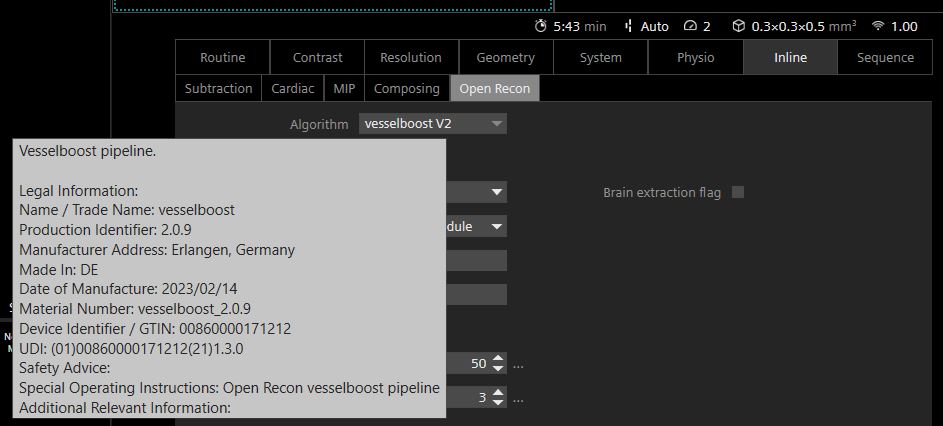
OpenRecon will not install an update to a container with the same version.
High-performance computing license side effects
For OpenRecon to work, the N_High_End_Computing license must be active on the scanner.
Activating this license takes memory away from the main ICE recon system, so normal recons might run out of memory sooner. If you need this memory back, you can temporarily disable this license and OpenRecon.
Turn the license off by commenting it out. Add # in front of the relevant lines in C:\Program Files\Siemens\Numaris\bin\Common\Licensing\license.dat.
Restart the whole system. Restarting the workspace is not enough.
Cleaning up packages on the scanner
After installing and testing different OpenRecon containers, old containers remain in the host registry and consume space on the host C: drive.
Download wip_OpenRecon_PackageRemover_Tool.exe from the Siemens MAGNETOM forum and follow the installation instructions.
At the end of a testing session, purge the old packages by running this in the powershell:
wip_OpenRecon_PackageRemover_Tool.exe --purgeAnswer y for each package you want to purge.
Then run garbage collection to clean up the storage:
wip_OpenRecon_PackageRemover_Tool.exe --gcThis tool often breaks the OpenRecon watcher process, so installing new packages after cleanup may fail until the host is restarted. Reboot the host after cleanup before installing more OpenRecon packages.
For the deletion to work, and for the tool to see your OpenRecon package, the package needs to be labeled as Research. It will not touch OpenRecon tools labeled as Product.
Check that your OpenReconLabel.json file contains:
"content_qualification_type": "RESEARCH"