This is the multi-page printable view of this section. Click here to print.
Neurocontainers
1 - CVMFS
Install the CernVM File System (CVMFS)
To begin, install CVMFS. Follow the official instructions here: https://cvmfs.readthedocs.io/en/stable/cpt-quickstart.html#getting-the-software
An example installation for Ubuntu in Windows Subsystem for Linux (WSL) would look like this:
sudo apt-get install lsb-release
wget https://ecsft.cern.ch/dist/cvmfs/cvmfs-release/cvmfs-release-latest_all.deb
sudo dpkg -i cvmfs-release-latest_all.deb
rm -f cvmfs-release-latest_all.deb
sudo apt-get update
sudo apt-get install build-essential
sudo apt-get install cvmfs
Ubuntu 24.04 might have an issue with this, so try installing dependies manually:
sudo apt install libattr1=1:2.5.2-1build1 libuuid1=2.39.3-9ubuntu6Configure CVMFS
Once installed create the keys and configure the servers used:
sudo mkdir -p /etc/cvmfs/keys/ardc.edu.au/


echo "-----BEGIN PUBLIC KEY-----
MIIBIjANBgkqhkiG9w0BAQEFAAOCAQ8AMIIBCgKCAQEAwUPEmxDp217SAtZxaBep
Bi2TQcLoh5AJ//HSIz68ypjOGFjwExGlHb95Frhu1SpcH5OASbV+jJ60oEBLi3sD
qA6rGYt9kVi90lWvEjQnhBkPb0uWcp1gNqQAUocybCzHvoiG3fUzAe259CrK09qR
pX8sZhgK3eHlfx4ycyMiIQeg66AHlgVCJ2fKa6fl1vnh6adJEPULmn6vZnevvUke
I6U1VcYTKm5dPMrOlY/fGimKlyWvivzVv1laa5TAR2Dt4CfdQncOz+rkXmWjLjkD
87WMiTgtKybsmMLb2yCGSgLSArlSWhbMA0MaZSzAwE9PJKCCMvTANo5644zc8jBe
NQIDAQAB
-----END PUBLIC KEY-----" | sudo tee /etc/cvmfs/keys/ardc.edu.au/neurodesk.ardc.edu.au.pub

echo "CVMFS_USE_GEOAPI=yes" | sudo tee /etc/cvmfs/config.d/neurodesk.ardc.edu.au.conf

echo 'CVMFS_SERVER_URL="http://cvmfs-geoproximity.neurodesk.org/cvmfs/@fqrn@;http://cvmfs.neurodesk.org/cvmfs/@fqrn@;http://s1osggoc-cvmfs.openhtc.io:8080/cvmfs/@fqrn@;http://s1fnal-cvmfs.openhtc.io:8080/cvmfs/@fqrn@;http://s1sampa-cvmfs.openhtc.io:8080/cvmfs/@fqrn@;http://s1brisbane-cvmfs.openhtc.io/cvmfs/@fqrn@;http://s1nikhef-cvmfs.openhtc.io/cvmfs/@fqrn@;http://s1bnl-cvmfs.openhtc.io/cvmfs/@fqrn@;http://s1perth-cvmfs.openhtc.io/cvmfs/@fqrn@"' | sudo tee -a /etc/cvmfs/config.d/neurodesk.ardc.edu.au.conf

echo 'CVMFS_KEYS_DIR="/etc/cvmfs/keys/ardc.edu.au/"' | sudo tee -a /etc/cvmfs/config.d/neurodesk.ardc.edu.au.conf

echo "CVMFS_HTTP_PROXY=DIRECT" | sudo tee  /etc/cvmfs/default.local
echo "CVMFS_QUOTA_LIMIT=5000" | sudo tee -a  /etc/cvmfs/default.local

sudo cvmfs_config setup
You can use the list above, but you can also pick a subset of servers that are close to you or fit your usecase better. To better understand what to choose, we use the following CVMFS server setup:
These CVMFS Stratum 1 servers are hosted by the Open Science Grid and every server has a Cloudflare CDN alias that is correctly geo-located through the Maxmind GEOAPI service in the CVMFS client:
- Illinois, USA: s1fnal-cvmfs.openhtc.io:8080 -> cvmfs-s1fnal.opensciencegrid.org:8000
- Nebraska, USA: s1osggoc-cvmfs.openhtc.io:8080 -> cvmfs-s1goc.opensciencegrid.org:8000
- New York, US: s1bnl-cvmfs.openhtc.io:8080 -> cvmfs-s1bnl.opensciencegrid.org:8000
- Oxford, UK: s1ral-cvmfs.openhtc.io:8080 -> cvmfs-egi.gridpp.rl.ac.uk:8000
- Netherlands, Europe: s1nikhef-cvmfs.openhtc.io:8080 -> cvmfs01.nikhef.nl:8000
This server is currently down:
- Sao Paulo, Brazil: s1sampa-cvmfs.openhtc.io:8080 -> sampacs01.if.usp.br:8000
These CVMFS Stratum 1 servers are hosted by ARDC Nectar Cloud and also has a Cloudflare CDN alias.
- Brisbane, Queensland, Australia: s1brisbane-cvmfs.openhtc.io -> cvmfs-brisbane.neurodesk.org
- Sydney, New South Wales, Australia: s1sydney-cvmfs.openhtc.io -> cvmfs-sydney.neurodesk.org
- Melbourne, Victoria, Australia: s1melbourne-cvmfs.openhtc.io -> cvmfs-melbourne.neurodesk.org
- Perth, Western Australia, Australia: s1perth-cvmfs.openhtc.io -> cvmfs-perth.neurodesk.org
This CVMFS Stratum 1 server is hosted by AWS:
- Frankfurt, Germany: cvmfs-frankfurt.neurodesk.org -> ec2-3-72-92-91.eu-central-1.compute.amazonaws.com
This CMVFS Stratum 1 server is hosted by Jetstream:
- Indiana, US: cvmfs-jetstream.neurodesk.org -> 149.165.172.188
Then we have a one geolocation-steered domain: cvmfs-geoproximity.neurodesk.org
153.02 (Longitude),-27.46 (Latitude) -> cvmfs-brisbane.neurodesk.org
151.2073, -33.8678 -> cvmfs-sydney.neurodesk.org
115.86,-31.95 -> cvmfs-perth.neurodesk.org
-88.30,41.84 -> cvmfs-s1fnal.opensciencegrid.org
-96.66,40.83 -> cvmfs-s1goc.opensciencegrid.org
-1.26, 51.75 -> cvmfs-egi.gridpp.rl.ac.uk
4.90,52.37 -> cvmfs01.nikhef.nl
8.68,50.11 -> ec2-3-72-92-91.eu-central-1.compute.amazonaws.com
-46.63,-23.54 -> sampacs01.if.usp.br
-86.45,39.22 -> cvmfs-jetstream.neurodesk.org
145.13,-37.92 -> cvmfs-melbourne.neurodesk.org
Every location has a health check attached to it and doesn’t forward to it if the destination is not working.
Then we have 3 direct URLS without CDNs as well that are geolocation-steered: cvmfs1.neurodesk.org: South America -> sampacs01.if.usp.br North America -> cvmfs-s1fnal.opensciencegrid.org Default -> cvmfs-brisbane.neurodesk.org Europe -> ec2-3-72-92-91.eu-central-1.compute.amazonaws.com Asia -> cvmfs-perth.neurodesk.org
cvmfs2.neurodesk.org: North America -> cvmfs-s1goc.opensciencegrid.org Europe -> cvmfs01.nikhef.nl Default -> cvmfs-s1goc.opensciencegrid.org
cvmfs3.neurodesk.org: North America -> cvmfs-s1bnl.opensciencegrid.org Asia -> cvmfs-brisbane.neurodesk.org Default -> cvmfs-s1bnl.opensciencegrid.org Oceania -> cvmfs-perth.neurodesk.org
These servers are currently NOT working and are NOT YET mirroring our repository (we are waiting for RAL to come back online, then the others will mirror that):
- Swinburne, Australia: s1swinburne-cvmfs.openhtc.io:8080 -> cvmfs-s1.hpc.swin.edu.au:8000
- China: s1ihep-cvmfs.openhtc.io:8080 -> cvmfs-stratum-one.ihep.ac.cn:8000
For WSL users
You will need to run this for each new WSL session:
sudo cvmfs_config wsl2_startTest if the connection works:
sudo cvmfs_config chksetup

ls /cvmfs/neurodesk.ardc.edu.au

sudo cvmfs_talk -i neurodesk.ardc.edu.au host info

cvmfs_config stat -v neurodesk.ardc.edu.au
For Ubuntu 22.04 users
If configuring CVMFS returns the following error:
Error: failed to load cvmfs library, tried: './libcvmfs_fuse3_stub.so' '/usr/lib/libcvmfs_fuse3_stub.so' '/usr/lib64/libcvmfs_fuse3_stub.so' './libcvmfs_fuse_stub.so' '/usr/lib/libcvmfs_fuse_stub.so' '/usr/lib64/libcvmfs_fuse_stub.so'
./libcvmfs_fuse3_stub.so: cannot open shared object file: No such file or directory
/usr/lib/libcvmfs_fuse3_stub.so: cannot open shared object file: No such file or directory
/usr/lib64/libcvmfs_fuse3_stub.so: cannot open shared object file: No such file or directory
./libcvmfs_fuse_stub.so: cannot open shared object file: No such file or directory
libcrypto.so.1.1: cannot open shared object file: No such file or directory
/usr/lib64/libcvmfs_fuse_stub.so: cannot open shared object file: No such file or directory


Failed to read CernVM-FS configuration
A temporary workaround is:
wget https://mirror.umd.edu/ubuntu/ubuntu/pool/main/o/openssl/libssl1.1_1.1.1f-1ubuntu2.15_amd64.deb
dpkg -i libssl1.1_1.1.1f-1ubuntu2.15_amd64.deb
Install singularity/apptainer
e.g for Ubuntu/Debian install apptainer:
sudo apt-get install -y software-properties-common
sudo add-apt-repository -y ppa:apptainer/ppa
sudo apt-get update
sudo apt-get install -y apptainer
sudo apt-get install -y apptainer-suid
e.g. for Ubuntu/Debian install singularity:
export VERSION=1.18.3 OS=linux ARCH=amd64 && \
    wget https://dl.google.com/go/go$VERSION.$OS-$ARCH.tar.gz && \
    sudo tar -C /usr/local -xzvf go$VERSION.$OS-$ARCH.tar.gz && \
    rm go$VERSION.$OS-$ARCH.tar.gz

echo 'export GOPATH=${HOME}/go' >> ~/.bashrc && \
    echo 'export PATH=/usr/local/go/bin:${PATH}:${GOPATH}/bin' >> ~/.bashrc && \
    source ~/.bashrc

go get -d github.com/sylabs/singularity

export VERSION=v3.10.0 # or another tag or branch if you like && \
    cd $GOPATH/src/github.com/sylabs/singularity && \
    git fetch && \
    git checkout $VERSION # omit this command to install the latest bleeding edge code from master

export VERSION=3.10.0 && # adjust this as necessary \
    mkdir -p $GOPATH/src/github.com/sylabs && \
    cd $GOPATH/src/github.com/sylabs && \
    wget https://github.com/sylabs/singularity/releases/download/v${VERSION}/singularity-ce-${VERSION}.tar.gz && \
    tar -xzf singularity-ce-${VERSION}.tar.gz && \789
    cd ./singularity-ce-${VERSION} && \
    ./mconfig --without-seccomp --without-conmon

./mconfig --without-seccomp --without-conmon && \
    make -C ./builddir && \
    sudo make -C ./builddir install

export PATH="/usr/local/singularity/bin:${PATH}"
Use of Neurodesk CVMFS containers
The containers are now available in /cvmfs/neurodesk.ardc.edu.au/containers/ and can be started with:
singularity shell /cvmfs/neurodesk.ardc.edu.au/containers/itksnap_3.8.0_20201208/itksnap_3.8.0_20201208.simgmake sure that SINGULARITY_BINDPATH includes the directories you want to work with:
export SINGULARITY_BINDPATH='/cvmfs,/mnt,/home'For WSL users
The homedirectory might not be supported. Avoid mounting it with
singularity shell --no-home /cvmfs/neurodesk.ardc.edu.au/containers/itksnap_3.8.0_20201208/itksnap_3.8.0_20201208.simgor configure permanently:
sudo vi /etc/singularity/singularity.confset
mount home = noInstall module system
sudo yum install lmodor
sudo apt install lmodUse of containers in the module system
Configuration for module system
Create a the new file /usr/share/module.sh with the content (NOTE: update the version, here 6.6, with your lmod version, e.g. 6.6 (Ubuntu 20.04/22.04), 8.6.19 (Ubuntu 24.04)):
# system-wide profile.modules                                          #
# Initialize modules for all sh-derivative shells                      #
#----------------------------------------------------------------------#
trap "" 1 2 3

case "$0" in
    -bash|bash|*/bash) . /usr/share/lmod/YOURLMODVERSION_HERE/init/bash ;;
       -ksh|ksh|*/ksh) . /usr/share/lmod/YOURLMODVERSION_HERE/init/ksh ;;
       -zsh|zsh|*/zsh) . /usr/share/lmod/YOURLMODVERSION_HERE/init/zsh ;;
          -sh|sh|*/sh) . /usr/share/lmod/YOURLMODVERSION_HERE/init/sh ;;
                    *) . /usr/share/lmod/YOURLMODVERSION_HERE/init/sh ;;  # default for scripts
esac

trap - 1 2 3
Make the module system usable in the shell
Add the following lines to your ~/.bashrc file or to /etc/bash.bashrc for a global install:
if [ -f '/usr/share/module.sh' ]; then source /usr/share/module.sh; fi

if [ -d /cvmfs/neurodesk.ardc.edu.au/neurodesk-modules ]; then
        # export MODULEPATH="/cvmfs/neurodesk.ardc.edu.au/neurodesk-modules"
        module use /cvmfs/neurodesk.ardc.edu.au/neurodesk-modules/*
else
        export MODULEPATH="/neurodesktop-storage/containers/modules"
        module use $MODULEPATH
        export CVMFS_DISABLE=true
fi

if [ -f '/usr/share/module.sh' ]; then
        echo 'Run "ml av" to see which tools are available - use "ml <tool>" to use them in this shell.'
        if [ -v "$CVMFS_DISABLE" ]; then
                if [ ! -d $MODULEPATH ]; then
                        echo 'Neurodesk tools not yet downloaded. Choose tools to install from the Application menu.'
                fi
        fi
fi
Restart the current shell or run
source ~/.bashrcUse of containers in the module system
export SINGULARITY_BINDPATH='/cvmfs,/mnt,/home'
module use /cvmfs/neurodesk.ardc.edu.au/neurodesk-modules/*
ml fsl
fslmaths
Troubleshooting and diagnostics
# Check servers
sudo cvmfs_talk -i neurodesk.ardc.edu.au host probe
sudo cvmfs_talk -i neurodesk.ardc.edu.au host info

# Change settings
sudo touch /var/log/cvmfs_debug.log.cachemgr
sudo chown cvmfs /var/log/cvmfs_debug.log.cachemgr
sudo touch /var/log/cvmfs_debug.log
sudo chown cvmfs /var/log/cvmfs_debug.log

sudo vi /etc/cvmfs/config.d/neurodesk.ardc.edu.au.conf
echo -e "\nCVMFS_DEBUGLOG=/var/log/cvmfs_debug.log" | sudo tee -a /etc/cvmfs/default.local
cat /etc/cvmfs/default.local
sudo cvmfs_config umount
sudo service autofs stop
sudo mount -t cvmfs neurodesk.ardc.edu.au /cvmfs/neurodesk.ardc.edu.au
# check if new settings are applied correctly:
cvmfs_config showconfig neurodesk.ardc.edu.au

cat /var/log/cvmfs_debug.log
cat /var/log/cvmfs_debug.log.cachemgr
2 - DataLad
Using Neurodesk Containers with DataLad
This page explains how to use DataLad and the ReproNim containers with Neurodesk tools.
Install DataLad, datalad-container, and the ReproNim containers repository
conda install datalad
pip install datalad_container
datalad install https://github.com/ReproNim/containers.git
cd containers
List all default available containers
datalad containers-listDownload and run the latest container version
datalad containers-run -n neurodesk-romeoChange version of container
You can change which version of a container is used in two ways:
Option 1: change version in .datalad/config
vi .datalad/config
# now change the version of the container you like
# all available containers can be seen via `ls images/neurodesk`
datalad save -m 'downgraded version of romeo to x.x.x'
datalad containers-run -n neurodesk-romeo
Option 2: change version using freeze_versions script
# all available containers can be seen via `ls images/neurodesk`
scripts/freeze_versions neurodesk-romeo=3.2.4
datalad save -m 'downgraded version of romeo to 3.2.4'
datalad containers-run -n neurodesk-romeo
3 - Docker
Our containers are automatically built in https://github.com/neurodesk/neurocontainers/ and hosted on dockerhub and on github
Pull Docker containers
e.g. for a julia container docker
docker pull vnmd/julia_1.6.1You an also build singularity images from dockerhub
singularity build julia_1.6.1.simg docker://vnmd/julia_1.6.1Replace julia_1.6.1 with your selected application. You can find the available containers here: https://neurodesk.org/applications/
4 - OpenRecon
Building an OpenRecon Container
These instructions were tested on GitHub Codespaces, and we recommend Codespaces as a starting point.
For a local setup, install Docker, Python 3, and neurodocker. If neurodocker is not already on your PATH, add it:
python -m pip install neurodocker

# Check whether neurodocker is already on PATH:
which neurodocker

# If not, add the appropriate local install path.
# The path depends on your local setup.
export PATH=$PATH:~/.local/lib/python3.12/site-packages/bin
export PATH=$PATH:~/.local/bin
1. Add the Python MRD server to a Neurocontainers recipe
Add the OpenRecon macro to any recipe in the neurocontainers recipes directory:
- include: macros/openrecon/neurodocker.yamlMake sure to adjust invertcontrast.py for your pipeline, or replace it with the files your pipeline needs from the Python MRD server.
Here is an example Neurocontainers recipe.
Then build the recipe:
sf-login openreconexample --architecture x86_64
# Or:
./builder/build.py generate openreconexample --recreate --build --login --architecture x86_64 --offline_mode true
2. Test the tool inside the container and then through the MRD server
Convert data to MRD test data
Note: enhanced DICOM and NIfTI-to-MRD conversion scripts are not yet merged into the main branch of python-ismrmrd-server.
In the meantime, get the scripts here:
Then add them to the image in build.yaml:
        - copy: enhanceddicom2mrd.py /opt/code/python-ismrmrd-server/enhanceddicom2mrd.py
        - copy: nifti2mrd.py /opt/code/python-ismrmrd-server/nifti2mrd.py
The directory that the container is built from is mounted automatically under /buildhostdirectory.
cd /opt/code/python-ismrmrd-server

# For legacy DICOM data:
python3 dicom2mrd.py -o input_data.h5 PATH_TO_YOUR_DICOM_FILES

# For enhanced DICOM data:
python /opt/code/python-ismrmrd-server/enhanceddicom2mrd.py -o /buildhostdirectory/input.h5 /buildhostdirectory/enhanced_dicom_data

# For converting NIfTI data to MRD:
python3 nifti2mrd.py -i /buildhostdirectory/input_Se1_Res0.8_0.8_Spac0.8.nii -o /buildhostdirectory/input_fromNIFTI.h5
Start the server and client, then test the application:
python3 /opt/code/python-ismrmrd-server/main.py -v -r -H=0.0.0.0 -p=9002 -s -S=/tmp/share/saved_data &
sleep 2
python3 /opt/code/python-ismrmrd-server/client.py -G dataset -o openrecon_output.h5 input_data.h5 -c openreconexample
3. Submit the container recipe to Neurocontainers
Submit the container recipe to the neurocontainers repository.
Here is an example: openreconexample.
The container is built automatically. If the build is successful, a pull request will be opened automatically for step 4.
4. Submit the container to OpenRecon
Submit the container to the openrecon repository.
Here is an example: openreconexample.
Detailed instructions for building on GitHub directly
Contributed by Kerrin Pine.
Prerequisites
You need a public GitHub account so the container can be submitted to the public Neurodesk OpenRecon repository and built.
Process
Fork
neurodesk/neurocontainersto your personal GitHub account. In the upper-right corner, clickFork. If prompted, fork to your personal GitHub account.After forking, go to your forked repository, for example
github.com/YOUR_GITHUB_USERNAME/neurocontainers.Create a new codespace. In your forked repository, click the green
<> Codebutton, then selectCreate codespace on main.In the terminal, run
neurodocker --version. You should see a version such as2.0.0.Still in the terminal, run
cd recipes, create a project directory withmkdir projectname, and copy the files fromrecipes/openreconexampleinto this new directory.In
build.yamlandtest.yaml, change all occurrences ofopenreconexampleto your own project name, and changeopenreconexample.pytoprojectname.py.Follow the instructions in
build.yamlto build.Building drops you into the container itself. Follow the instructions in
test.yamlto import your own test DICOM data into an.h5file for testing. In Codespaces, you can drag data from another window into the folder.Continue following the instructions in
test.yamlto start the server and send demo data to it. For example:python3 /opt/code/python-ismrmrd-server/client.py \ -G dataset \ -o /buildhostdirectory/output.h5 \ /buildhostdirectory/b0map.h5 \ -c openreconexampleYou should see the expected number of images sent from the client to the server and returned by the server. The output in
output.h5can be viewed with the built-in H5Web viewer.To check intermediate outputs for troubleshooting, open Extensions with
Ctrl+Shift+Xor the Extensions icon on the left, then installniivuefor NIfTI image viewing in Codespaces.Once the container has been thoroughly tested and you are happy with it, commit the new files and push them if you were not working on
github.com. Do not include your demo data.To build a container ready for the scanner, first open a pull request. For example:
Add projectname container for OpenRecon MRD server. In the pull request description, include theneurodocker.yamlbuild instructions, the customized MRD Python scripts, and the Codespaces testing notes.The second step is to write a recipe for
neurodesk/openrecon. Because it is a separate repository, fork it, navigate torecipes, create a folder for your project, and addOpenReconLabel.jsonandparams.shwith the version number.OpenReconLabel.jsondefines how the container description and UI options appear on the scanner. Then open a pull request. Updating the version number will trigger the container to be rebuilt, and instructions for downloading and installing the container will appear as an issue in that repository.
Tips, tricks, and troubleshooting for OpenRecon
Installing and testing a new OpenRecon package
Make sure that no protocol is open, because an open protocol can prevent installation of a new package.
Copy the OpenRecon zip file into C:\Program Files\Siemens\Numaris\OperationalManagement\FileTransfer\incoming.
Wait for the file to disappear.
Check whether it is being installed by watching C:\ProgramData\Siemens\Numaris\log\syngo.MR.HostInfra.OpenRecon.Watcher.
It should first create a 0 KB text file with the container name and version.
The text file then fills to about 100-200 KB.
Once the log file is written, you can open a protocol and check whether the package is available.
Run the sequence with OpenRecon enabled and check for errors in the log viewer at C:\ProgramData\Siemens\Numaris\log\OpenRecon.utr.
Sent image values must fit within a 4096-value range
OpenRecon can send a maximum integer range of 4096 values back to the scanner.
If the returned images exceed that range, the values can wrap around instead of clipping. The symptom is that the sent images show repeating integer wraps and can look a bit like phase images.
Scale or clamp derived image data into the scanner-safe range before sending it from the MRD server.
Choice parameters need a non-empty default
If a choice parameter in OpenReconLabel.json has an empty default value, the OpenRecon package validates OK and can still install successfully, but the tool will not be selectable in the sequence tab (it shows in the list, but when clicking on it nothing happens).
For example, this can fail because "default": "" does not match any entry in values:
{
  "id": "metricsregion",
  "label": { "en": "Metrics Region" },
  "type": "choice",
  "values": [
    {
      "id": "wholebody",
      "name": { "en": "wholebody" }
    },
    {
      "id": "abdomen",
      "name": { "en": "abdomen" }
    },
    {
      "id": "pelvis",
      "name": { "en": "pelvis" }
    },
    {
      "id": "thigh",
      "name": { "en": "thigh" }
    },
    {
      "id": "leg",
      "name": { "en": "leg" }
    }
  ],
  "default": "",
  "information": { "en": "Region passed to MuscleMap metrics" }
}
Set the default to one of the available values IDs instead:
{
  "id": "metricsregion",
  "label": { "en": "Metrics Region" },
  "type": "choice",
  "values": [
    {
      "id": "wholebody",
      "name": { "en": "wholebody" }
    },
    {
      "id": "abdomen",
      "name": { "en": "abdomen" }
    },
    {
      "id": "pelvis",
      "name": { "en": "pelvis" }
    },
    {
      "id": "thigh",
      "name": { "en": "thigh" }
    },
    {
      "id": "leg",
      "name": { "en": "leg" }
    }
  ],
  "default": "wholebody",
  "information": { "en": "Region passed to MuscleMap metrics" }
}
Do not use Prio Recon with OpenRecon
This option has to be disabled in an OpenRecon sequence:
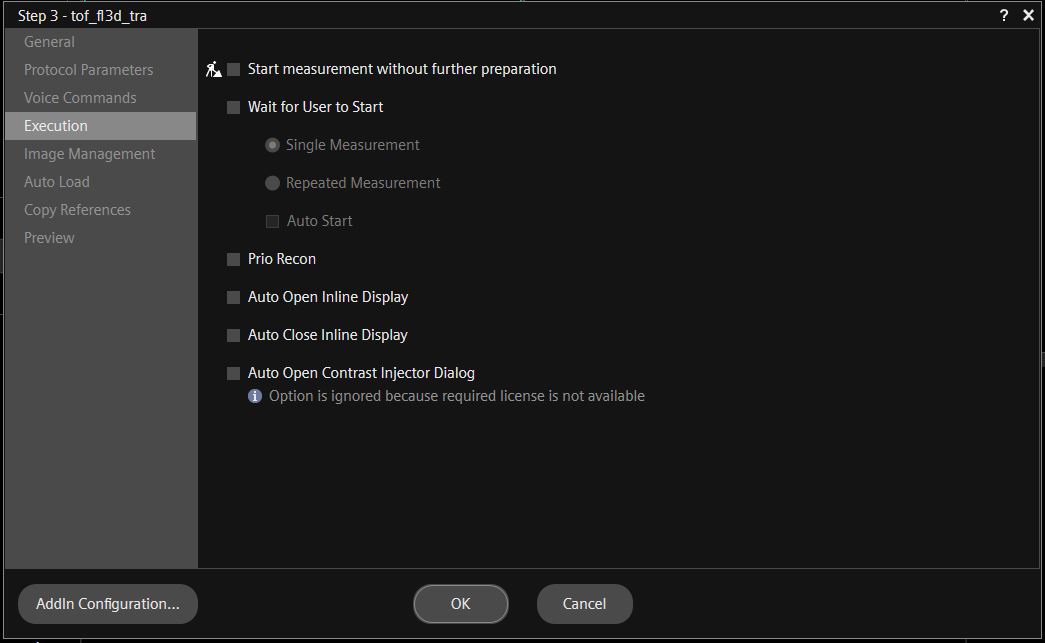
Right-click Sequence in the Scan Queue, then select Edit Properties (Alt+Enter) and Execution.
CUDA version
Make sure that you install the correct CUDA version in the container and that it does not get overwritten by a pip install. OpenRecon only supports CUDA 11.x.
Always double-check in the container with:
# Check that the CUDA version is valid for MARS; it must be CUDA 11.x.
python -c "import torch; print(torch.version.cuda)"
Versioning of containers
OpenRecon requires container versions. For example, on the scanner, version 1.2.3 only shows the major version in the selection box, but hovering over the name shows the full version:
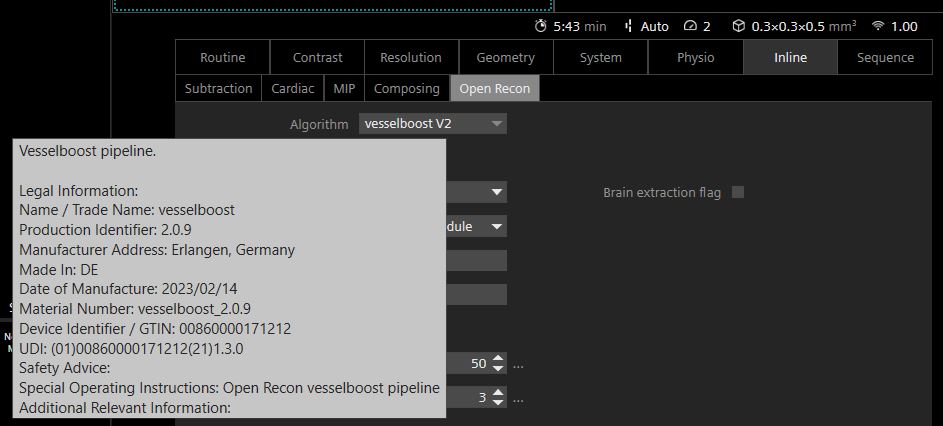
OpenRecon will not install an update to a container with the same version.
High-performance computing license side effects
For OpenRecon to work, the N_High_End_Computing license must be active on the scanner.
Activating this license takes memory away from the main ICE recon system, so normal recons might run out of memory sooner. If you need this memory back, you can temporarily disable this license and OpenRecon.
Turn the license off by commenting it out. Add # in front of the relevant lines in C:\Program Files\Siemens\Numaris\bin\Common\Licensing\license.dat.
Restart the whole system. Restarting the workspace is not enough.
Cleaning up package on the scanner
After installing a few different versions the container library can get full.
Download the tool “wip_OpenRecon_PackageRemover_Tool.exe” from the Siemens magnetom.net forum. Make sure to follow the installation instructions. Then run wip_OpenRecon_PackageRemover_Tool.exe -p to cleanup old versions.
For the deletion to work (and for the tool to see your OpenRecon package), the package needs to be labeled as Research - it will not touch OpenRecon tools labels as Product.
so check, that you have this in your OpenReconLabel.json file:
"content_qualification_type": "RESEARCH"5 - Singularity/Apptainer
Our docker containers are converted to singularity/apptainer containers and stored on Object storage.
Download Singularity Containers
First get an overview of which containers are available as Singularity containers: https://github.com/neurodesk/neurocommand/blob/main/cvmfs/log.txt
curl -s https://raw.githubusercontent.com/neurodesk/neurocommand/main/cvmfs/log.txtassign the container name to a variable:
export container=itksnap_3.8.0_20201208Then download the containers. One way is to use CURL:
curl -X GET https://neurocontainers.s3.us-east-2.amazonaws.com/$container.simg -OSingularity Containers and GPUs
Some of our containers contain GPU-accelerated applications. Here is an example that tests the GPU accelerated program eddy in FSL:
curl -X GET https://neurocontainers.s3.us-east-2.amazonaws.com/fsl_6.0.5.1_20221016.simg -O
git clone https://github.com/neurolabusc/gpu_test.git
singularity shell --nv fsl_6.0.5.1_20221016.simg
cd gpu_test/etest/
bash runme_gpu.sh
Transparent Singularity
The singularity containers can be also be used in combination with our Transparent Singularity Tool, which wraps the executables inside a container to make them easily available for pipelines. More information can be found here:
one example to do this is:
curl -s https://raw.githubusercontent.com/neurodesk/neurocommand/main/cvmfs/log.txt
export container=itksnap_3.8.0_20201208
git clone https://github.com/neurodesk/transparent-singularity ${container}
cd ${container}
./run_transparent_singularity.sh ${container}
6 - Windows 11 and Windows Subsystem for Linux
1. Install WSL
Follow the instructions to enable Windows Subsystem for Linux 2 in Windows 11: https://docs.microsoft.com/en-us/windows/wsl/install
2. Configure CVMFS, Singularity and LMOD (only needs to be done once)
Install build tools
sudo apt update
sudo apt install make gcc
Install singularity
export SINGULARITY_VERSION=3.9.3 VERSION=1.17.2 OS=linux ARCH=amd64
wget -q https://dl.google.com/go/go$VERSION.$OS-$ARCH.tar.gz
sudo tar -C /usr/local -xzvf go$VERSION.$OS-$ARCH.tar.gz
rm go$VERSION.$OS-$ARCH.tar.gz
export GOPATH=${HOME}/go
export PATH=/usr/local/go/bin:${PATH}:${GOPATH}/bin
mkdir -p $GOPATH/src/github.com/sylabs
cd $GOPATH/src/github.com/sylabs
wget -q https://github.com/sylabs/singularity/releases/download/v${SINGULARITY_VERSION}/singularity-ce-${SINGULARITY_VERSION}.tar.gz
tar -xzvf singularity-ce-${SINGULARITY_VERSION}.tar.gz
cd singularity-ce-${SINGULARITY_VERSION}
./mconfig --prefix=/usr/local/singularity
make -C builddir
sudo make -C builddir install
cd ..
sudo rm -rf singularity-ce-${SINGULARITY_VERSION}
sudo rm -rf /usr/local/go $GOPATH
Setup Bindpaths for Singularity (e.g. in .bashrc)
export PATH="/usr/local/singularity/bin:${PATH}"
export SINGULARITY_BINDPATH='/cvmfs,/mnt,/home'
CVMFS
Follow the instructions here: https://neurodesk.org/docs/getting-started/neurocontainers/cvmfs/
LMOD
sudo apt install lmod3. Use Neurodesk containers
When restarting WSL the cvmfs service has to be started manually:
sudo cvmfs_config wsl2_startInitialize the neurodesk modules:
module use /cvmfs/neurodesk.ardc.edu.au/neurodesk-modules/*Example usage of fsleyes:
ml fsl
fsleyes
List the available programs:
ml av